A game of territory and polygons


by Drew Edwards
|
|
One, two, three — bright as gold can be!
Four, five, six — shovels, mattocks, picks!
We're the merry miner-boys,
Make the goblins hold their noise.
~ George MacDonald, The Princess and the Goblin
Four, five, six — shovels, mattocks, picks!
We're the merry miner-boys,
Make the goblins hold their noise.
~ George MacDonald, The Princess and the Goblin
There is a simple and mysterious pleasure in creating a labyrinth, akin to the forking paths of a well-played game. Much of the joy we get from abstract games comes from these surprising turns: though players may have complete information as to the game’s current state, its course through time is always a gratifying surprise.
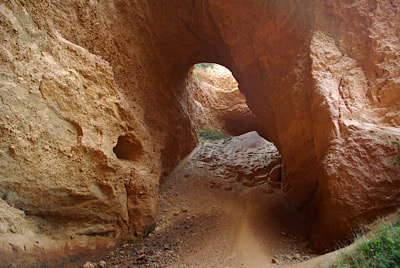
In Mattock, the game’s labyrinth is not only metaphorical. Named after the pickaxe-like mining tool, Mattock is played on a board of hexagonal spaces using both neutral tiles and players’ stones. Think of the stones as miners, and the tiles as the corridors they dig through the rock.
The central mechanic is that no tile may ever touch more than three other tiles: if you clear too much open space, the mine will collapse. This mechanic generates the forking paths within which the miners will move. Occupy choke points with your own miners to exclude your opponent from sections of the board. When your opponent has no space left to mine, you win.
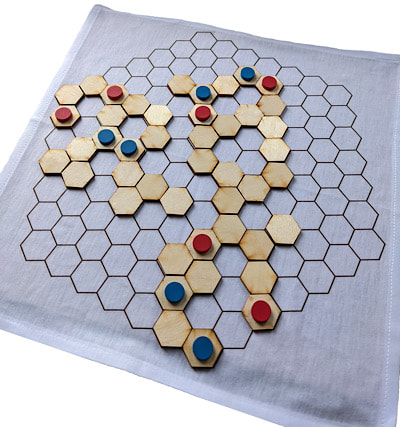
Mattock physical set
Rules
Materials: 1 board, 90 hexagonal tiles, 12 miners in 2 colours (6 each).
For a short game, use the inner board: 45 tiles, and 6 miners (3 each).
Materials: 1 board, 90 hexagonal tiles, 12 miners in 2 colours (6 each).
For a short game, use the inner board: 45 tiles, and 6 miners (3 each).
Mattock board sizes and fixed setup options
Fixed Setup: Place one tile and one miner on each of the indicated spaces.
Freestyle Setup: Take turns placing one tile and one miner of your colour on a single board space. You may place anywhere, except next to already placed tiles/miners. The player who places last takes the first turn.
On your turn, take these three steps in order:
1. Mine
Place 1 tile on an open space next to, or connected by other tiles to, at least one of your miners. Opponent’s miners block connections.
To prevent the mine from collapsing, the tile must not touch:
If you have any miners which were removed on previous turns, place one of them on this tile.
If you cannot Mine, you lose the game.
2. Move
You may choose to move any one of your miners to a tile connected to it. You do not have to move.
You may move through your own miners, but opponent’s miners block your path.
3. Remove
Remove all opponent miners that are now both:
Your opponent takes the removed miner(s) and will place one back on the board on their turn.
See the two figures below for an example of mining, moving, and removing.
Freestyle Setup: Take turns placing one tile and one miner of your colour on a single board space. You may place anywhere, except next to already placed tiles/miners. The player who places last takes the first turn.
On your turn, take these three steps in order:
1. Mine
Place 1 tile on an open space next to, or connected by other tiles to, at least one of your miners. Opponent’s miners block connections.
To prevent the mine from collapsing, the tile must not touch:
- More than three other tiles;
- A tile which already touches three other tiles.
If you have any miners which were removed on previous turns, place one of them on this tile.
If you cannot Mine, you lose the game.
2. Move
You may choose to move any one of your miners to a tile connected to it. You do not have to move.
You may move through your own miners, but opponent’s miners block your path.
3. Remove
Remove all opponent miners that are now both:
- Not connected to another opponent miner;
- Connected to two or more of your miners.
Your opponent takes the removed miner(s) and will place one back on the board on their turn.
See the two figures below for an example of mining, moving, and removing.
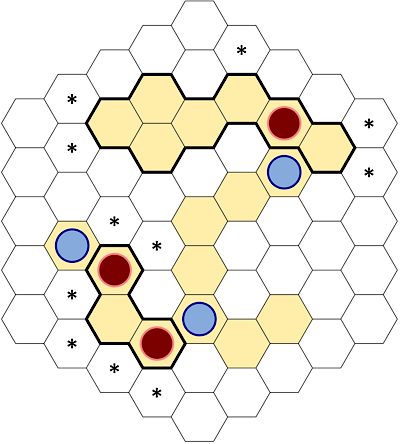
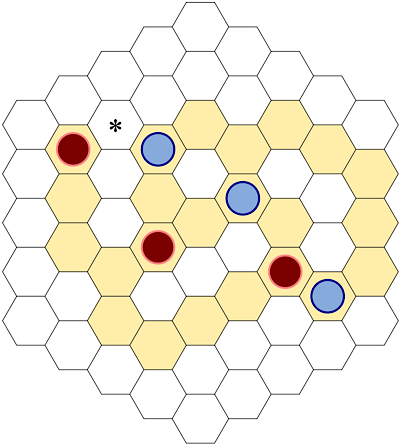
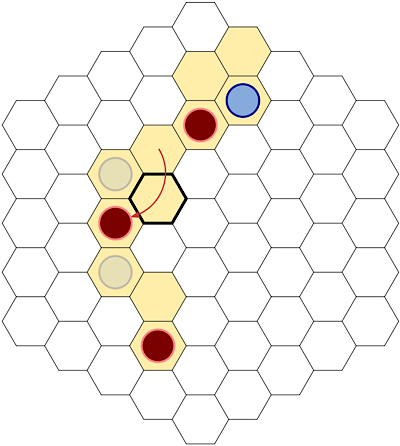
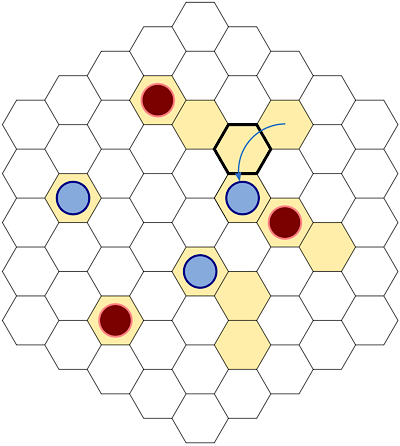
Red's connections are highlighted in bold. Red's legal tile placements are indicated with a *.
|
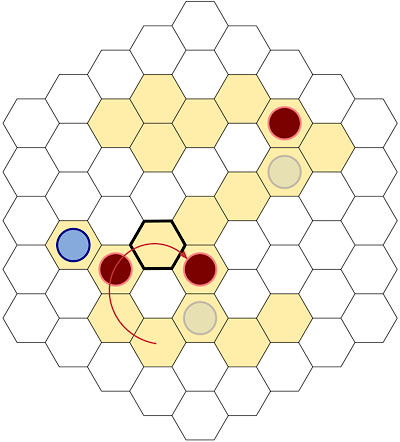
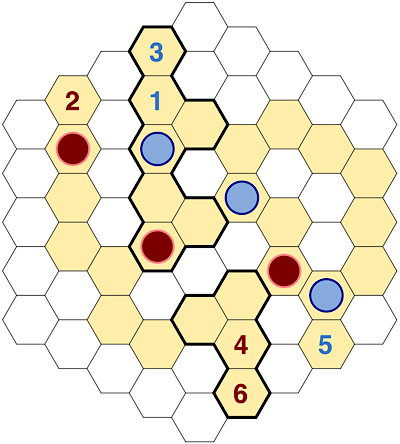
Red places the highlighted tile. moves 1 miner, and removes 2 blue miners. The final blue miner remains, as it connects to only 1 red miner.
|
The Emergent Territorial Goal
Although it is not explicitly stated, a territorial goal emerges from the rules: to win, you must exclude your opponent from a large area of open spaces. Similar to Amazons, you want to end the game with plenty of empty space all to yourself. In practice, the empty spaces will usually be around the edges of the board, so the main strategic goal is to create a defensible frontier that prevents your opponent's miners from connecting to open edge spaces.
Unlike in many other territory and connection games, the tiles you mine are fundamentally neutral territory—they are only "yours" if you can block your opponent from connecting to them. So, everything you do must work towards blocking your opponent’s access to areas of the board.
There are two ways to block your opponent:
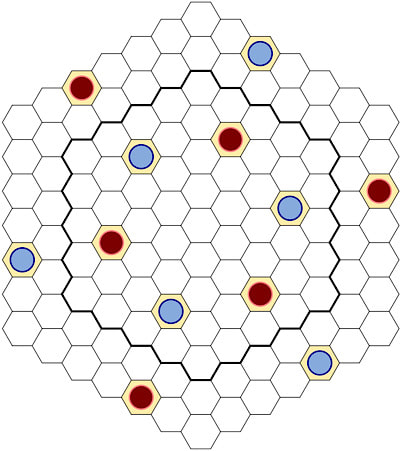
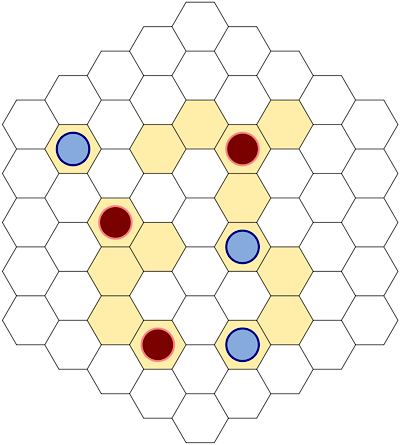
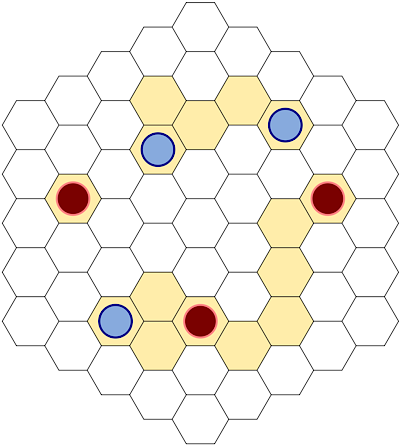
Below is an endgame position in which the players have each blocked off large portions of empty space that their opponent cannot reach: Red has a large area in the east, and Blue has two smaller areas in the north and the southwest. Both players occupy critical choke points with their miners. Elsewhere, the structures on the board prevent connection due to the central mechanic: no tile may touch more than three other tiles.
Although it is not explicitly stated, a territorial goal emerges from the rules: to win, you must exclude your opponent from a large area of open spaces. Similar to Amazons, you want to end the game with plenty of empty space all to yourself. In practice, the empty spaces will usually be around the edges of the board, so the main strategic goal is to create a defensible frontier that prevents your opponent's miners from connecting to open edge spaces.
Unlike in many other territory and connection games, the tiles you mine are fundamentally neutral territory—they are only "yours" if you can block your opponent from connecting to them. So, everything you do must work towards blocking your opponent’s access to areas of the board.
There are two ways to block your opponent:
- Occupy a chokepoint with your miner
- Create a structure to which your opponent cannot connect
Below is an endgame position in which the players have each blocked off large portions of empty space that their opponent cannot reach: Red has a large area in the east, and Blue has two smaller areas in the north and the southwest. Both players occupy critical choke points with their miners. Elsewhere, the structures on the board prevent connection due to the central mechanic: no tile may touch more than three other tiles.
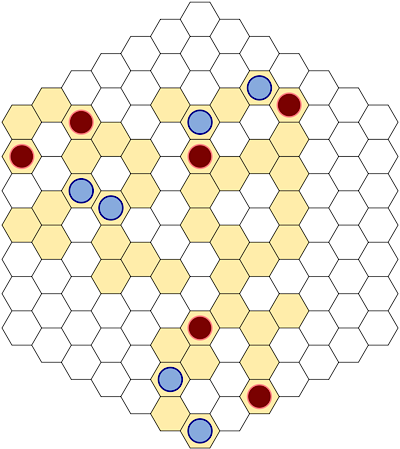
Example endgame position
Here is the final position, which resulted in a narrow win for Blue with no spaces left on the board. This game is notable because there are two separate labyrinths that cannot connect.
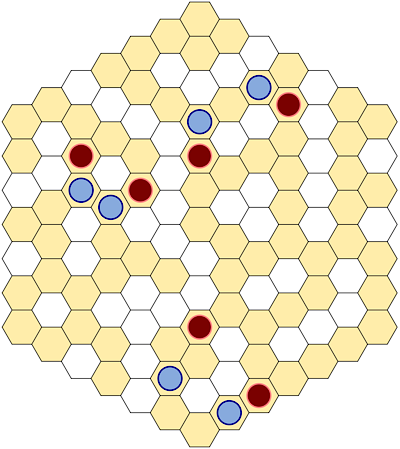
The final position
Basic structures
It may seem that mining would require players to tediously count adjacent tiles to ensure a legal move. But in practice, the mechanics allow only a few basic structures: once you can recognize them, there is no need to count. Thus, in addition to being a territory and connection game, Mattock is also a game about building polyominoes: shapes that link together to form the labyrinth. Recognizing and visualizing these shapes is key to playing effectively.
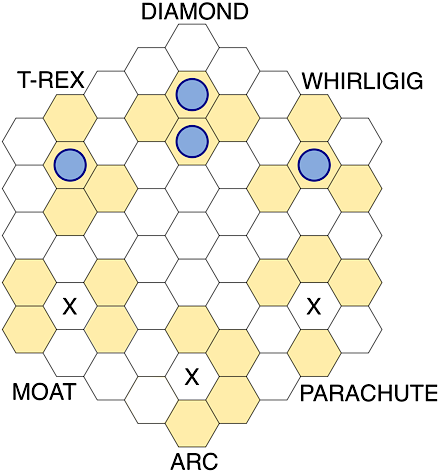
When an area of the board is fully mined so that no more tiles can be placed there, the tiles in that area will form the three shapes at the top of the board: the t-rex, diamond, and whirligig. These four-tile structures are the only ways that a tile can touch three other tiles. Blue miners mark the tiles that already touch three other tiles—all open spaces next to these tiles are blocked.
It may seem that mining would require players to tediously count adjacent tiles to ensure a legal move. But in practice, the mechanics allow only a few basic structures: once you can recognize them, there is no need to count. Thus, in addition to being a territory and connection game, Mattock is also a game about building polyominoes: shapes that link together to form the labyrinth. Recognizing and visualizing these shapes is key to playing effectively.
When an area of the board is fully mined so that no more tiles can be placed there, the tiles in that area will form the three shapes at the top of the board: the t-rex, diamond, and whirligig. These four-tile structures are the only ways that a tile can touch three other tiles. Blue miners mark the tiles that already touch three other tiles—all open spaces next to these tiles are blocked.
Basic structures
A single tile can be a part of multiple structures, linking them together. You can see all of these basic shapes in the board positions above.
The moat, arc, and parachute shown at the bottom of the board are preliminary shapes composed of four tiles. Although they are not yet part of a completed structure, they can also block spaces, as shown with an X.
This first set of tactics will show some ways to use these structures in play. I will use a small hex5 board, which yields a fast game of about 16-22 moves before the winner is apparent. The examples are all based on actual games that were played on a larger hex7 board.
T-rex
The T-rex is generally the most common shape on the board, since any group of three contiguous tiles can become a t-rex. T-rexes are useful for walling off portions of the board without using a miner, and otherwise blocking your opponent on the “flat” side of the t-rex while allowing you to expand on the other side. You can chain several t-rexes together to create a long, straight wall.
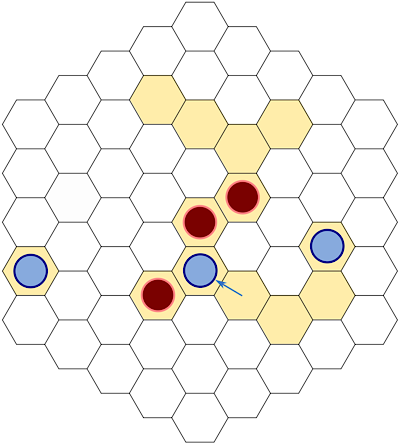
Below, it is Blue’s turn. Red threatens to mine and move to the indicated space, which would allow Red access to the spaces in the north of the board. Blue cannot occupy that space with one of his own miners, because all three are already needed to occupy critical choke points—moving any of them would allow Red to invade and remove Blue’s miners.
The moat, arc, and parachute shown at the bottom of the board are preliminary shapes composed of four tiles. Although they are not yet part of a completed structure, they can also block spaces, as shown with an X.
This first set of tactics will show some ways to use these structures in play. I will use a small hex5 board, which yields a fast game of about 16-22 moves before the winner is apparent. The examples are all based on actual games that were played on a larger hex7 board.
T-rex
The T-rex is generally the most common shape on the board, since any group of three contiguous tiles can become a t-rex. T-rexes are useful for walling off portions of the board without using a miner, and otherwise blocking your opponent on the “flat” side of the t-rex while allowing you to expand on the other side. You can chain several t-rexes together to create a long, straight wall.
Below, it is Blue’s turn. Red threatens to mine and move to the indicated space, which would allow Red access to the spaces in the north of the board. Blue cannot occupy that space with one of his own miners, because all three are already needed to occupy critical choke points—moving any of them would allow Red to invade and remove Blue’s miners.
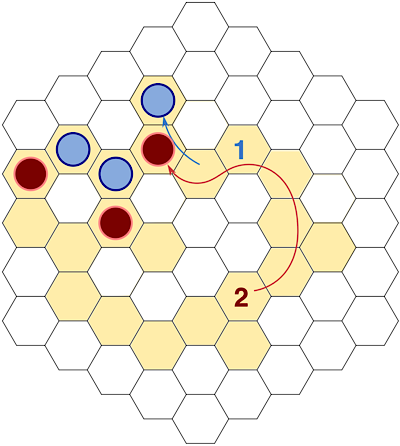
Blue to move. Red threatens to move to *.
|
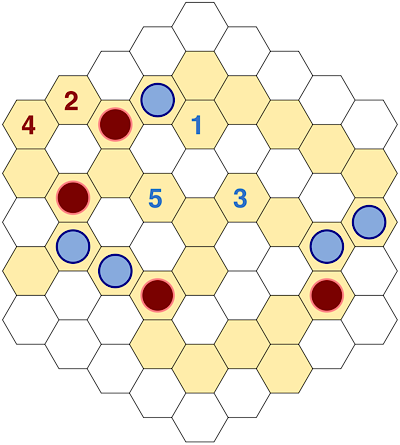
Blue defends.
|
The second image shows Blue’s defence. The numbers show the sequence of mining that follows. Blue builds a t-rex with his first move. Red attempts to connect farther to the north, but Blue finishes the t-rex wall (highlighted in bold) on the third move to prevent Red’s connection. (Note that Red cannot connect from the left, but Blue can still expand towards the right.) Red then apprehends an invasion threat from Blue in the southeast, and begins to build a defensive t-rex of her own on moves 4-6 (also highlighted in bold). The result is a win for Red, with 6 spaces left to mine, versus Blue’s 4 spaces. Even though Blue was able to protect his territory, Red’s advance still forced Blue to use open spaces needed to win the game.
Whirligig
Occupying the center of a whirligig can be an efficient placement for your miner, allowing you to control connections in three directions. However, whirligigs also serve less obvious tactical uses.
Below, it is Red’s turn. Blue threatens to remove Red’s miner by placing at any one of the three indicated spaces. Red will then be unable to replace her removed miner in the same space, effectively ceding control of the south to Blue.
In the second diagram, Red blocks all three of these threatening spaces by building a whirligig. This is a specific instance of a general tactic: complete structures in a way that benefits you and frustrates your opponent.
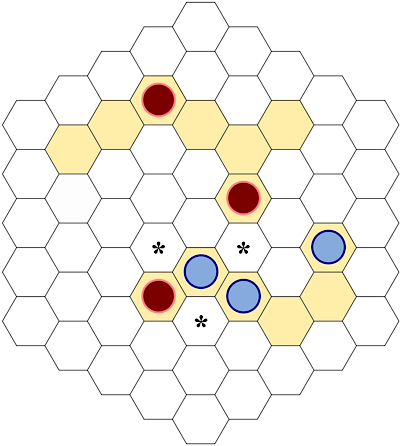
Red to move. Blue threatens the Red Miner by mining at any of the * spaces.
|
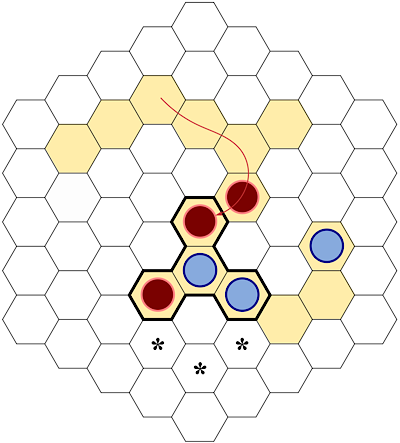
Red creates a whirligig and blocks all threats.
|
Even though Blue occupies the centre of the whirligig (normally a favourable position), Blue will not be able to connect and remove Red’s miner for three more turns—just enough time for Red to rescue the miner with a connection from the northwest.
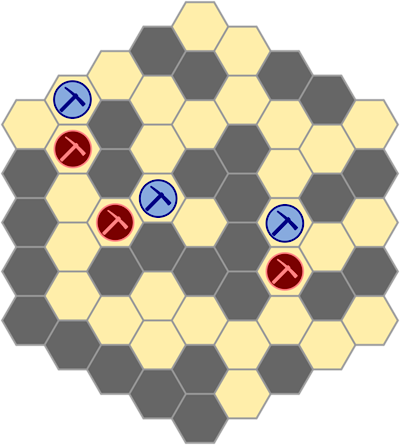
This same configuration can also be used offensively. In this modified position, Blue creates a whirligig to prevent Red from connecting to an isolated miner—Red now cannot prevent removal.
This same configuration can also be used offensively. In this modified position, Blue creates a whirligig to prevent Red from connecting to an isolated miner—Red now cannot prevent removal.
Blue creates a whirligig to isolate the Red Miner.
Diamond
The diamond is a powerful shape, blocking three spaces on each side and allowing a variety of surprising tactics.
The diamond is a powerful shape, blocking three spaces on each side and allowing a variety of surprising tactics.
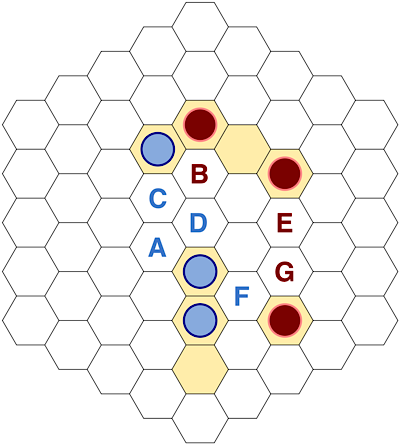
- Simple block: The position below is taken from a game on a larger hex7 board; thus the increased number of miners. It is Blue’s turn, threatening to connect across the centre of the board. Red thinks she is safe from the threat—if Blue plays at A or B, Red can respond at C to create a t-rex, blocking D. But Blue instead creates a diamond to the north, blocking C—Red cannot now prevent Blue’s connection through the centre. To prevent Blue from removing both of her miners in the west, Red must either retreat or use previously protected spaces to connect her miners.
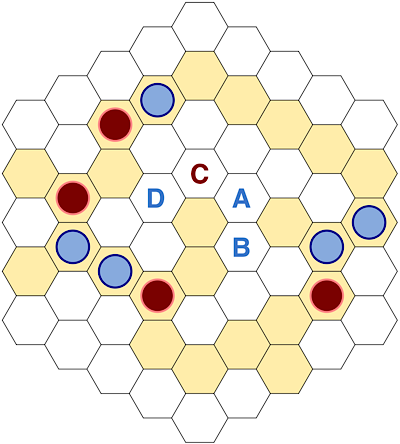
Red defence to one Blue attempt to connect across the centre
|
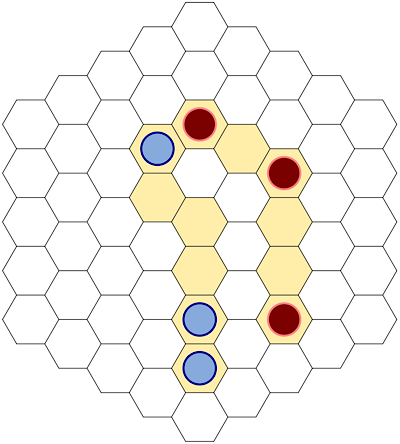
Blue diamond initiates successful connection across the centre.
|
- Trap: A diamond can trap your opponent’s miners if both sides are blocked by your own miners, or the edge of the board. Below, Blue’s northern miner is trapped in a diamond—Red’s miner blocks one side, and the edge of the board blocks the other. This Blue miner has no more spaces available to mine.
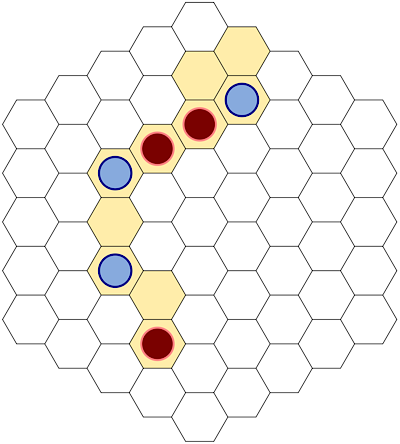
The Blue miner in the north is in a diamond trap.
- Bypass: You can use a diamond to bypass an enemy miner placed in a bend. On the next turn, below, Red uses this tactic to remove two Blue miners. Because Blue’s remaining miner has no space to mine, Blue has now lost the game.
Red uses a diamond to bypass an enemy miner.
Removal and protection from removal
Removal is not a goal in itself, and does not always advance your interests—it serves to consolidate territory. In the example directly above, Red could have removed Blue’s northern miner on a prior turn, but chose not to, instead leaving it trapped in the diamond. If Red had removed this miner earlier, it would have reinforced and strengthened Blue’s other weak group. Whenever your opponent has two isolated miners, think carefully about which you will remove—your opponent will likely use the removed miner to reinforce the other isolated miner.
Although removal may sometimes enable you to reinforce a weak area, it is typically to be avoided. The simplest way to avoid removal is to connect your miners and create blocking structures to prevent your opponent from interposing her own miner between yours—this is the basic tactical challenge of the game. Note also that two adjacent like-coloured miners are immune from removal. Such a pair can move around the board while retaining this immunity by leapfrogging each other, one space at a time. This is an effective tactic for causing trouble behind enemy lines.
There are, however, some other ways to respond to an opponent’s removal threat besides connecting your miners together.
Make removal unsafe
Below, Blue could remove Red’s miners in several ways, but in every case Red could reply with her own removal or double removal.
Red's miners are safe.
One space away
It is not always necessary to connect your miners to protect against removal. Because removal happens at the end of your opponent’s turn, you may be able to replace your miner on the same tile, or even advance farther, if you have another group of miners one space away. It is often possible to gain a tempo and territory advantage by foregoing immediate connection.
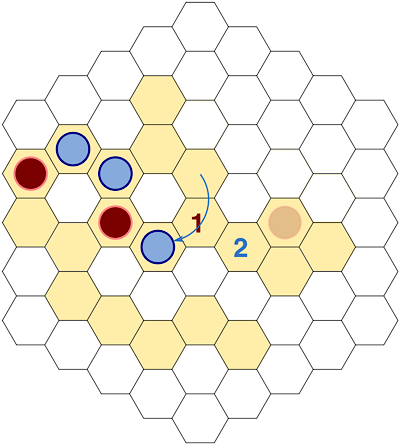
Below, rather than connecting her isolated miner to her main group, Red has advanced north forming a strong t-rex structure and staking a claim to the eastern part of the board. Red need not fear removal if Blue mines at A. Blue would need to move his miner to B to remove Red’s miner—since the removal happens at the end of Blue’s turn, Red can replace her miner at C and advance farther into Blue’s territory. The second figure shows this result. Blue could also mine at D, threatening to invade at E, but Red’s move at C also creates a t-rex that blocks E, thus serving a double purpose.
It is not always necessary to connect your miners to protect against removal. Because removal happens at the end of your opponent’s turn, you may be able to replace your miner on the same tile, or even advance farther, if you have another group of miners one space away. It is often possible to gain a tempo and territory advantage by foregoing immediate connection.
Below, rather than connecting her isolated miner to her main group, Red has advanced north forming a strong t-rex structure and staking a claim to the eastern part of the board. Red need not fear removal if Blue mines at A. Blue would need to move his miner to B to remove Red’s miner—since the removal happens at the end of Blue’s turn, Red can replace her miner at C and advance farther into Blue’s territory. The second figure shows this result. Blue could also mine at D, threatening to invade at E, but Red’s move at C also creates a t-rex that blocks E, thus serving a double purpose.

Red advances and leaves herself open to removal.
|
But Red can counter and gain territory.
|
Leaving one open space does not guarantee reconnection after removal, however. Consider the modified line below, in which Red allows Blue to create a diamond, preventing Red from replacing her miner.
Instead of advancing north, Red mines at 1, and is removed after Blue creates a diamond.
Sacrifice
Occasionally, it is possible to gain an advantage by placing your own miner in a removal position. Since your miner will remain on its space until the end of your opponent’s following turn, you can block your opponent from occupying a certain tile during that turn. Below, Blue sacrifices his own miner in order to occupy a strategically important tile that Red needed to occupy with her own miner on the following turn. This miner will be removed at the end of Red’s next turn, but Blue can replace it because Blue has another miner one space away. Red must now spend two turns to connect its miners in the northeast to avoid removal, blocking critical spaces along the board’s edge.
Occasionally, it is possible to gain an advantage by placing your own miner in a removal position. Since your miner will remain on its space until the end of your opponent’s following turn, you can block your opponent from occupying a certain tile during that turn. Below, Blue sacrifices his own miner in order to occupy a strategically important tile that Red needed to occupy with her own miner on the following turn. This miner will be removed at the end of Red’s next turn, but Blue can replace it because Blue has another miner one space away. Red must now spend two turns to connect its miners in the northeast to avoid removal, blocking critical spaces along the board’s edge.
The Blue sacrifice can be replaced next turn, splitting the Red miners.
Combining tactics: Using the arc, parachute, and moat for rescue
Below, players use the arc, parachute, and moat (described in the Basic structures, above) to rescue isolated miners in danger of removal. Assume it is Blue’s turn, and Blue wishes to save his isolated miner. Blue cannot connect directly on this turn, but Blue can mine one space away from his isolated miner—close enough to replace the miner if it is removed on Red’s next turn. Blue must, however, choose his space with care. If Blue mines at A, this allows Red to create a diamond at B, blocking C and preventing Blue from replacing his removed miner. Blue must therefore block B while simultaneously bringing his miners close enough for a rescue. Blue can mine at C to create an arc around B, or at D to create a parachute around B. In both cases, Red cannot create a structure which would prevent Blue from connecting C and D on its following turn.
Below, players use the arc, parachute, and moat (described in the Basic structures, above) to rescue isolated miners in danger of removal. Assume it is Blue’s turn, and Blue wishes to save his isolated miner. Blue cannot connect directly on this turn, but Blue can mine one space away from his isolated miner—close enough to replace the miner if it is removed on Red’s next turn. Blue must, however, choose his space with care. If Blue mines at A, this allows Red to create a diamond at B, blocking C and preventing Blue from replacing his removed miner. Blue must therefore block B while simultaneously bringing his miners close enough for a rescue. Blue can mine at C to create an arc around B, or at D to create a parachute around B. In both cases, Red cannot create a structure which would prevent Blue from connecting C and D on its following turn.
Blue to move. Blue and Red must both mine carefully to save their isolated miners.
|
Both isolated miners are saved following the sequence D, G, C, E.
|
Now assume it is Red’s turn, and Red wants to protect her own isolated miner from removal. If Red mines at E, that will bring her miners one space away from connection. However, Blue could create a t-rex at F, blocking G and preventing Red from replacing her removed miner. Instead, Red should mine at G, which builds a moat around F, blocking Blue from mining there. Blue then cannot prevent Red from rescuing her miner.
The figure above right shows a position four moves later after both players have played defensively to protect their miners from removal. Note that even though there is no completed t-rex, whirligig, or diamond on the board, the parallel lines of tiles still block four spaces, preventing internal connections between these lines. This is an example of a longer moat, extending beyond the initial four-tile structure.
Considerations for a larger board: Miner groups
When playing on the larger hex7 board, each player has 6 miners rather than three. This enables each player to have two or three separate and defensible territories. Players must therefore consider how to distribute their miners. In the hex7 example at the start of the article, red has one group of four in the east and another group of two in the northwest; blue has three separate groups of two. A favourite strategy of mine is to protect my main territory with a group of four, and send a group of two into my opponent’s territory to cause trouble and use up their open spaces.
Of course, the distribution will depend on the particular circumstances of the game you are playing. Try to avoid situations in which you have too many miners in a small area, and too few in a large area. If this happens, try to link your groups so that you can redistribute your miners more efficiently. You can sometimes gain a strategic advantage if you prevent your opponent from linking their groups, especially if their miners are distributed inefficiently.
A final puzzle
On Red’s next turn, prevent both the removal of Red’s isolated miner in the west, and Blue’s impending invasion in the northeast.◾️
Puzzle: Red to move; save the Red miner in the west and prevent the Blue invasion in the east.
The puzzle solution is here.
How to play Mattock
Mattock is a new game, so tactics and strategy are still evolving. Each game that I play surprises me. Here are some ways you can try it yourself:
Print-and-play boards are available on BoardGameGeek.com, or you can play with a hex board of any size and shape that you have around the house. For miners, you can use stones or other game tokens. For tiles, pennies work well on the hex5 board, or you can simply colour in the spaces with a pencil.
MindSports.nl hosts a version playable in your desktop or mobile browser. If you would like to challenge someone to a game, this is where to play.
AiAi by Stephen Tavener includes a version of Mattock with built-in AI (listed under the game's prior name, Las Médulas).
Tabletop Simulator has a version available in Steam Workshop.
AirBoardGame is another option for play.
Mattock online play
Note: Mattock was previously released as Las Médulas, and may be listed under the old name.