Strategic analysis
Roman aqueduct, Segovia. Photo art C.
|
by Phil Leduc
|
Introduction
In 52 BCE, at the conclusion of the Gallic Wars, Julius Caesar besieged the ancient city of Alesia. The Gauls had built a walled city-fort to keep the Romans out, and the Romans built walls around the city to keep the Gauls in!
Murus Gallicus is a breakthrough game of balance in material and tactics, area control, and timing. Pieces are sown and captured by mutual elimination. It is a game of straightforward strategies and subtle tactics that tests the inner General. Players attempt to force their opponent to yield the center of the board and press forward for a breakthrough win. Failing this as material dwindles, stalemate becomes a feasible path to a win.
Murus Gallicus was designed starting in 2005 and finally published in 2009. Its design was based on the principles of accessibility, simplicity, and balance. The game was to be easily constructed from game components available to all; it was designed on a coffee table using a checker/draughts board and an ample supply of checkers. It was not intended to be a commercial success; rather it was hoped (perhaps naively) that it would be played based on its own merits. Time will tell. The rules were to be kept to a minimum in order to entice new players and, of course, the rules were to veil tactical complexities for the serious gamers too. Lastly, the game was to keep players engaged from start to finish. The game was to be balanced and tense so that each player always felt they had a chance to win.
The original goal of the game was to tie up or wall off the opponent’s pieces and was initially named Houdini (after the great Hungarian-born American illusionist and escape artist, Harry "Handcuff" Houdini of the early 1900’s). Movement was as in Mancala, only in two dimensions instead of circular. Stacking limits were fuzzy. Play testing revealed the game was too slow and sluggish. Large stacks did not distribute well, but that was acceptable since this contributed to the stalemate goal. However, the game did need to be more dynamic. Capture by replacement was introduced causing the game to feel more like checkers or chess, with attrition the predominant path to victory. One problem with this was the distribution of multiple pieces and multiple captures; balance was in jeopardy. The stacking limit was dropped to just two. The goal of the game transitioned from stalemate to breakthrough or stalemate. However, it needed something more, something unique or rare to help the game stand out. With time, replacement capture morphed into mutual capture—to capture an opponent’s piece, an own piece must be sacrificed. This fit well with the goal of balancing the game. Both players always have the same number of pieces on the board—material balance. With this change, the game seemed to work well. The rules were complete but the game needed a better name. Murus Gallicus (Latin for Gallic Wall) came about serendipitously from a series of internet searches. This new name had the added benefit of suggesting a theme for the game. The theme would help players understand the game, playing the game would become more intuitive. Terms associated with forts and castles, such as wall, tower, chariot, battering ram, and siege tower, apply well to the basic formations of Murus Gallicus.
Setup
Murus Gallicus is played on a 7 x 8 rectangular board, seven rows (ranks) and eight columns (files). Each player starts with 16 stackable pieces and places stacks of two on each home row. The light player [Blue, here, and dark player, Green] leads, players alternate turns, no passing.
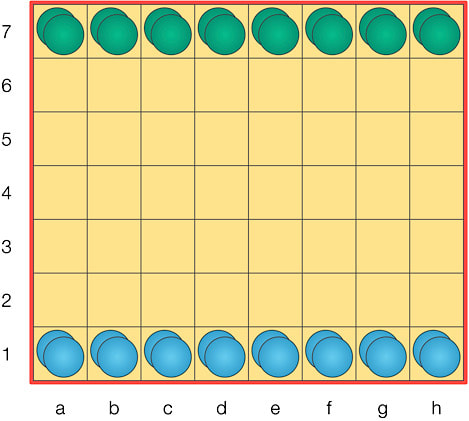
Initial setup.
Rules
On a player’s turn, the active player must perform one of the following two actions:
On a player’s turn, the active player must perform one of the following two actions:
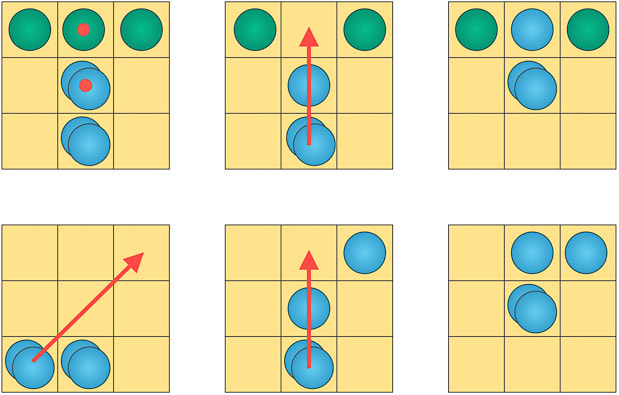
- Distribute a stack of two owned pieces onto the two nearest squares in any one orthogonal or diagonal direction. Each destination square must be empty or contain a single owned piece (singleton). This implies that distribution is blocked by the edge of the game board, the presence of an opponent piece, or any stack, including owned stacks! Note that the distribution onto owned singletons creates new stacks. Stack size is limited to two. Stacks never consist of opposing pieces.
- Sacrifice a piece from an owned stack to remove any one orthogonally or diagonally adjacent opponent singleton from the board. Sacrifice cannot be used to reduce opponent stacks to singletons. Sacrifice is not forced by the mere presence of an opponent’s singleton.
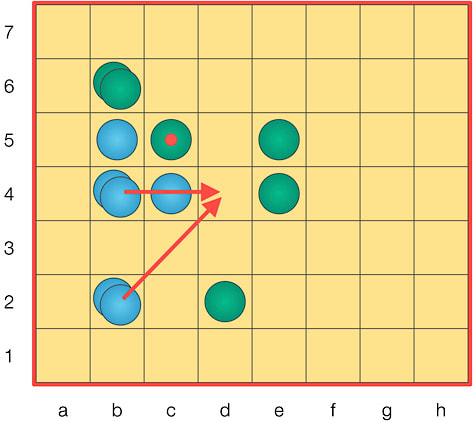
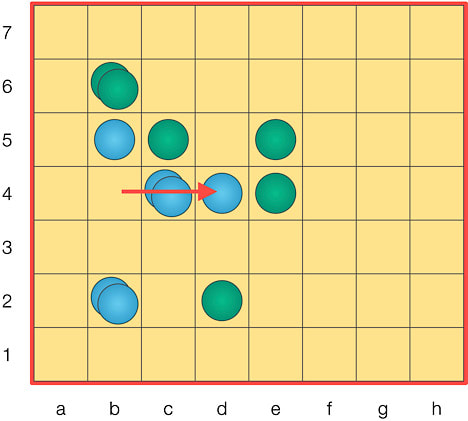
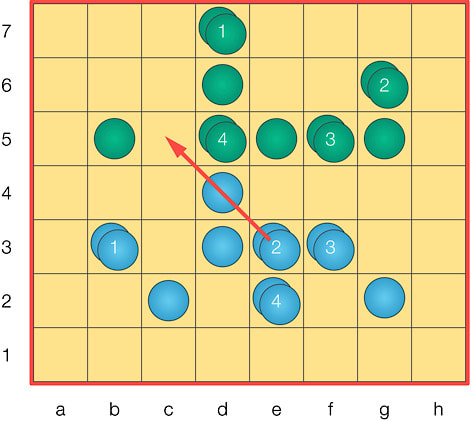
Blue's possible moves are indicated by arrows and a potential capture is indicated by a dot (c5). All other moves are blocked by the edge of the board, a Green unit, or a Blue stack.
|
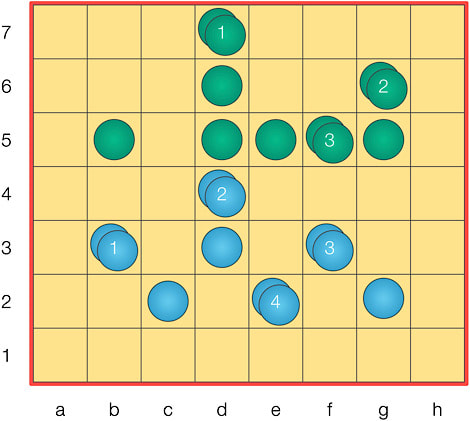
Movement result after the two Blue pieces in b4 are distributed to c4 and d4, annotated as b4-d4.
|
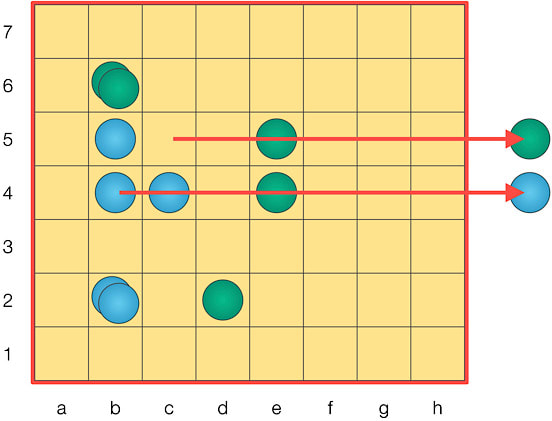
Sacrifice result after a Blue piece is removed from b4 and a Green piece is removed from c5, annotated as
b4xc5.
A player wins by
- breakthrough, distributing a piece in the opponent’s home row , or
- stalemate, leaving the opponent with no moves or sacrifices.
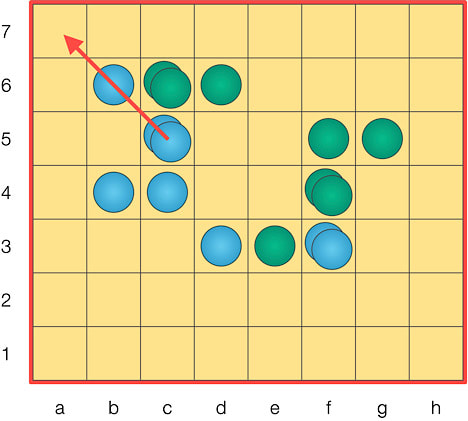
Blue wins by breakthrough to a7. If Green to move, the capture c6xb6 does not prevent c5-a7.
|
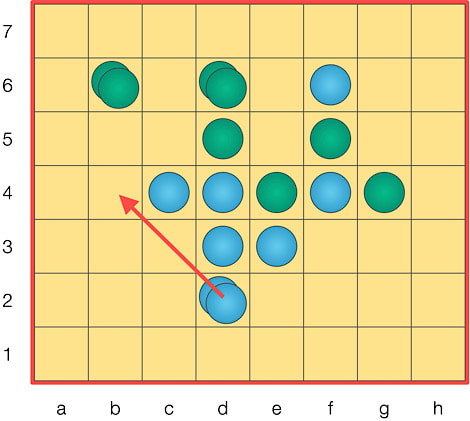
Blue stalemates Green with d2-b4. Green can no longer move to b4. Although Blue flattens her last stack, Green loses because he is unable to move or capture at the start of his turn.
|
Formations
The first observation that new players make is that controlling the movement of their pieces requires planning. Movement cannot be easily reversed. Each turn requires the distribution or sacrifice of a stack and yet having no stacks loses the game!
This is a bit of a dilemma. The solution is to maintain stack count by distributing a stack’s pieces onto previously placed singletons. The point being a player’s singletons and stacks must coordinate with each other, as is the case in any good dynamic abstract game. These units can combine into various formations that block the opponent’s movement acting like walls and towers, charging across the board like chariots, or hammering through defences like battering rams.
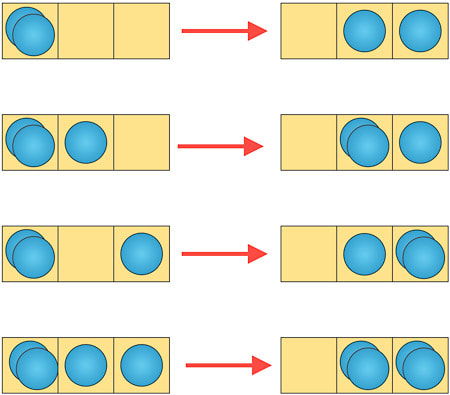
There are four basic transformations that can occur when a stack is distributed. The stack distributes onto:
1. Two empty squares—creating two new singletons
2. One owned singleton then one empty square—creating a new stack and a singleton
3. One empty square then one owned singleton—creating a singleton and a new stack, or
4. Two singletons—creating two new stacks.
The first observation that new players make is that controlling the movement of their pieces requires planning. Movement cannot be easily reversed. Each turn requires the distribution or sacrifice of a stack and yet having no stacks loses the game!
This is a bit of a dilemma. The solution is to maintain stack count by distributing a stack’s pieces onto previously placed singletons. The point being a player’s singletons and stacks must coordinate with each other, as is the case in any good dynamic abstract game. These units can combine into various formations that block the opponent’s movement acting like walls and towers, charging across the board like chariots, or hammering through defences like battering rams.
There are four basic transformations that can occur when a stack is distributed. The stack distributes onto:
1. Two empty squares—creating two new singletons
2. One owned singleton then one empty square—creating a new stack and a singleton
3. One empty square then one owned singleton—creating a singleton and a new stack, or
4. Two singletons—creating two new stacks.
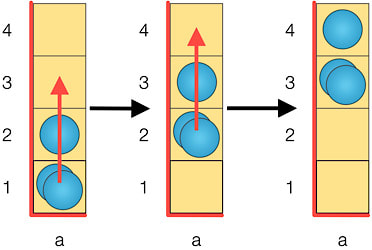
Stack distributions: Keep in mind stacks can distribute in any orthogonal or diagonal direction.
In the first case, a player’s stack count goes down by one. In the second and third cases, the stack count is stable. Lastly, in the fourth case, the stack count goes up by one! In Murus Gallicus material for both players remains the same, but stack counts do not! Stack count is a good indicator of who is ahead in a game, but it is only part of the story; stack mobility and coordination with other units should also be considered.
Chariot Formation
The chariot formation consists of a stack and a friendly singleton in line with an empty square. By distributing the stack in the direction of the singleton piece, the formation advances one square. A chariot formation is ideal for “moving” stacks and can be used to create threats. This is akin to gliders in John Conway’s Game of Life.
Unimpeded chariot movement.
Gallic Wall Formation
A singleton acts as an obstruction to opponent stack distributions and as a stepping stone. Its main function is defence; but it is also a passive part of the offense too, since singletons are needed as stepping stones to move stacks. An isolated singleton with no adjacent friendly units is weak. It cannot move, can be easily sidestepped, and is subject to capture if neighbouring an opponent stack. Fortunately, there is strength in numbers.
A Gallic Wall formation is an orthogonally connected group of like-coloured singletons and/or stacks that form a barrier which impedes the forward progress of the opponent. The opening of a game of Murus Gallicus is often marked by the creation of barriers in each player’s third row. The game board’s short dimension (seven rows) encourages players to build walls in close proximity of each other and creates tension right from the start of the game.
Strong Gallic Wall Formations.
|
Weakened Gallic Wall Formation.
|
In the Strong Gallic Wall Formation diagram, the Blue and Green stacks have very limited forward moves available. Note that diagonal connections do not work well. In the Weakened Gallic Wall Formation diagram, Blue can slip through the two diagonally adjacent Green pieces, b4 and c5, with the move d3-b5.
Battering Ram Formation
A versatile formation is the battering ram formation, which consists of two adjacent stacks. Battering rams can be used to breakthrough singleton blockers. By sacrificing a stack piece, the player can create a chariot formation with an option to move onward next turn. In general, any two adjacent stacks can be converted into a chariot formation using any convenient adjacent opponent singleton piece. Even without the help of an opponent singleton, the stacks of a battering ram formation can, in two moves, convert into a bi-directional chariot formation.
Top row: Battering Ram Breakthrough; Bottom row: Battering Ram to Bi-directional Chariot Transformation.
Two adjacent stacks can also be used to stall for time when an opponent is about to run out of moves. There is a cycle of six moves by which a battering ram with ample room can disassemble then reassemble to its original position. It is theoretically possible for both players to have battering ram formations, and this could cause infinite cycling, but this is very unlikely. Both players would have to play for the draw and not interfere with each other. On much larger boards, it becomes more likely this situation could occur.

Battering Ram Cycle.
Siege Tower
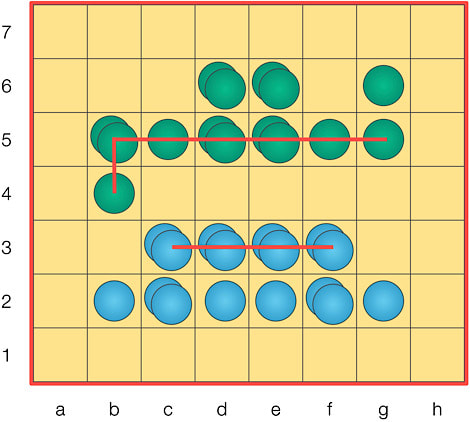
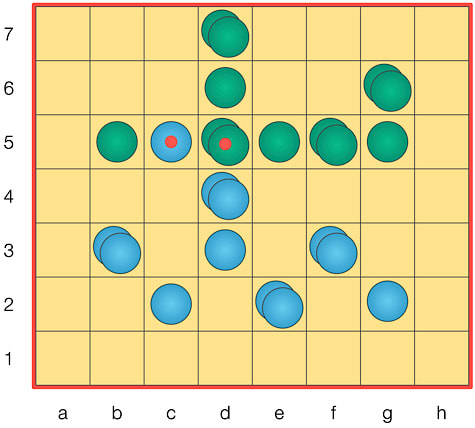
The primary goal of Murus Gallicus is to reach the opponent’s home row, your seventh row. Doing this immediately wins the game. The penultimate goal is constructing a stack on your fifth row. Doing so puts a heavy burden on the defence because this stack must be stopped. The defender will have to dedicate two or three units (singletons and/or stacks) to block the invading stack, effectively reducing the defender’s mobility. These burdened units are pinned—see the green stack on the third row and the blue stack on the fifth row, in the diagram below. Note that an intrusive siege stack cannot be directly eliminated from its perch and can sit there indefinitely—although the requirement to move or capture each turn may eventually force the siege stack to retreat. For these reasons and to underscore their importance, stacks on the fifth row are referred to as siege towers. Most of the action in Murus Gallicus revolves around obtaining a siege tower. Even the mere threat of achieving a siege tower is enough to force an opponent to sacrifice capture, which lowers his stack count.
The primary goal of Murus Gallicus is to reach the opponent’s home row, your seventh row. Doing this immediately wins the game. The penultimate goal is constructing a stack on your fifth row. Doing so puts a heavy burden on the defence because this stack must be stopped. The defender will have to dedicate two or three units (singletons and/or stacks) to block the invading stack, effectively reducing the defender’s mobility. These burdened units are pinned—see the green stack on the third row and the blue stack on the fifth row, in the diagram below. Note that an intrusive siege stack cannot be directly eliminated from its perch and can sit there indefinitely—although the requirement to move or capture each turn may eventually force the siege stack to retreat. For these reasons and to underscore their importance, stacks on the fifth row are referred to as siege towers. Most of the action in Murus Gallicus revolves around obtaining a siege tower. Even the mere threat of achieving a siege tower is enough to force an opponent to sacrifice capture, which lowers his stack count.
Siege Tower Rows.
Strategy and Tactics
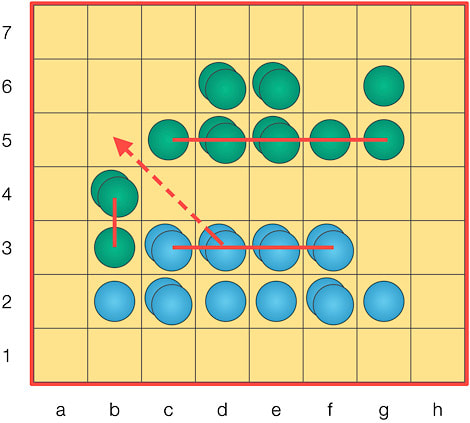
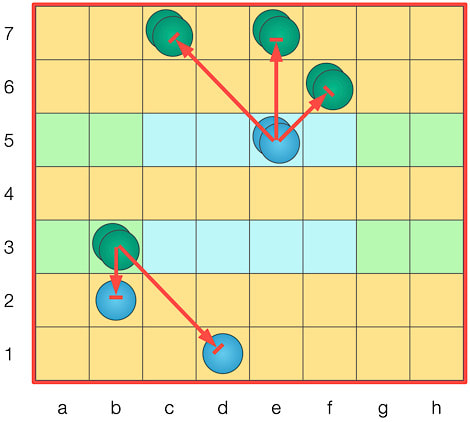
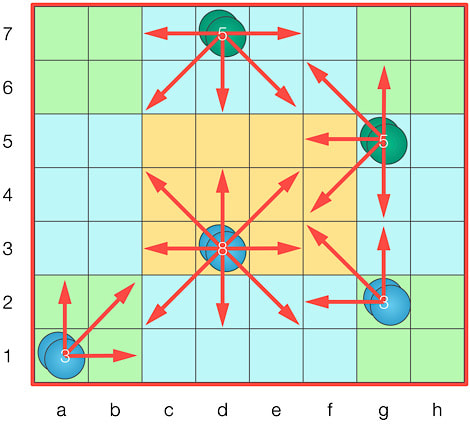
In general, because material balance is maintained through sacrificial captures, players must gain positional advantage to win; one that limits your opponent’s options and expands your own. There is a battle for space. These options are best measured by efficient singleton structure and stack mobility. This is the key to any strategy. Each singleton’s usefulness can be measured by how many opponent stacks it blocks, how immune to capture it is, and how many owned stacks can use it as a stepping stone. Any singleton that does not block and does not act as a stepping stone can be thought of as useless or isolated at least on a temporary basis. Stack mobility can be measured by how many directions it can use for distributing itself and how many opponent singletons it can capture. To these ends, it is best to build stacks in the centre of the board.
In general, because material balance is maintained through sacrificial captures, players must gain positional advantage to win; one that limits your opponent’s options and expands your own. There is a battle for space. These options are best measured by efficient singleton structure and stack mobility. This is the key to any strategy. Each singleton’s usefulness can be measured by how many opponent stacks it blocks, how immune to capture it is, and how many owned stacks can use it as a stepping stone. Any singleton that does not block and does not act as a stepping stone can be thought of as useless or isolated at least on a temporary basis. Stack mobility can be measured by how many directions it can use for distributing itself and how many opponent singletons it can capture. To these ends, it is best to build stacks in the centre of the board.
Mobility Potential.
|
Sacrifice Potential.
|
A straightforward strategy for playing Murus Gallicus has the following objectives: control the center of the board, breach the opponent’s barrier, establish a stack on the opponent’s third row (your fifth row), diminish the opponent’s stack count, and then when the time is right go for the breakthrough or stalemate win. This seems simple enough, but at the same time, stack mobility must be maintained.
Variations on this basic strategy include:
A common tactic to gain an advantage in stack count is to force your opponent to sacrifice a stack piece. This can be done by moving a chariot formation next to the targeted stack and creating a threat of passing through the opponent’s defences. (See Forced Sacrifice diagrams 1, 2, and 3.) If the opponent captures the chariot’s leading singleton piece, the opponent’s count declines, while the moving player’s count does not! It should be noted that there is no stack count advantage gained if two singletons are created when approaching the opponent’s stack; but this latter maneuver is useful in the end game, as it can block off the targeted stack in two directions and lead to stalemate.
Variations on this basic strategy include:
- Racing into the opponent’s territory early in the game--foregoing development, in order to disrupt and unsettle the opponent. Against a knowledgeable player, this strategy may not work too well because early in the game blocking is relatively easy to do.
- Building a dominant formation in the centre--such as four stacks in a square 2x2 formation on the second and third rows, in the hope of using the flexibility that the battering ram formation offers.
- Constructing a wall of stacks on the third row--in order to block the opponent’s forward movement. With these stacks assigned to a blocking role their movement is limited to opportune moments in the game. Waiting for these moments can be a challenge. A battering ram behind the leading wall can be used to stall.
- Aligning a wall of singletons on the third row with stacks on the second and first rows. This is a flexible defensive strategy, but gives up ground in the centre.
A common tactic to gain an advantage in stack count is to force your opponent to sacrifice a stack piece. This can be done by moving a chariot formation next to the targeted stack and creating a threat of passing through the opponent’s defences. (See Forced Sacrifice diagrams 1, 2, and 3.) If the opponent captures the chariot’s leading singleton piece, the opponent’s count declines, while the moving player’s count does not! It should be noted that there is no stack count advantage gained if two singletons are created when approaching the opponent’s stack; but this latter maneuver is useful in the end game, as it can block off the targeted stack in two directions and lead to stalemate.
Forced Sacrifice 1: Both players have four stacks. Blue to move e3-c5.
|
Forced Sacrifice 2: Blue threatens to create a siege tower at c5 with d4-b6.
|
Forced Sacrifice 3: d5xc5, Green has three stacks and Blue has four.
Players should try to maintain stack count equality or superiority, but not at the cost of actual (rather than potential) mobility. The sacrifice action was designed to remove blocking singleton pieces. Therefore, when attempting to block opponent stacks with singleton pieces, it is prudent to distribute pieces two squares away from the targeted stack, as this denies immediate removal by the targeted stack.
Singleton Placement: Both Blue singletons block three stacks. On the left, the singleton is threatened by capture.
On the right, the singleton is not.
One last tactical consideration applies to the end game. Much of a game of Murus Gallicus has to do with the struggle to get a siege tower on your opponent’s third row. If successful, the tower will very likely lead to a breakthrough win, but blocking and capturing makes doing so a challenge. If neither player succeeds in creating a siege tower, captures slowly reduce the material on the board, the end game becomes inevitable, and stalemate more likely. A player down to his last stack can no longer sacrifice capture or flatten out into two singletons! Be prepared.
Scalability
As stated earlier, the peculiar dimensions of the Murus Gallicus game board, 7 x 8, was selected to create immediate tension in the centre, and coincidentally the early wall formations materialize on the opponent’s siege row! Murus Gallicus, as designed, is felt to be optimal.
That said, the game mechanics work well on 7 x 7, 8 x 8 and probably 9 x 9 game boards. A shorter game of Murus Gallicus can be played on a checker board with just six stacks to a side. Anyone with a set of checkers can try the game. It is believed that Murus Gallicus can be played on a 9 x 9 board with nine stacks per player or even larger, but this has not been play tested. Standard Murus Gallicus plays in about 10 to 20 minutes. Expect larger boards to require more time. One last thing about larger boards--with more space drawn games are more likely, as players can more easily create battering ram cycles. A four-player version can be played on an 8 x 8 board with six stacks to a side. Murus Gallicus has even been played on 5 x 5 hex-hex boards, which can be used for two or three players using nine or five stacks per player respectively. Most of these configurations have been implemented in Stephen Tavener’s game anthology program, AiAi, which is available free. Kudos goes to Stephen for his efforts.
Variants
There are two variants with slight rule changes that readers may find of interest, Houdini and Advanced Murus Gallicus.
Houdini (escape version) was the predecessor of Murus Gallicus. The only rule change is that it is played without captures. With this omission, Houdini takes longer to play and encourages a divide-and-conquer strategy. Houdini may not be everyone’s cup of tea but some may find it quite challenging.
Second, a more viable variant is Advanced Murus Gallicus, which introduces a new unit and a little more depth to the game at the cost of less elegant rules. The stacking limit is increased to three like-colored pieces. Units of this height (referred to as a 3-stack) act like catapults. Instead of distributing its pieces, one of its pieces is “thrown” two or three spaces, in any forward or lateral direction, (left, diagonally left, straight ahead, diagonally right, or right) over any intervening units and must land on an empty square or an opponent’s unit (singleton, 2-stack, or 3-stack), but not owned units. When an opponent’s unit is hit, the projectile is removed from the game as is one of the targeted unit’s pieces. The remaining 2-stack can distribute as normal on a later turn. In addition, 3-stacks can be reduced by one or two pieces by adjacent opponent 2-stacks. The attacking stack loses the same material as the targeted catapult.

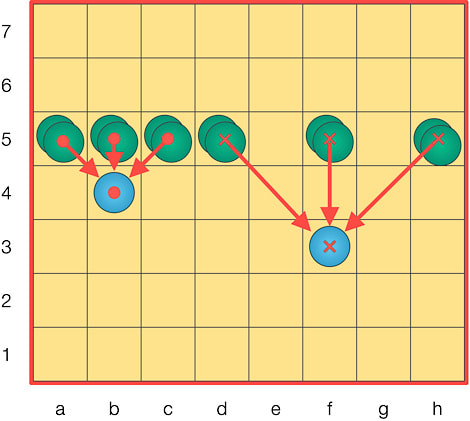
Catapult Range: Only the dotted squares can be targeted by the 3-stack. The squares with X's and all blank squares cannot be targeted.
|
Catapult Targets: The units identified by red dots can be “hit” by the opponent's 3-stack.
|
Annotated Game
Murus Gallicus is a game of surprises. Knowledge of its rules and formations only suggests what playing the game might be like. The material balance provides tension for the duration of the game. Winning space in the centre of the board is no easy task, and gains can be squandered if careless. Threats abound and escapes are almost miraculous (shades of Houdini) until time runs out as pieces dwindle. Below is an annotated game that will hopefully give the reader a better sense of the game play. Enjoy!
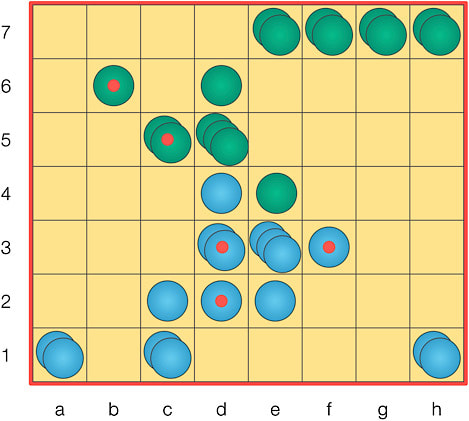
1. a1-c3 d7-d5, 2. h1-f3 b7-d5 (Diagram 1). Blue's first two moves, a1-c3 and h1-f3, develop her flank stacks towards the centre of the board. With d7-d5 and b7-d5, Green establishes a stack in the centre with an eye to d3 and b3. Blue's loss of d3 would limit the development of three Blue stacks (b1, d1, and f1); whereas losing b3, which is off-centre, would only hamper two stacks (b1 and d1). Blue will have to respond to the d3 threat.
Murus Gallicus is a game of surprises. Knowledge of its rules and formations only suggests what playing the game might be like. The material balance provides tension for the duration of the game. Winning space in the centre of the board is no easy task, and gains can be squandered if careless. Threats abound and escapes are almost miraculous (shades of Houdini) until time runs out as pieces dwindle. Below is an annotated game that will hopefully give the reader a better sense of the game play. Enjoy!
1. a1-c3 d7-d5, 2. h1-f3 b7-d5 (Diagram 1). Blue's first two moves, a1-c3 and h1-f3, develop her flank stacks towards the centre of the board. With d7-d5 and b7-d5, Green establishes a stack in the centre with an eye to d3 and b3. Blue's loss of d3 would limit the development of three Blue stacks (b1, d1, and f1); whereas losing b3, which is off-centre, would only hamper two stacks (b1 and d1). Blue will have to respond to the d3 threat.
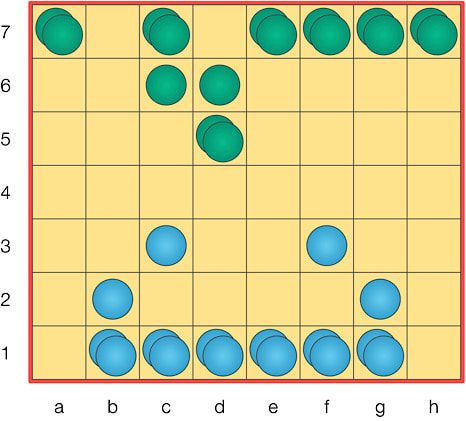
Diagram 1: Position after 2....b7-d5.
|
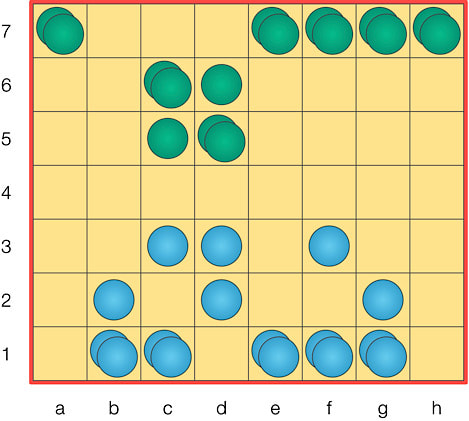
Diagram 2: Position after 3....c7-c5.
|
3. d1-d3 (Blue blocks by occupying d3 and believes b3 is less of a problem.) 3....c7-c5 (Diagram2. Green uses a chariot move to approach the centre and prepares for a7-c5 or c6-c4, or … ?) 4. e1-e3 (Blue continues centre development.) 4....d5-b3 (Diagram 3. Green gets aggressive and occupies b3, establishing a base for a siege tower—with perhaps c6-c4 and c4-a2 to finish the job later!)
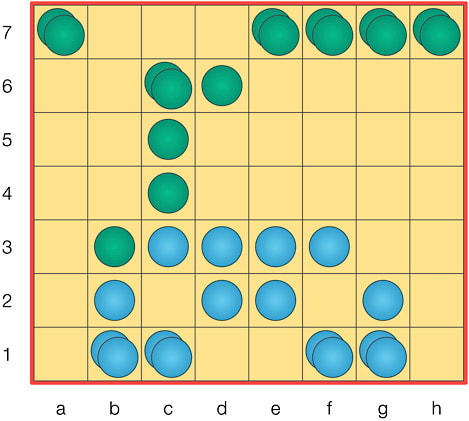
Diagram 3: Position after 4....d5-b3.
|
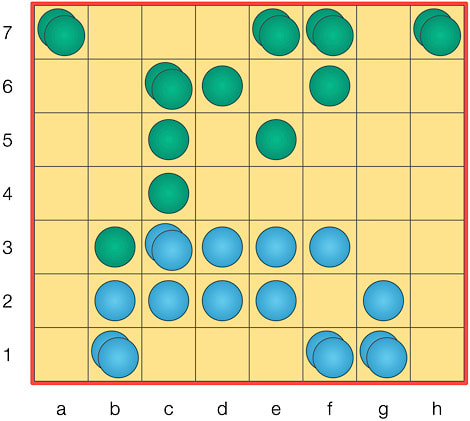
Diagram 4: Position after 5....g7-e5.
|
Blue had two options to defend: c1-a3 and c1-c3. 5. c1-a3 would create a battering ram formation that could be used to remove b3 and then the resulting chariot could move forward later—but this is off-centre. Instead, c1-c3 counter-attacks and targets e5. Turn-around is fair play. Blue can use c3xb3 later, but this will leave a singleton facing a battering ram!? 5. c1-c3 (Blue's chosen move brings up a defender to capture the Green singleton on b3. 5....g7-e5 (Diagram 4. Green prevents c3-e5, which would jam up Green's development, by occupying e5 first. Also, the two singletons on b2 and c2 will stop a siege tower on b3. Timing is not quite right for Green to head for the siege tower. 6. f1-d3 (Blue develops another stack in the centre.) 6....f7-d5 (Diagram 5. Green defends against d3-d5).
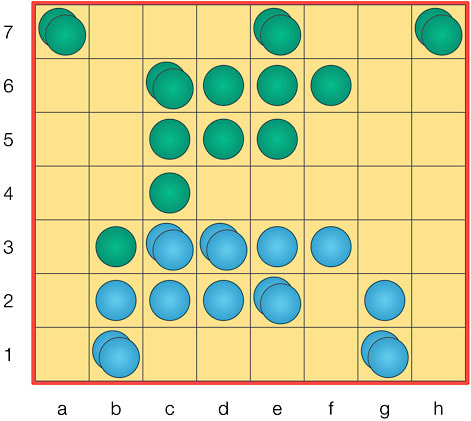
Diagram 5: Position after 6....f7-d5.
|
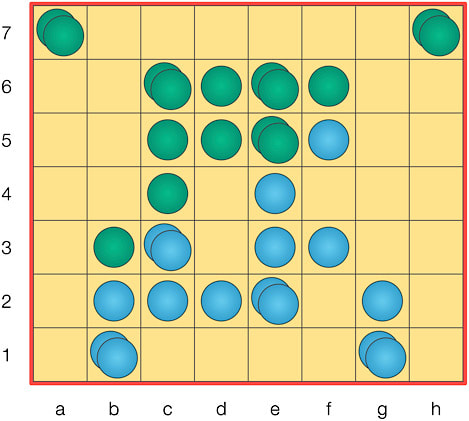
Diagram 6: Position after 7....e7-e5.
|
7. d3-f5 (Blue dashes to the siege row with thoughts of e2-g4 and f3-f5. A siege tower on f5 would require three blockers for Green to prevent a breakthrough win for Blue!) 7....e7-e5 (Diagram 6. Green brings up defenders and creates a battering ram formation.) 8. e2-e4 (Blue builds a centred battering ram formation and threatens e4-g6 to gain a siege tower on f5.) 8....e5xf5 (Diagram 7. Green is forced to capture f5.) Note that Blue has five stacks to Green's four and Blue's stacks are looming over the centre. Green must get some counter play, and he has the problem of two stacks in the corners.
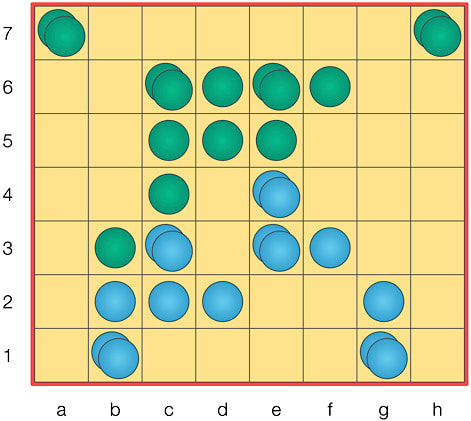
Diagram 7: Position after 8....e5xf5.
|
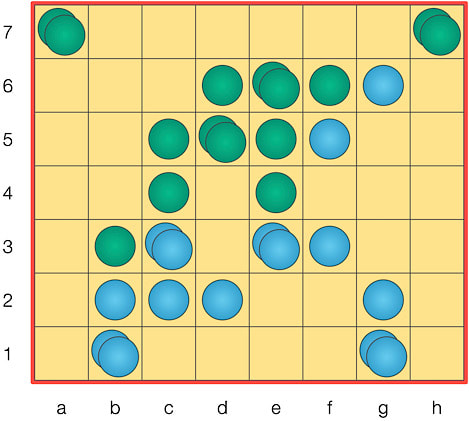
Diagram 8: Position after 9....c6-d4!!
|
9. e4-g6!? (Again, Blue positions a base for a siege tower at f5. Green's only defender is the stack on e6, and the stack at h7 is hemmed in. It can only sacrifice or flatten out. Unfortunately, this move leaves e4 open.) 9....c6-e4!! (Diagram 8. Green plays to the centre and threatens a battering ram on b3 and c4 and another on e4 and e5!) 10. e3-g3?? (Blue hopes to counter with a siege tower on f5. She cannot defend against both battering rams.) 10....e6-e4 (Diagram 9. Green forges straight ahead and calls Blue on her plan.
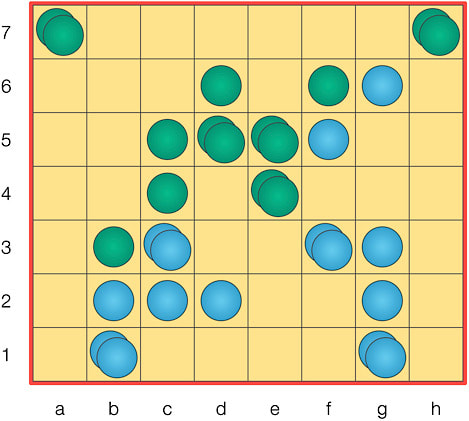
Diagram 9: Position after 10....e6-e4.
|
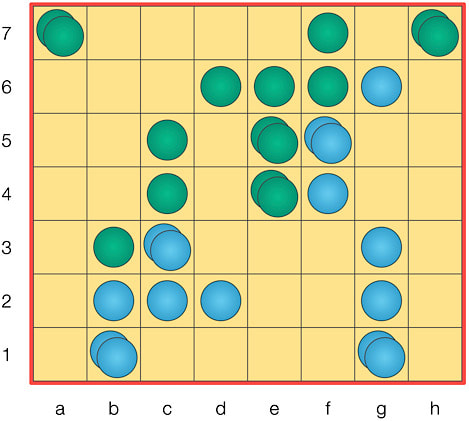
Diagram 10: Position after 11....de-f7.
|
11. f3-f5 (Blue gets her siege tower, but it will prove to be ineffectual. f3-d3 would have offered a slightly better defence for what is to come.) 11....d5-f7 (Diagram 10. Green must block Blue's siege tower’s breakthrough. This move also frees up Green's battering ram. Green can occupy e3 with e4-e2 and follow up with e5-e3 for a siege tower on e3.) 12. g1-e3 (Blue attempts to forestall the battering ram.) 12....e4xe3 (Diagram 11. The battering ram captures and transforms into a chariot formation. Pressure on e3 is maintained.)
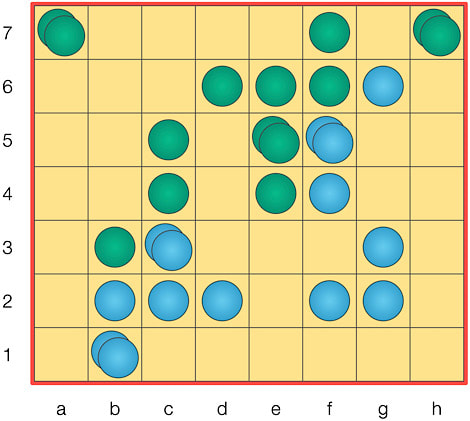
Diagram 11: Position after 12....e4xe3.
|
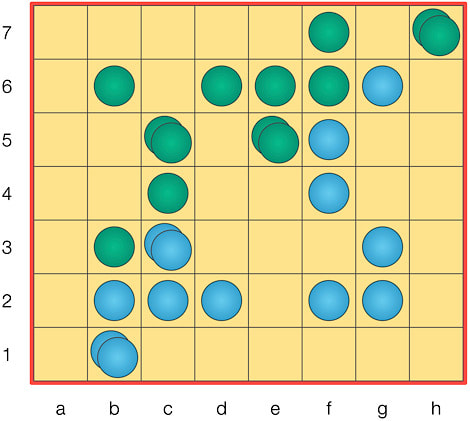
Diagram 12: Position after 13....a7-c5.
|
13. f5xe4 (Blue's siege tower is abandoned and is used to remove the chariot’s leading singleton.) 13....a7-c5 (Diagram 12. From the distant corner, Green continues pressure on e3!) 14. c3-e3 (Blue blocks e3 again but unfortunately opens c3 and in doing so reduces her stack count to one. Her next move will be forced as she is down to only one stack!) 14....e5-c3 (Diagram 13. Green takes advantage of the opening and sets up for yet another battering ram.)
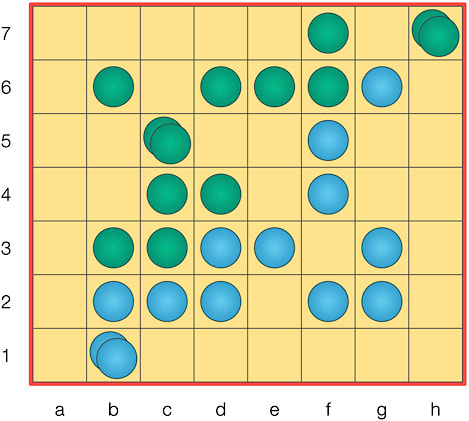
Diagram 13: Position after 14....e5-c3.
|
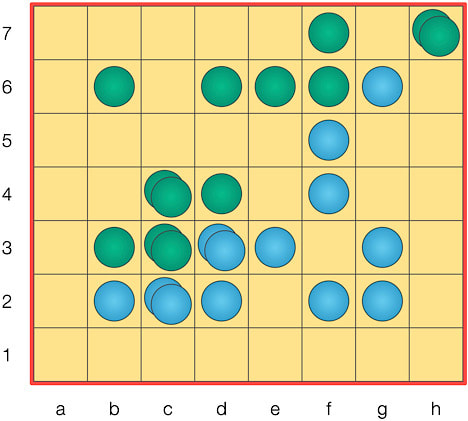
Diagram 14: Position after 15....c5-c3.
|
15. b1-d3 (Blue's only option. She creates a battering ram formation of little use.) 15....c5-c3 (Diagram 14. Green does the same; he creates a siege tower at the same time and pins Blue's stack on c2. Green wins in three moves.) 16. d3-f5 (Blue weakly responds by creating a siege tower on f5. It’s blocked and impotent. d3-f3 and d3-d1 are no better and offer no help on the left flank.) 16....c4-a2 (Diagram 15. Green exerts even more pressure by creating a second siege tower.)
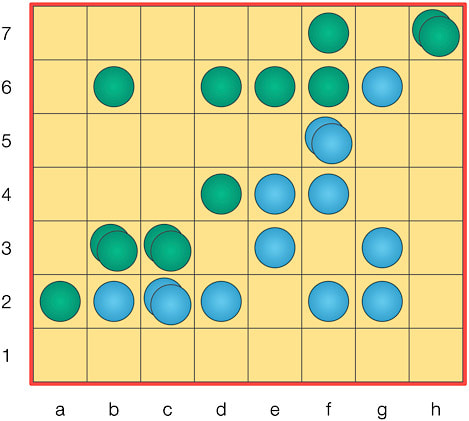
Diagram 15: Position after 16....c4-a2.
|
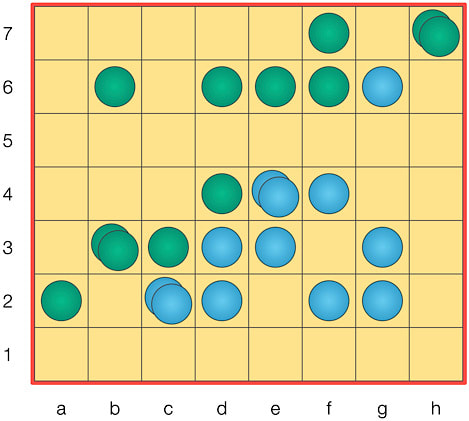
Diagram 16: Final position, after 17.... c3xb2, 18. Resign.
|
17. f5-d3 (Any move of the stack on f5 leads to the same result.) 17....c3xb2 (Black opens a path to b1.) 18. Resign. (Diagram 16. Blue resigns; there is no way to stop b3-b1.)
There is a free downloadable Murus Gallicus Flash/Shockwave game file (Murus58.swf), whose AI function uses piece location, stack mobility counts, and the existence of siege stacks to select its moves! The game file is available for download here and here.
Murus Gallicus is also available for play on PC’s using Stephen Tavener’s Java-based game anthology program named AiAi, which can be downloaded for free from his website.
Murus Gallicus can also be played online at the igGameCenter website. Murus Gallicus is one of a handful of games there that can be played against an AI opponent!
Lastly, if you want to play on an actual game board, Murus Gallicus can be purchased at the NestorGames website.
Murus Gallicus can of course be played with equipment borrowed from other games. As I mentioned in my review of Fenix, the Fenix set by HUCH! is perfect. Murus Gallicus is unusual because of its symmetrical "capture" mechanism and the fact that only stacks can move. Just a few very simple but non-standard mechanisms come together to make a game of elegance and depth that is somehow reminiscent of Epaminondas—and not only because of the traversal goal common to both games. The power structures in Epaminondas are immediately apparent in the lengths of the phalanxes of pieces; the power structures in Murus Gallicus are immediately apparent in the distribution of stacks. Murus Gallicus is the Roman newcomer to Robert Abbott's "Greek" Epaminondas. ~ Ed.