Annotated game

by Francesco Salerno |

|
Despite its being a relatively young game at only 20 years old, Hive can count already on a wide base of regular players and an official World Championship held every year online on the platform Boardspace.net. Here I want to show and comment on one of my favourite games played during the World Cup 2019. This game has a strong symbolic meaning as it was the last of the final match between Jewdoka (Joe Schultz) and Quodlibet (Christian Galeas). The match ended 3.5-1.5 in favour of Quodlibet, crowning him Hive World Champion for the third time!
The match score before this game was 2.5-1-5 for Quodlibet, and since the match was played over a total of six games, the game I am commenting on here could have been decisive. Jewdoka must win if he wants to still have a chance to clinch the match. He plays this game as White, so potentially with a tiny advantage. Quodlibet had demonstrated how to handle Black very well over the course of the match, although Jewdoka had won the previous game as White. Needless to say, this last game was particularly tense and fun and demonstrated that we still have a lot to learn about Hive. Let us start now!
2019 Online World Championship Final Match
Game 5 Jewdoka – Quodlibet
(Jewdoka-Quodlibet 2019-10-03-0001)
You can rewatch and analyse the game yourself using the Entomologist tool or directly on BoardSpace.net (Jewdoka-Quodlibet 2019-10-03-0001). I have added as many diagrams as possible to make comments clear, but the notation system is a powerful tool to discuss the game clearly and concisely, and I assume it is known to the reader. The notation system is explained in Randy Ingersoll’s book Play Hive like a Champion, or can be found in my Hive article in AG17.
1. wL
2. bG1 /wL
3. wQ wL-
4. bL /bG1
5. wA1 wQ/
6. bQ -b
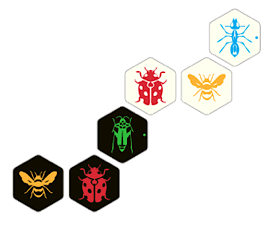
Figure 1: Position after 6. bQ -b.
“Wait a second! Didn’t you say in a previous issue of this magazine (AG17) that it is crucial to develop your fast pieces (Ants/Mosquitoes) as soon as possible to have high mobility (especially for Black)? What is Quodlibet doing here?” Keep calm, he knows what is doing. At first glance, sure, the black Queen is in an unusual position as she self-pins two friendly pieces at once. One pinned bug is inevitable but what about the second? Other factors come into play: (1) the Ladybug is an effective defensive piece, and can be combined with a Mosquito played in -bG1; (2) in general, this more stretched shape gives black more spawn points (available hexes for a player to place new pieces from the reserve) than does a compact hub (see Figure 2). The hub is considered a safer approach than the elbow shape (see Figure 3), but the latter retains more flexibility, as will be clear later. All in all, Black’s strategy is slower but has its merits and is recently gaining followers.
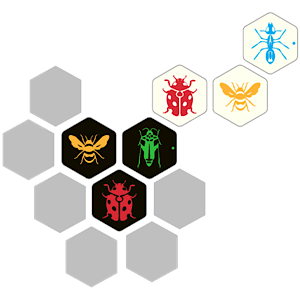
Figure 2: The hub shape.
|
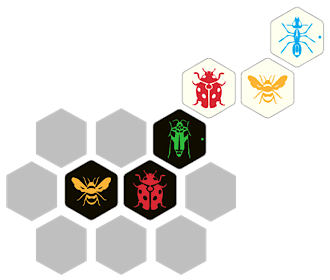
Figure 3: The elbow shape.
|
7. wA2 wA1-
8. bM bQ/
9. wS1 wL/
10. bP -bM
8. bM bQ/
9. wS1 wL/
10. bP -bM
Figure 4: Position after 10. bP -bM.
|
Figure 5: Defensive shell with Mosquito safe in a pocket.
|
White has increased his mobility as expected (two Ants in play) and with his last move he threatened to pin the black Mosquito. As Black has to defend against it (pinning a strong piece such as the Mosquito using a weak one such as a Spider is disadvantageous for the Mosquito side), White places the Spider with tempo. On the other hand, Quodlibet answers by creating a typical defensive shell with the Pillbug placement. This achieves two goals at the same time: (1) neutralizing the Spider threat as the Mosquito is now safe in a pocket (see Figure 5) and will be able to escape later moving as a Ladybug/Grasshopper; (2) optimally placing the Pillbug (in combination with the Mosquito), to defend the Queen—and the Pillbug would likely have been played next to the Queen anyway sooner or later. Now, White has firepower, with two Ants in play ready to pin any bug Black can place. On the other hand, Quodlibet has a flexible shell in place. This means he has several options to react effectively to White’s attack. What next?
11. wS1 bP/
12. bA1 bL-
Black felt this was the right time to sacrifice an Ant to keep at least one of the opponent’s Ants busy. It will be clear soon that this placement has also a second purpose. An alternative "waiting" move was 12. bS1 bL-, threatening to attack the white Queen, but sooner or later Black will need to place some Ants anyway.
13. wA2 bA1\
Jewdoka delays the attack on the Queen in order to keep more control over Quodlibet’s Ants. What should Black do now, sacrifice a second Ant, maybe, so that he can finally place a third free and happy Ant?
14. bL wL/
Figure 6: Position after 13. wA2 bA1\.
|

Figure 7: Position after 14. bL wL/.
|
Not this time! Now we see all the advantages of having such a flexible structure: Black has potentially two pockets (see Figures 8 and 9, below) and chooses to empty one of those to make room for another bug (potentially a safe place for a Beetle). At the same time, the Ladybug gets close to the white Queen and represents an anchor for Black, a friendly bug in enemy territory used to place new pieces in aggressive positions.
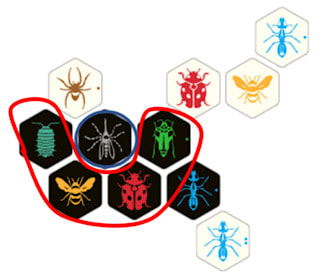
Figure 8: Pocket for the black Mosquito.
|
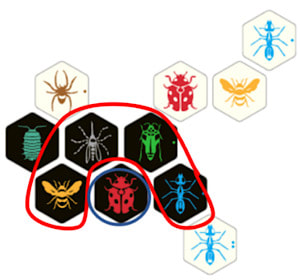
Figure 9: Pocket for the black Ladybug.
|
15. wA1 bQ\
This move not only starts an attack on the enemy Queen (an anchor for White as well), but most importantly prevents Black from making use of his pocket.
16. bA2 bL/
Black places the second Ant finally! I found this move to match quite well with a general principle: react to an attack on your Queen by increasing your mobility. White does not want to move his Ant#1 again now to pin black Ant#2 as he would lose a tempo and the initiative, and therefore Jewdoka plays a safe move—time for the Pillbug to appear.
17. wP wQ-
18. bA3 -bA
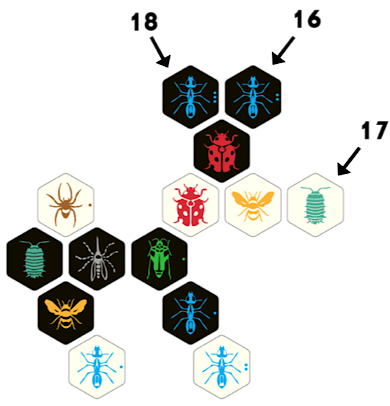
Figure 10: Position after 18. bA3 -bA.
With move 16, Black was threatening to choke the Queen with bA2 wQ-. Choking is used to indicate the complete control over an opponent’s bug. In this case, Black would have prevented white from placing the Pillbug next to his Queen. Therefore, White was virtually forced to place the Pillbug before it was too late. Black takes advantage of a previous White defensive move to increase his firepower. In general, when your opponent is able to launch a Beetle attack (White can potentially place Beetles close to the black Queen now, with 19. wB1 /wA1 or 19. wB1 \wS1 for instance), it is a good idea always to have two Ants/Mosquitoes free in order to pin the opponent’s attackers (the two defenders rule). Black seems pretty safe now, and White has to find a plan to attack.
19. wA3 wS1/
Now it is White who needs to sacrifice an Ant to obtain some play, even though it was also possible (and maybe more logical) to pin the newly placed Ant with the Spider (19. wS1 -bA3) to reduce Black mobility by a little. Probably Jewdoka did not want to leave to Black new spawn points close to the black Pillbug-Mosquito pair.
20. bA3 \wA3
21. wB1 /wA1
It is important to realise that in Hive PLM (all three expansions included), the Pillbug is a game changer. When the Pillbug is placed next to the Queen, it can save the game almost every time by warping the Queen out into a safer spot using its ability, just before the kill shot. In most cases, part of your attack plan must involve neutralizing the Pillbug first, before immobilizing the enemy Queen under your Beetles/Mosquitoes. Therefore, you must find the right timing to place your Beetles in play. Here, it seems this single beetle attack can be easily stopped by a black Ant (22. bA2 /wB1), so why not wait for a more opportune moment? Jewdoka’s plan was likely to continue by putting a Mosquito into play, and then try to convert it to a Beetle, taking advantage of the Beetle#1 just placed in the area of the black Queen. However…
22. bB1 -bQ
Black uses another method to defend, sparing his Ant for other jobs: he places a Beetle ready to recover the white Beetle once the white Beetle covers the black Queen. The Queen will still be immobile under two Beetles, but the Pillbug-Mosquito setup offers great defensive chances.
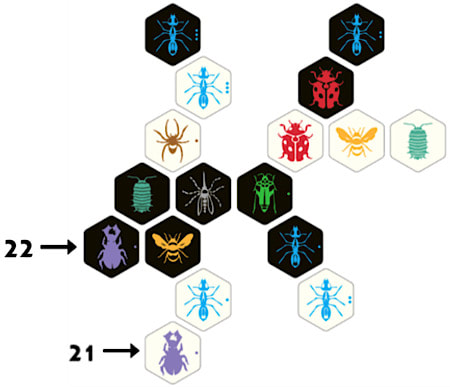
Figure 11: Position after 22. bB1 -bQ.
23. wB1 wA1
24. bB2 -bA2
25. wS2 wP\
24. bB2 -bA2
25. wS2 wP\
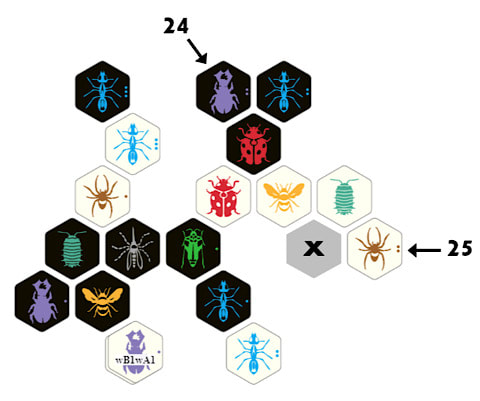
Figure 12: Position after 25. wS2 wP\.
.Although White already has a menacing Beetle on top of the hive, he still needs to be careful. I think that 25. wA2 \bB2 was an interesting alternative here with the idea of preventing Black from using his last Beetle. With the white Pillbug already in play, it will be really hard to stop the white Queen from being warped easily to a safer place when necessary. It is also true that after 25. wA2 \bB2, Black can still free his Beetle#2, but that comes at the cost of an Ant again with 26. bA1\bA2, and White still has the resources to defend.
The move played by Jewdoka is still sound and creates a safe space (the "X" in Figure 12) for a defender (Beetle or Mosquito), ready to cover the enemy Beetle moving towards the white Queen. At the same time, White still has one Beetle or Mosquito in reserve to attack, and the situation is unbalanced with chances for both players.
26. bB2 bL
27. wS2 bA1-
It turns out that Jewdoka had other plans for his Spider#2, that is to replace the pin on the black Ant#1 and free the white Ant#2. However, this leaves black Beetle#2 free to advance undisturbed…. I feel 27. wB2 -wS2 was more natural (although clearly more defensive).
28. bA2 wA2\
Quodlibet immediately pins the white free Ant!
29. wB2 /wB1
Jewdoka keeps attacking with his second Beetle. Another option was to limit Black’s mobility by playing 19. wS2 bA2\.
30. bB2 wL
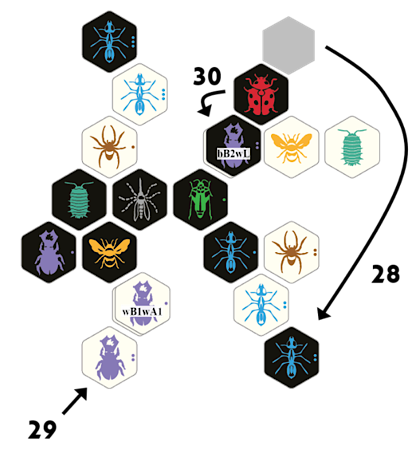
Figure 13: Position after 30. bB2 wL.
Another option was to pin the white Beetle#2 using one of the black Ants, but this would have set free one of the white Ants, which in turn could have pinned the black Beetle#1. Quodlibet improves his position sufficiently to proceed with the attack without needing to defend right now. Speaking of which, what is Black’s attack plan? Why cover the white Ladybug and not the Queen? This will be clear soon.
31. wB1 bQ
32. bB1 wB1
33. wB2 -wA1
The position gives chances for both players: White has already covered the black Queen, he has four bugs in reserve, and the Pillbug is well placed to defend; Black has better Ant control, with a Beetle on top of the hive and the defensive Pillbug-Mosquito combo.
34. bG2 \bA3!
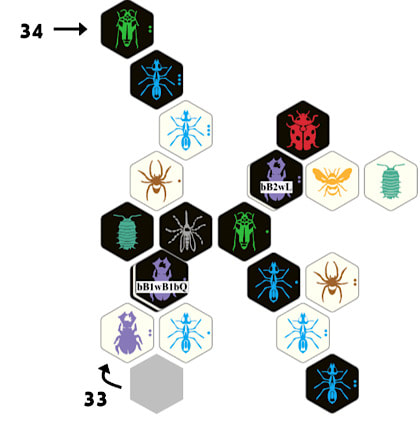
Figure 14: Position after 34. bG2 \bA3!
Black correctly calculates that rescuing his Mosquito is a crucial part of the plan, and 34. bG2 \bA3! is a critical move to ensure it.
35. wB2 bB1
Pinning the Grasshopper with 35. wA1 \bG2 should have been considered as well, slowing down White’s own attack, but preventing the inner structure of the hive from becoming too favourable to Black.
36. bG2 wS1-
37. wS1 \bA3
38. bL bP/
35. wB2 bB1
Pinning the Grasshopper with 35. wA1 \bG2 should have been considered as well, slowing down White’s own attack, but preventing the inner structure of the hive from becoming too favourable to Black.
36. bG2 wS1-
37. wS1 \bA3
38. bL bP/
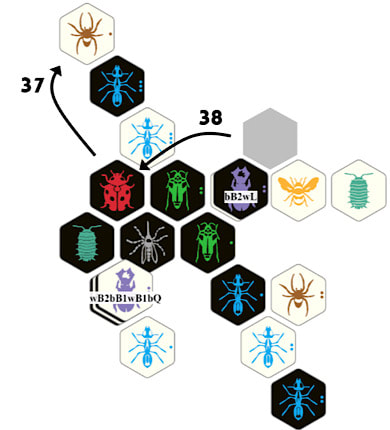
Figure 15: Position after 38. bL bP/.
Now it is all clear! The black Mosquito can escape by moving either to \wQ or to /wQ, Black will have a second Beetle available and the spot left behind (wB2/) becomes almost inaccessible to White.
39. wB2 bP?
Covering the Pillbug is normally the most sensible thing to do as it is the biggest defensive strongpoint. However, looking at the important role of the black Mosquito in the next few moves, 39. wB2 bM (covering the black Mosquito) should have been considered seriously. Now the black Mosquito will transform into a powerful Beetle! The Black counterattack is very hard to stop.
40. bM bG1-
41. wS2 bA2\
42. bM wQ
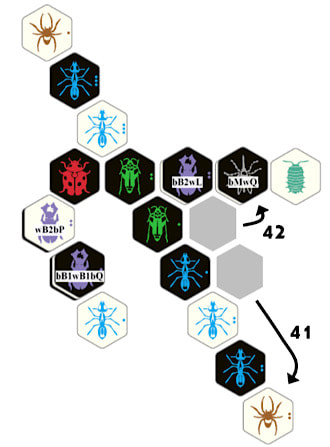
Figure 16: Position after 42. bM wQ.
Black has now two white kill spots (\bM and /bM) where he can directly drop a piece from the reserve, the most efficient way to attack. Jewdoka tries to control one of these hexes moving his Pillbug and Ant#1 but it is too late.
43. wP bM\
44. bS1 bM/
45. wA1 \bS1
46. bG3 bB1- !
43. wP bM\
44. bS1 bM/
45. wA1 \bS1
46. bG3 bB1- !
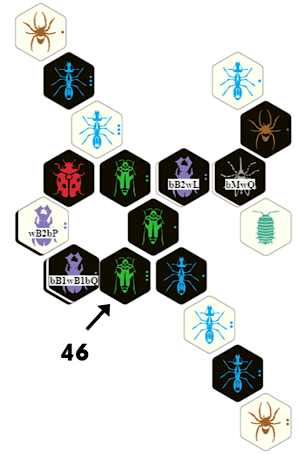
Figure 17: Position after 46. bG3 bB1-!
Elegant move! Rings are bad... except when you are the only one who can break them! The power of this ring resides in the ability of the black Grashopper#1 to break it and form it again dropping a new piece in the same hex. The next moves are almost forced, two Beetles on top of the hive are simply too strong, and White does not have good defensive measures or enough pieces to counterattack.
47. wM wA1/
48. bG1 bB2/
49. wP bM-
50. bS2 bA1/
Forming the ring again! This time it will be broken by the black Grasshopper#2, with deadly consequences.
47. wM wA1/
48. bG1 bB2/
49. wP bM-
50. bS2 bA1/
Forming the ring again! This time it will be broken by the black Grasshopper#2, with deadly consequences.
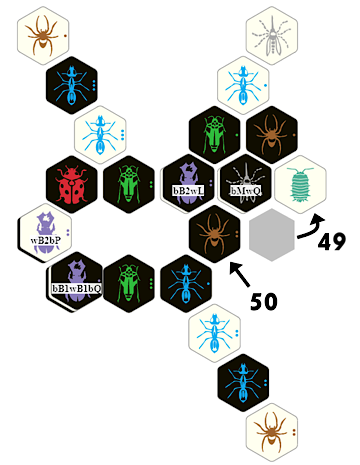
Figure 18: Position after 50. bS2 bA1/.
51. wP bS1-
52. bM bS2-
53. wM wA1-
54. bG2 wQ- Black wins.
52. bM bS2-
53. wM wA1-
54. bG2 wQ- Black wins.
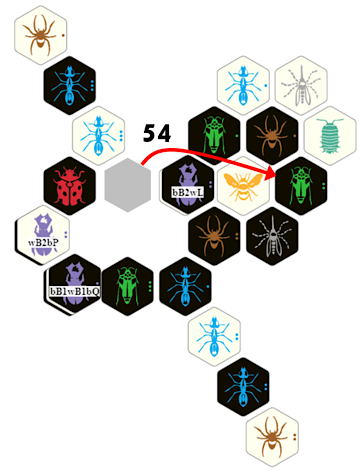
Figure 19: Final position, after 54. bG2 wQ-.
Black Grasshopper#2, introduced on move 34, concludes this exciting game, the match and the 2019 World Cup!
If you keep studying this particular game, you will find many ideas I have not discussed here, at so many different levels that literally anyone can learn something from it. I hope you have enjoyed reading through this annotated game as much as I did watching and analyzing it!
References and Resources
- A lot of the jargon used in the article has been created by Jewdoka (Joe Schulz) in his book recently published: The Canon of Hive: Groundwork. A monumental work that lays the foundation for any player who wants to start studying Hive for competitive play!
- An off-line tool to review the games played on BoardSpace.net is available here.
- The diagrams shown here were made by using this great online tool.