Connection Games
|
Introduction by Kerry Handscomb
Game annotation by Paul van Wamelen |
Mirador is an unusual, and perhaps even foundational, connection game designed by Andrew Perkis and initially published in the January 2010 edition of Games magazine. The game has been playable on SuperDuperGames since it was developed, and it has a BoardGameGeek page, but otherwise Mirador is little known. The same is true of Andrew's game Alfred's Wyke, which we presented in AG21. These games are two of the very best from this designer, and they deserve continuing recognition, in my view.
Mirador is interesting especially because because it uses line-of-sight connections, in the same way as Sid Sackson's Network, first published in his classic book, A Gamut of Games. The recent territorial games Tumbleweed (AG21), Stigmergy, Lox, and Meridians also use line of sight, which has become a popular theme to investigate. In addition, Mirador is a connection game on a square board, where the objective is to connect either pair of parallel opposite sides of the board, a property that it shares with Gonnect (AG6), Tak (AG17), and Bridget, the latter reviewed here in this issue.
We will be giving the rules of Mirador, rewritten, but inspired by Andrew's own description, here. We will follow up with a game annotated by Paul van Wamelen, which ought to give the reader a good feel for Mirador and how it works.
Rules
Mirador is a connection game played on a 27x27 square grid. Andrew Perkis originally described Mirador as a pencil-and-paper game, and this might still be the easiest way to play the game in physical form, although it ought not to be too difficult to put together a set with solid board and pieces. There are two players, who we will call Green and Blue for the purpose of this article.
On each turn, a player fills in a 2x2 square in the player's own colour. Each of these completed 2x2 squares is a mirador. Miradors cannot overlap; a mirador cannot even touch another mirador of either colour, except for the single exception that miradors of the same colour can touch at their corners.
For the notation, just the bottom left corner square of a mirador needs to be recorded, which means only that the first 26 squares on the horizontal and vertical axes needs to be identified. The size 27x27 is an unusual choice, perhaps inspired by the 26 letters of the alphabet in English. On the other hand, Paul van Wamelen begins the annotated game with an explanation of why 27x27 might be absolutely the ideal size for Mirador. Paul muses whether the designer understood the full implications of 27x27. If the size was chosen just to fit the length of the alphabet, it was a very fortuitous choice.
Green moves first, and the pie rule is used to balance the advantage of the first move. In other words, after Green's first move, Blue can decide either to switch sides and play Green, with the existing placement as Green's first move, or to stay as Blue and make the next move as Blue.
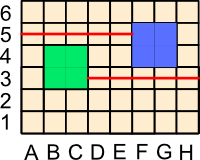
If there is an unobstructed line of sight between two miradors of the same colour, then these two miradors are connected. The "lines of sight," of course, must be parallel to the sides of the squares forming the grid. Likewise, if a mirador has an unobstructed line of sight to any square on the side of the board, then the mirador is connected to that side. Two miradors of the same colour touching at their corners are also connected.
In the lines of sight indicated in the diagrams below, you will note that I have drawn the lines through the centres of the small squares. A line of sight should be thought of as running across the board a full small square wide—the exception, of course, is the diagonal connection between friendly miradors.
The object of the game is to use the miradors of your colour to construct a series of unobstructed line of sight connections between two opposite sides of the board, either horizontally or vertically. Of course, the diagonal connections between friendly miradors can also form part of the the winning connection. This connection must be unassailable, unbreakable whatever the opponent does.
Mirador is a connection game played on a 27x27 square grid. Andrew Perkis originally described Mirador as a pencil-and-paper game, and this might still be the easiest way to play the game in physical form, although it ought not to be too difficult to put together a set with solid board and pieces. There are two players, who we will call Green and Blue for the purpose of this article.
On each turn, a player fills in a 2x2 square in the player's own colour. Each of these completed 2x2 squares is a mirador. Miradors cannot overlap; a mirador cannot even touch another mirador of either colour, except for the single exception that miradors of the same colour can touch at their corners.
For the notation, just the bottom left corner square of a mirador needs to be recorded, which means only that the first 26 squares on the horizontal and vertical axes needs to be identified. The size 27x27 is an unusual choice, perhaps inspired by the 26 letters of the alphabet in English. On the other hand, Paul van Wamelen begins the annotated game with an explanation of why 27x27 might be absolutely the ideal size for Mirador. Paul muses whether the designer understood the full implications of 27x27. If the size was chosen just to fit the length of the alphabet, it was a very fortuitous choice.
Green moves first, and the pie rule is used to balance the advantage of the first move. In other words, after Green's first move, Blue can decide either to switch sides and play Green, with the existing placement as Green's first move, or to stay as Blue and make the next move as Blue.
If there is an unobstructed line of sight between two miradors of the same colour, then these two miradors are connected. The "lines of sight," of course, must be parallel to the sides of the squares forming the grid. Likewise, if a mirador has an unobstructed line of sight to any square on the side of the board, then the mirador is connected to that side. Two miradors of the same colour touching at their corners are also connected.
In the lines of sight indicated in the diagrams below, you will note that I have drawn the lines through the centres of the small squares. A line of sight should be thought of as running across the board a full small square wide—the exception, of course, is the diagonal connection between friendly miradors.
The object of the game is to use the miradors of your colour to construct a series of unobstructed line of sight connections between two opposite sides of the board, either horizontally or vertically. Of course, the diagonal connections between friendly miradors can also form part of the the winning connection. This connection must be unassailable, unbreakable whatever the opponent does.
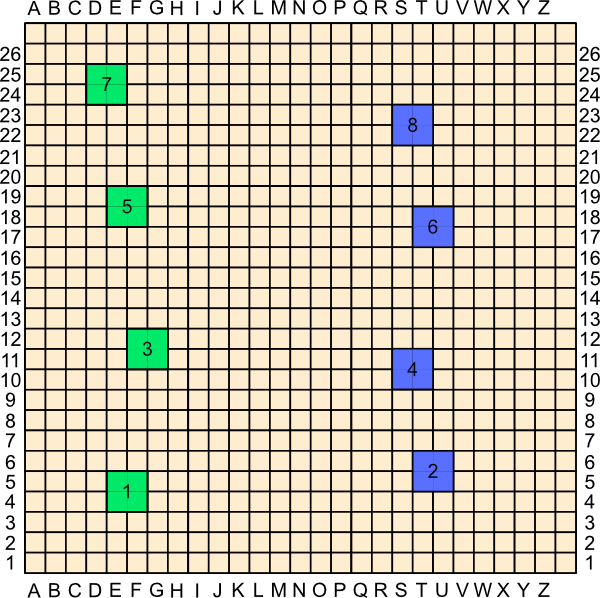
Green has a secure horizontal connection; no Blue move can break this connection.
Green's wining connection, above, could also be vertical. Likewise, Blue can make winning connections horizontally or vertically.
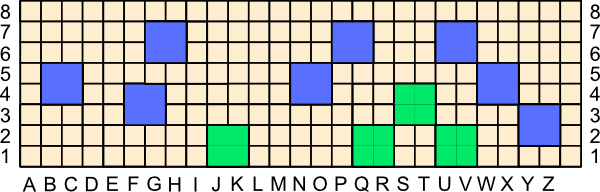
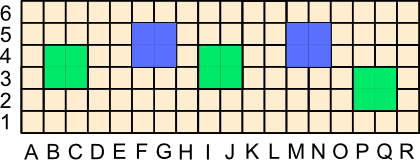
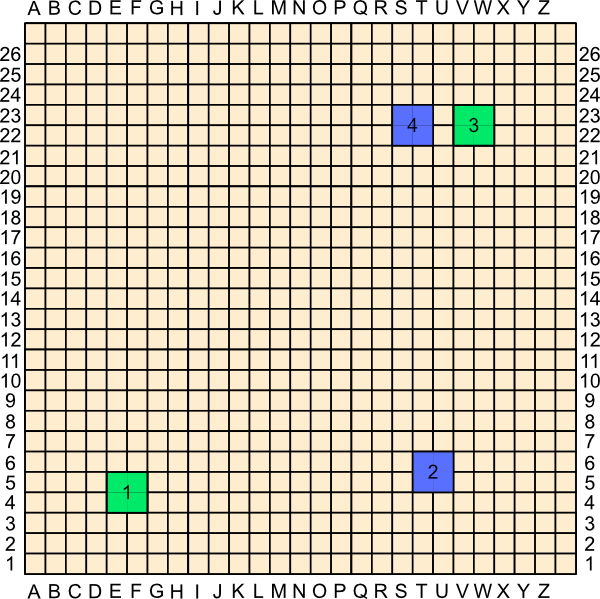
After a player has made a move, if that player thinks she has a winning connection that cannot be broken, then that player can "Declare." The other player then places as many miradors in his colour as he likes in an attempt to break the connection. If he cannot, the declaring player wins; if he can break the connection, then he wins instead. See the example below. Blue, thinking she has a winning horizontal connection, declares.
After a player has made a move, if that player thinks she has a winning connection that cannot be broken, then that player can "Declare." The other player then places as many miradors in his colour as he likes in an attempt to break the connection. If he cannot, the declaring player wins; if he can break the connection, then he wins instead. See the example below. Blue, thinking she has a winning horizontal connection, declares.
However, now Green gets to place some miradors to try to break the connection. You can see, by the two green miradors below marked with red dots, that Blue's declaration was premature and that Green has now won—the Blue connection is broken!
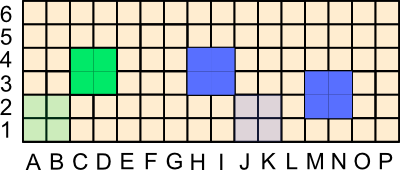
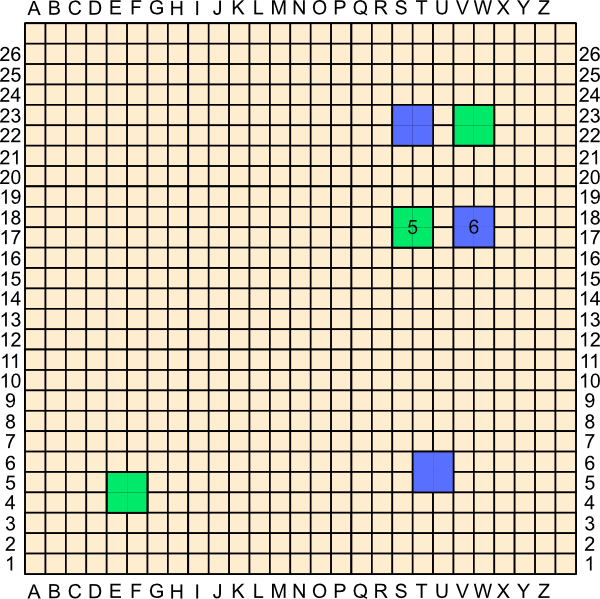
With the small change, below, with just one blue mirador moved one square to the left, Blue's declaration would be sound. Why don't you try to break the Blue connection? Remember, no two miradors can touch along their sides, and only friendly miradors can touch at their corners.
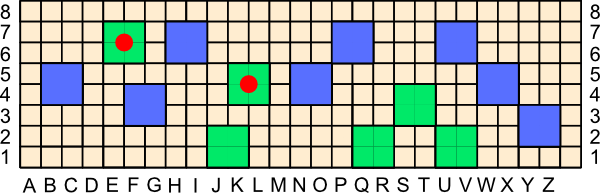
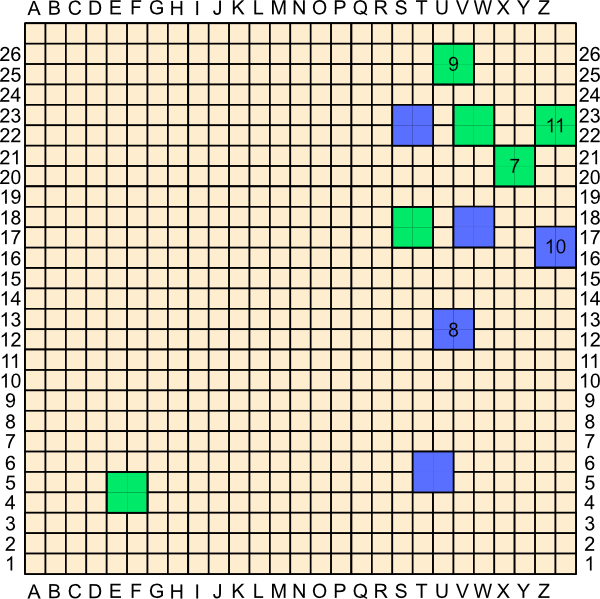
A player can declare and be threatening horizontal and vertical connections simultaneously. The player does not have to specify which she is aiming for. See, for example, the diagram below, where Green has just placed the mirador marked with the red dot and declares. Green is now threatening both horizontal and vertical connections. If Blue plays at A, he blocks the vertical connection; if Blue plays at B, he blocks the horizontal connection. No Blue placement, or even a series of Blue placements, blocks both connections, and Green's declaration is thereby sound.
Comments
The designer had developed a nomenclature for certain types of mirador placement. I will review some of this terminology, so that any future discussion of Mirador will have the beginnings of a language. See below for blocking, peeping, and leapfrogging, the meaning of which should be clear without needing further explanation. Locations where only one of the two players can place a mirador are moves that can be held in reserve—see the annotated game for a further example of a reserve placement.
The designer had developed a nomenclature for certain types of mirador placement. I will review some of this terminology, so that any future discussion of Mirador will have the beginnings of a language. See below for blocking, peeping, and leapfrogging, the meaning of which should be clear without needing further explanation. Locations where only one of the two players can place a mirador are moves that can be held in reserve—see the annotated game for a further example of a reserve placement.
Block
Peep
|
Leapfrogging
Reserves
|
See the diagram below for two types of ladder found in Mirador. The designer notes that the ladder on the left is slower and provides peeping opportunities that may benefit the other player.
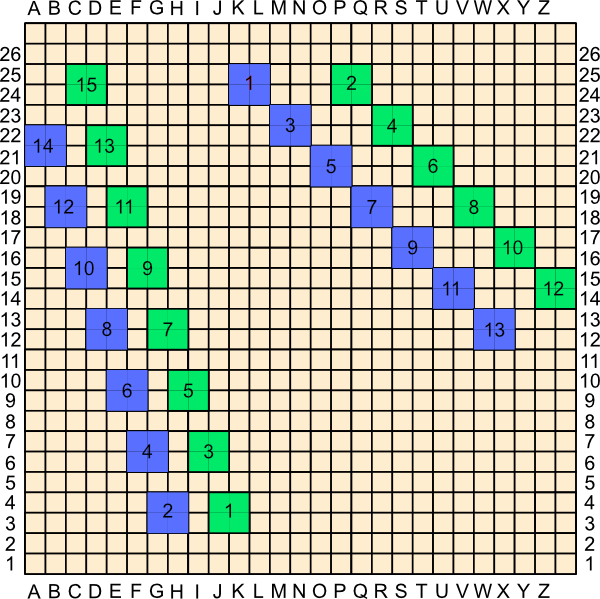
Without further ado, here is the game annotated by Paul van Wamelen. This game was played between fritzd (Green) and pim (Blue) on SuperDuperGames and is recorded here.
Annotated game
I think we are only starting to understand this game, but below are some thoughts and explanations of what we have learned so far. The game was the last one in a long sequence that were played between the two highest rated players on SuperDuperGames.
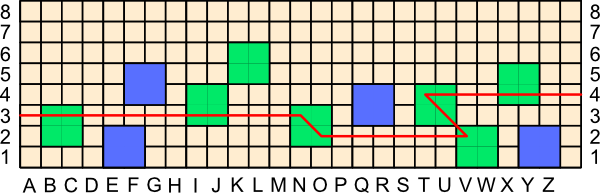
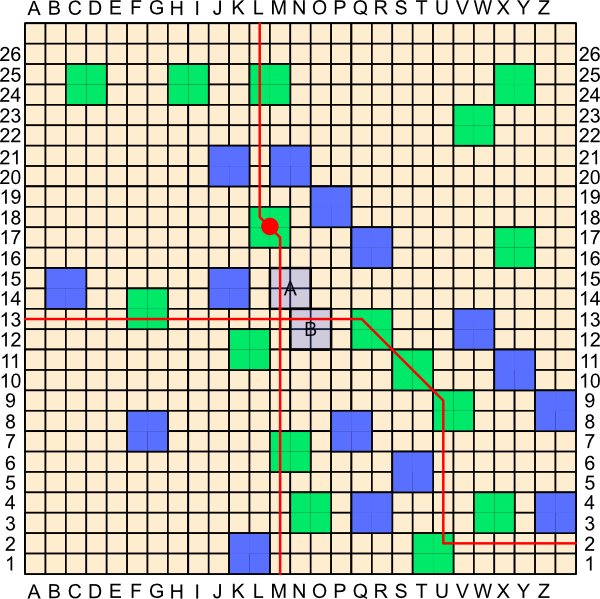
First a bit of an introduction that explains the first move. One of the basic patterns of Mirador is demonstrated with this game from SuperDuperGames, shown below. Blue has just declared, and Green resigns. No series of placements by Green can prevent Blue's winning connection. You can create an unassailable connection in just four moves!
I think we are only starting to understand this game, but below are some thoughts and explanations of what we have learned so far. The game was the last one in a long sequence that were played between the two highest rated players on SuperDuperGames.
First a bit of an introduction that explains the first move. One of the basic patterns of Mirador is demonstrated with this game from SuperDuperGames, shown below. Blue has just declared, and Green resigns. No series of placements by Green can prevent Blue's winning connection. You can create an unassailable connection in just four moves!
Blue wins with only four miradors!
The balance is very delicate. If the board was one more square wide, you would need five moves, and if the board was one less square wide, you would probably have more options of connecting in just four moves. For this particular board size there is only this one four move connection where the pieces have to be aligned in exactly this way to be connected. (Did the designer know this!?)
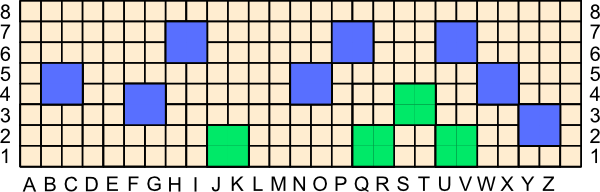
It also seems that the T5-S10 arrangement, the first two moves of Blue above, where the opponent has no pieces defending toward the top side, is extremely strong, possibly already winning. See, for example, this other game from SuperDuperGames.
This all means that if a player places a piece four squares from a side, you should already be thinking about defending! If the first move is played at E5, you cannot defend in both directions, and you might already be lost. So E5 is too strong a first move, and the opponent will always swap sides.
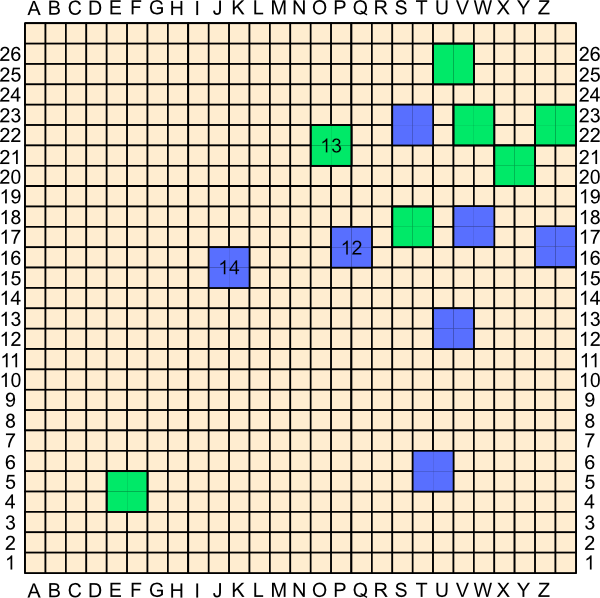
On the other hand, something like D4 is too weak, because the opponent will play in the opposite corner at V22 and have a double attack. Therefore, something like E4 seems ideal. The second move then defends by playing in the lower right area. This is how our annotated game starts, and now you know why:
1. E4
Seems like a good start—not too weak to attack, not too strong to be immediately swapped.
2. T5
Defending the four move connection threat across the bottom, and setting up a four move connection towards the top.
3. V22
Defending the top to bottom threat, while creating a left-to-right threat.
4. S22
Defending and attacking. Somehow having the S22 and T5 parts of the basic four-move connection is much easier to defend than having, say, T5 and S10.
It also seems that the T5-S10 arrangement, the first two moves of Blue above, where the opponent has no pieces defending toward the top side, is extremely strong, possibly already winning. See, for example, this other game from SuperDuperGames.
This all means that if a player places a piece four squares from a side, you should already be thinking about defending! If the first move is played at E5, you cannot defend in both directions, and you might already be lost. So E5 is too strong a first move, and the opponent will always swap sides.
On the other hand, something like D4 is too weak, because the opponent will play in the opposite corner at V22 and have a double attack. Therefore, something like E4 seems ideal. The second move then defends by playing in the lower right area. This is how our annotated game starts, and now you know why:
1. E4
Seems like a good start—not too weak to attack, not too strong to be immediately swapped.
2. T5
Defending the four move connection threat across the bottom, and setting up a four move connection towards the top.
3. V22
Defending the top to bottom threat, while creating a left-to-right threat.
4. S22
Defending and attacking. Somehow having the S22 and T5 parts of the basic four-move connection is much easier to defend than having, say, T5 and S10.
Blue defends and attacks with S22.
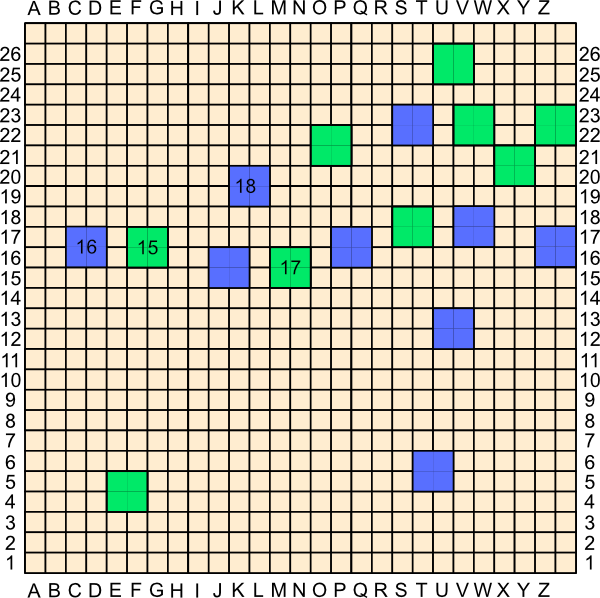
5. S17
Defending the top to bottom threat in a very straightforward way. Note that S19, for example, would also work, but S17 might be stronger because it leaves room for a possible U19.
6. V17
For now, there is a perfect stalemate in the top right. All four pieces are blocked left-right and top-bottom.
Defending the top to bottom threat in a very straightforward way. Note that S19, for example, would also work, but S17 might be stronger because it leaves room for a possible U19.
6. V17
For now, there is a perfect stalemate in the top right. All four pieces are blocked left-right and top-bottom.
A stalemate in the top right
7. X20
The X20-V22 group is now securely connected to both the top and the right of the board and peaking at the bottom and the left.
8. U12
Blue is not unassailably connected to the bottom yet, but resistance in that direction is probably futile. On the other hand, it seems trivial to block towards the top—so trivial that it almost seems like a poor move. But….
9. U25
Blocks U12’s view to the top. Note that Blue cannot even add any pieces between U12 and the top in order to renew the threat.
10. Z16
Note Z16 is essentially connected to the bottom (through V17, etc.), and is threatening something like Y24 that would connect to the top. So Green is forced to block. Fortunately, that is again trivial and seemingly in such a way that no follow up seems clear.
11. Z22
Green is playing forcing moves, but the top looks completely blocked now. Where is this going?
Green continues to play forcing moves in the top right.
12. P16
Oh! Looks like Blue is now threatening a run across the board (P16 is already fully connected to the right). But there is also the immediate threat of something like Q20 (because P16 is also already virtually connected to the bottom through Z16, V17).
13. O21
Blocks the connection to the top (and in such a way that renewing the threat seems impossible. Note that there is no way Blue can prevent Green from playing at Q19 at some future move). It also sets up a left-to-right threat for Green. O21 is connected to the right. Unfortunately it is only one square ahead of the Blue left-to-right threat, and seeing as it is Blue’s move, that is probably not enough. Let’s see how Blue finishes this off.
14. J15
This is part of the 4-9 connection to the left, but the hole to P16 seems a bit big…. Or is it? If Green plays at M15, Blue just wins with E16. What if Green plays M16? Blue still wins with E16! After M16, the J15 mirador can see the right side of the board without touching another Blue piece and without Green being able to play anything in the line of sight!
Blue makes a secure connection to the right.
15. F16
This threatens J15’s connection to the left, but more importantly makes it so that later playing at M15 will break the connection between J15 and the right.
16. O16
Securing J15’s line of sight to the right.
17. M15
As promised. This looks good for Green, doesn’t it?
18. K19
Wow! There is no way Green can prevent Blue from playing at N18 next, which is a reserve placement for Blue, completing the Blue connection.
Final position, and a Blue win
Acknowledgement
Header mage: The Lighthouse of Alexandria, one of the Wonders of the Ancient World. Johann Bernhard Fischer von Erlach, Public domain, via Wikimedia Commons.
Header mage: The Lighthouse of Alexandria, one of the Wonders of the Ancient World. Johann Bernhard Fischer von Erlach, Public domain, via Wikimedia Commons.
🔴⚫️🔴⚫️🔴⚫️🔴
We have discussed four games by Andrew Perkis in total, Miller's Thumb (AG9), Super Halma (AG15, AG18), Alfred's Wyke (AG21), and now Mirador. Super Halma is a valiant attempt to make a serious competitive game from the Victorian classic. Andrew is now retired from game design, having given us many unusual and original creations. At the very least, Alfred's Wyke and Mirador should not be permitted to slip into obscurity, in my opinion. Hopefully, we can investigate other games by the designer which likewise deserve to be remembered. ~ Ed.