Line-of-sight games

|

|
Nine puzzles and explanations designed, written, and compiled by a few people from the Tumbleweed community:
testingqwerty, hootie, and spartacu5
testingqwerty, hootie, and spartacu5
Introduction
The following document is a set of nine puzzles meant to augment our original publication Local Tactics in Tumbleweed. These puzzles represent various ideas that are useful during fighting and endgame in the game of Tumbleweed. All the puzzles were authored by the player Testingqwerty.
In these puzzles, it is always Red to play and win. We present sets of one puzzle at a time, with explanations and solutions immediately following each. Because all the puzzles are on board size three, Red needs at least ten points to win. Remember that your score is the sum of your owned stacks, plus empty cells controlled by you.
Most of these problems have unique solutions (symmetry notwithstanding).
Helpful terms
Size/Height: The number on the stack
LOS: line of sight
eLOS: enemy line of sight
fLOS: friendly line of sight
Link: a shared LOS between two friendly stacks
Capture: Replace an enemy stack with a bigger stack of your own
Reinforce: Replace a friendly stack with a bigger stack
Live: An uncapturable stack
Suicidal move: placing a stack on a cell controlled by the opponent
Snapback: an immediate recapture or a forcible, delayed recapture
Parry: increase fLOS to exceed eLOS on an attacked friendly stack
Shield: placement in between an attacked friendly stack and enemy stack
Cap: stack on the end of a linear group which ensures life of that group
Anchor: an (often) sacrificial move meant to temporarily increase fLOS
Cut: place a stack in between linked enemy stacks
Pinwheel: add new eLOS to the same attacked stack
Cornerstone: a stack that will define the perimeter of a territory
Puzzle A
Author: Testingqwerty
Difficulty: Easy
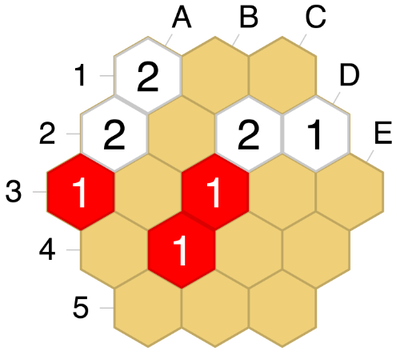
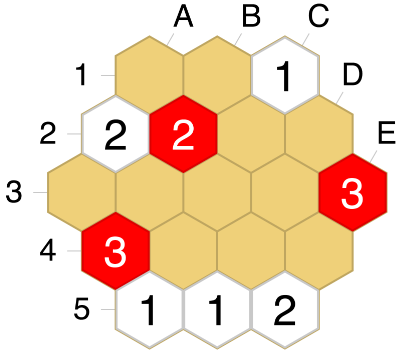
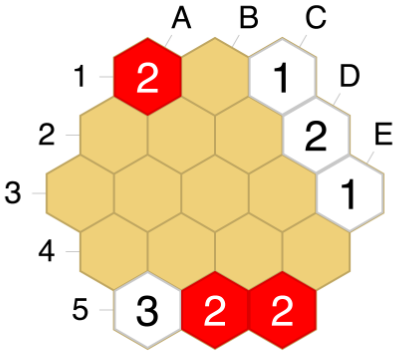
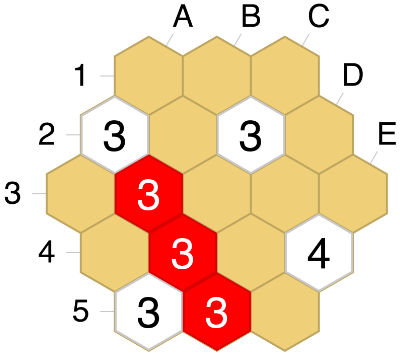
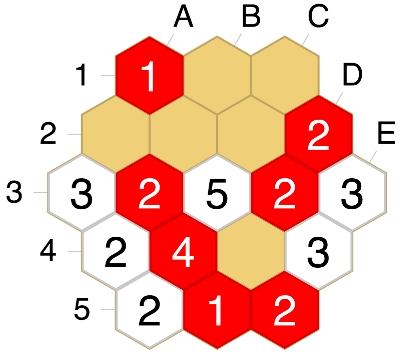
Red has only three 1-stacks on the board, and one of them, the stack on C3, is threatened by two White LOS. To defend, Red shouldn’t reinforce 1.C3+ as this fails spectacularly after White …D3 captures it.
It is also not possible to capture the attacking stacks: A1 and C2 are both safely embedded in the White formation, hidden from Red LOS. Thus, it will be important to play a move along the LOS stemming from C3.
Shielding is not an option, because the attacking stack C2 is too close to shield C3 from, and the intervening space between A1 and C3 are controlled by White: placing a stack there would be suicidal for Red.
The remaining option is to parry the threat by adding a third Red LOS: such a move would make the White capture C3x suicidal.
However, options like 1.E3 will allow White to cut between C3 and E3 by playing a 2-stack on …D3, renewing the threat with a vengeance.
1. E5 is the winning move, parrying the threat on C3 while adding a second LOS to E4, securing the ten points for Red.
Puzzle B
Author: Testingqwerty
Difficulty: Medium
Author: Testingqwerty
Difficulty: Medium
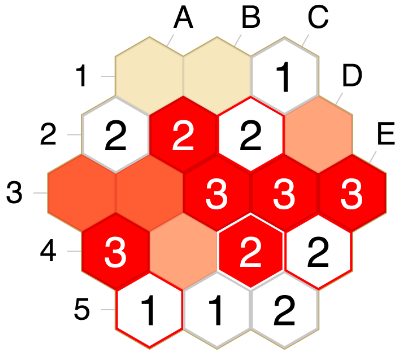
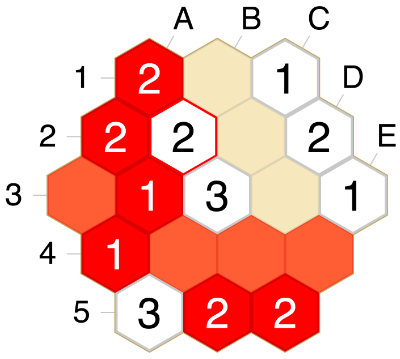
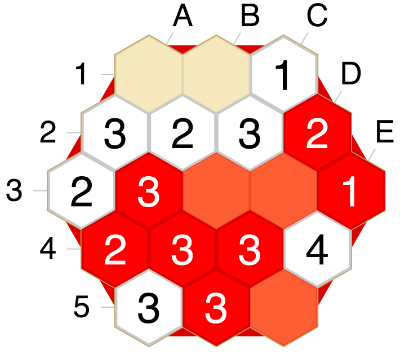
Here, Red is down on material but has a single route to victory. In order to disrupt White's coordination in the centre while link Red's bottom and top pieces, Red should consider a cutting move.
Red can make such a cut with 1. D3. White may attack the cutting stack with …D2, but Red may respond with a shielding stack on 2. C3. When White adds a third line of sight with …E4, Red may comfortably reinforce via 3.D3+ and White has no way to gain anything more.
If Red instead tried 1.D2 first, White forces a win with the tricky …E4! If then Red plays 2.D3, White …C3 controls D4 and despite that Red can capture it by playing 3.C2, White …D4 will still ensure a win for White.
Defensible cuts are sensible cuts!
Puzzle C
Author: Testingqwerty
Difficulty: Hard
Author: Testingqwerty
Difficulty: Hard
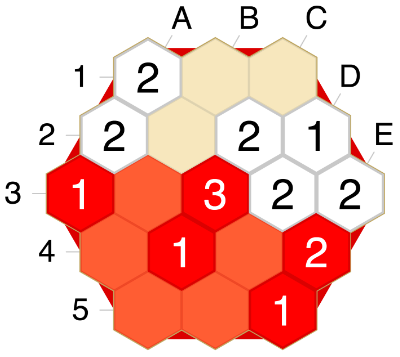
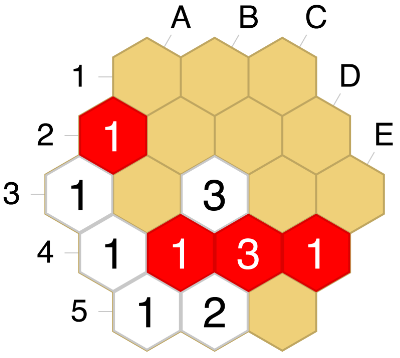
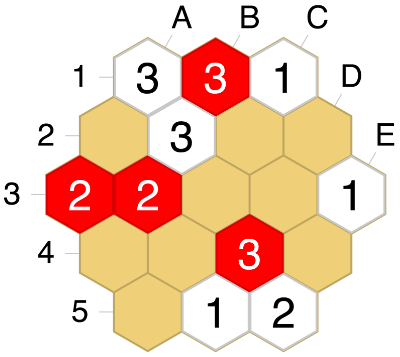
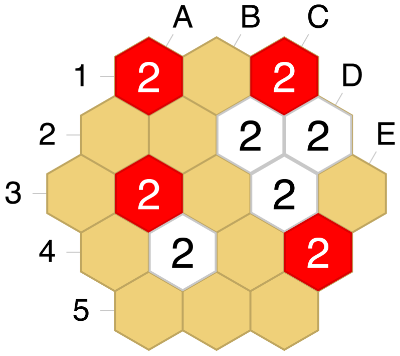
Red has fewer stacks, but the White stacks on C1 and C5 are weak. If Red can play in the centre, Red could attack them, but the key central space, C3, is controlled by White.
Red places an anchor on 1.D4 to temporarily gain majority LOS on the centre. White can forcibly capture it by wrapping around with …C4, but it isn’t enough after 2.C3, a strong Red 3-stack with an attack on C1. If instead White plays …C2, 2.C3 is met with …E4 and red must be careful to respond with 3.D3 instead of capturing 3.E5x, to attenuate the damage done after …D4x.
Sometimes you must sacrifice a piece to gain crucial LOS elsewhere. Don’t forget to squeeze out the last potential of sacrificial stacks before they disappear!
Puzzle D
Author: Testingqwerty
Difficulty: Hard
Author: Testingqwerty
Difficulty: Hard
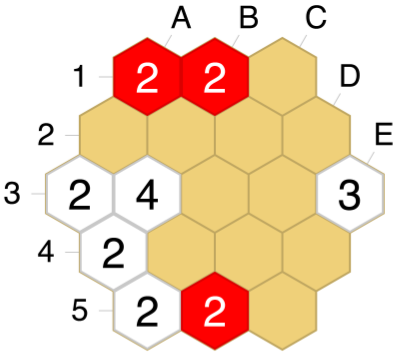
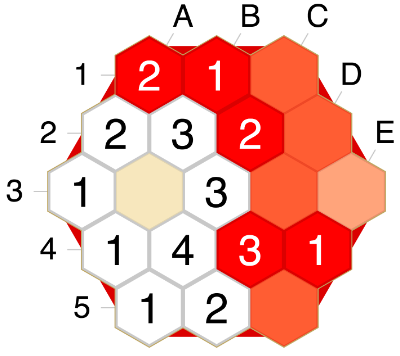
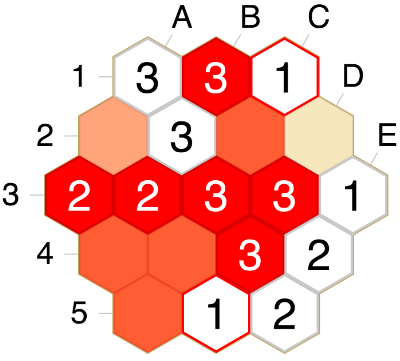
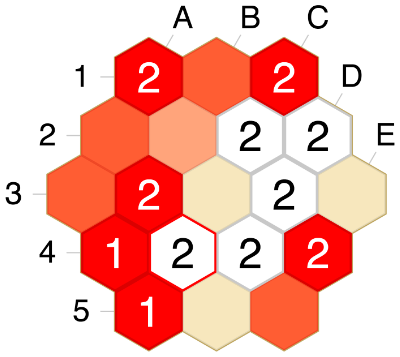
Red needs to build a border on the upper side, or else risk losing both stacks on A2 and C4 without compensation. If Red cannot survive on the upper side, then Red will not have enough territory to win. The A2 stack is bound to die, but it should be useful to create border stacks anyway. D4 can be recognized as a cornerstone for Red. The key is to use the other dying stack on C4 to create threats that distract White, while claiming territory.
Moves like 1.E5? are threatening but do not help the upper side. After openers like 1.A1 or 1.C2, Red can’t prevent the White onslaught of captures.
The winning move is Red 1.B1, attacking B4 while putting a second LOS on A1. No matter White’s responses, Red can constantly threaten to control B2 via the moves 2.A1 and then 3.C2.
Build while attacking!
Puzzle E
Author: Testingqwerty
Difficulty: Medium
Author: Testingqwerty
Difficulty: Medium
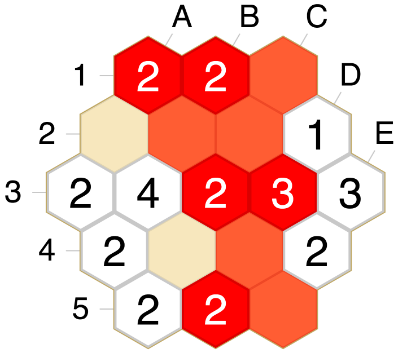
Red can win with a natural first move, as 1. B3 claims a contested centralized cell, offers huge influence, and comes with an attack on E3.
If White shields with …C3, Red can lose with 2.C4 B2, leaving the B3 stack unprotected. Red can also fall victim to a fierce counterattack after 2.B2 C4! Instead, Red plays the clever 2. B4, making …B2 no longer a threat because of a swift parry 3.A2, securing the win.
If instead White opts for the immediate counterattack after 1.B3 C4, Red has multiple ways forward: 2.E3x, 2.D3, or 2.C3 all protect B3 and lead to a winning position for Red.
Both this puzzle D and puzzle A have this in common: there is safety in numbers. Often, the easiest way for small groups to survive is to connect them.
Puzzle F
Author: Testingqwerty
Difficulty: Hard
Author: Testingqwerty
Difficulty: Hard
In this position, White’s 1-stack on D5 is poisoned: If Red captures 1.D5x C2, Red’s attempt to expand 2.D3 is shut down via White …E4. It’s reasonable to think: if White’s key to winning is connecting E5 to the northeast, we can play 1.E4 ourselves, but after …B3x Red is lost.
Instead, Red claims 1.D3 immediately, allowing …E4 2.C3 after which C1 and D5 cannot be saved. If Red captured 2.D5x then …C2 wins for White because D3 can be eaten away.
It’s tempting to capture an attacking enemy stack. But you should always be on the lookout for a bigger move.
Instead, Red claims 1.D3 immediately, allowing …E4 2.C3 after which C1 and D5 cannot be saved. If Red captured 2.D5x then …C2 wins for White because D3 can be eaten away.
It’s tempting to capture an attacking enemy stack. But you should always be on the lookout for a bigger move.
Puzzle G
Author: Testingqwerty
Difficulty: Hard
Author: Testingqwerty
Difficulty: Hard
Red needs to invade White’s territory because Red is concentrated into a small stick-like shape in the lower left. Candidate moves include invasions like B1, E3, and D2.
If Red 1.B1 B2, 2.E3 D4 3.C3, White can sacrifice the top with …D3 and after 4.B2x E3x 5.D4x C1 White has enough to win.
Instead, Red must play 1.E3 immediately and it becomes very difficult to attack: …C1 is met with a Red shield via 2.D2. White …A3, attempting to snag a point on B4, can be responded to by Red 3.B4. At this point, all territory is solid except E5, which White cannot seize, lacking the necessary influence. Attempts such as …B2 are easily blocked by 4.D4.
Puzzle H
Author: Testingqwerty
Difficulty: Hard
Author: Testingqwerty
Difficulty: Hard
Red has several points of secure territory in the northwest, but still must expand a little to win.
If Red 1.E5, White has the resource …D5, somehow defending every threat (2.D4 C3, or 2. B4 C3, or 2.C3 D4).
Red can side-step this possibility by immediately placing pressure on C4 by playing 1.B4. When White shields …D4, Red follows up with a pinwheel 2.C5, forcibly capturing the all-important C4.
Note that a similar, but less powerful attack by Red, 1.D4, fails to White …C3. The stack on C4 was a better target as it lacks friendly support.
Attack vulnerable enemy stacks before they can defend!
Puzzle I
Author: Testingqwerty
Difficulty: Very hard
Author: Testingqwerty
Difficulty: Very hard
This is a complicated puzzle. it is worth noting that White can capture either A1, B3 or D3, so many of the red stacks are endangered. Red’s cornerstone on C4, being a 4-stack on a sharp edge, is mostly safe. However, White capturing D3 forces Red to shield via D4 to save D5, otherwise White eats away the whole south. Because the bottom group is 4 points, Red only needs 6 points in the top to win (therefore, Red doesn't need to worry about losing D3 and D2). Keeping this in mind, how do we protect both the north and south groups?
If Red C2, threatening C3x, White plays B3x and after 2.A2 C4x White is winning. If Red plays B1, White responds …D3, and after 2.D4 C2 winning D2 for White, or 2.C2 D5x killing the bottom. Red can instead try 1.B2, but this loses as well – after D3x, Red must spend a move defending the bottom with 2.D4, giving white time to play C2, again winning D2.
Surprisingly, 1.A2 wins for Red. This time when White …D3x 2.D4 C2, Red can save the situation with 3.C1! If White B3x, 4.C2 wins. If White …D2x 5.B1 both threatens C2 and adds fLOS to B3 allowing Red to reinforce it.
Eliminate redundancies in your network! Friendly stacks block each other’s lines of sight. ◾️
🔴⚫️🔴⚫️🔴⚫️🔴
We introduced Tumbleweed in AG21. Tumbleweed is a representative of an emerging genre of line-of-sight games, perhaps the first game of this type. Meridians, covered in this issue, is another of these games. The goal of Meridians is elimination, not territory—although territory, still is an emergent goal.
I would like to thank the Tumbleweed community for putting these puzzles together. Further writing on good play in Tumbleweed can be found here at the BoardGameGeek page for Tumbleweed, including, "Local Tactics in Tumbleweed," and "Opening Theory in Tumbleweed." The former document contains 69 puzzles in base 3, and is similar to the article here, but much longer and with more variety; the latter document is designed to introduce beginners to Tumbleweed concepts for opening play.
My argument in AG22 was that Arimaa is still a game to be taken seriously because of its literature. This article and the other writings on Tumbleweed clearly demonstrate the intricacy and the interest of Tumbleweed tactics and strategy. The nascent Tumbleweed literature is a reason in itself to play Tumbleweed.
Otherwise, the Tumbleweed community is flourishing on its Discord server, and Tumbleweed was recently implemented on BoardGameArena. The implementation allows an optional "beginner" setting to visualize controlled/contested cells, and an optional alternative "free setup" mode where the neutral stack may be placed in a cell other than the exact centre.
Tumbleweed is still a very new game, originating in 2020, but already in 2021 there were several Tumbleweed tournaments and a Tumbleweed league was established. Most importantly, the 2021 World Championship was held, a seven-player round-robin tournament which was won by Atari. The growing Tumbleweed community, with its organized competitive play, is another good reason to consider playing this game seriously. ~ Editor