Twenty Years on: Graduation to JadeJack
Hi-Jack was introduced to Abstract Games Magazine readers 20 years ago. In a renamed form, JadeJack, it has just been hosted on the Gorrion games playing site, but in an 11x11 form, rather than concentrating on an 8x8 board. The result has been an influx of new players. The initial interest of revisiting JadeJack was a comparison with Tumbleweed, another territorial game with ‘blocking’. So this article will look at some of those differences, though mainly by looking at JackJack itself, at its main features, and how an 11x11 board game has panned out and how it demonstrate those features.
Play, as in other territorial games, starts with an empty playing area. The basic idea of JadeJack is that a placed piece puts claims on immediately surrounding territory. A second player can only play where his claims at least match the claims of the other player (which also includes therefore playing on unclaimed squares.) A second piece can be added to a single piece (this can also happen as a result of capturing) and extends the claimed territory by one square.
Play, as in other territorial games, starts with an empty playing area. The basic idea of JadeJack is that a placed piece puts claims on immediately surrounding territory. A second player can only play where his claims at least match the claims of the other player (which also includes therefore playing on unclaimed squares.) A second piece can be added to a single piece (this can also happen as a result of capturing) and extends the claimed territory by one square.
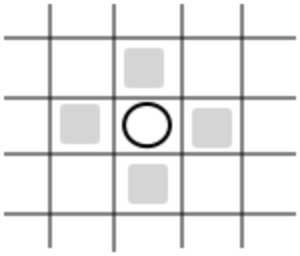
Spaces controlled by a single piece
|
Spaces controlled by a 2-stack
|
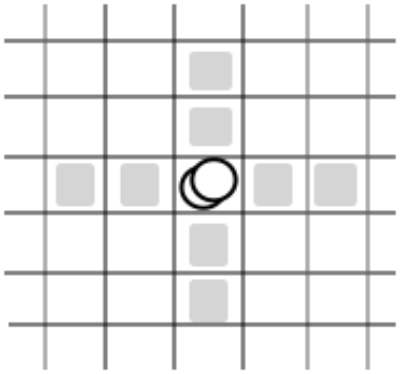
The diagonal squares are not claimed by a 1-high or 2-high stack, so a typical playing pattern for a second player could be to play in this diagonal square. This results in two of the claims being neutralised.
Diagonal placement
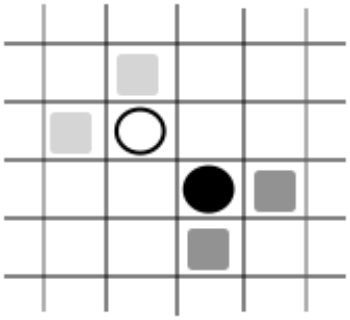
The attacking rule in JadeJack is similar to the occupying rule: another stack maybe attacked and occupied if the attacking player’s claims are greater than the defending player by the height of the stack. In the case just quoted, white or black may move alongside the opposing piece, into the square where the claims are equal. In the diagram to the right, the result is that black attacks white: black has a claim on the square which white occupies, and so can overcome a 1-high stack. When an attack is successful, the attacking player places a new piece on top of the attacked stack. Alternatively, white can defend. If white places a piece to the side of his existing piece, the new piece will exert a claim on it, and in that case black will not have enough claims – an extra claim – to attack the white piece. This simple rule means that claims can act as attacking claims or defending claims.
If white were to defend in the other direction, black could add a second piece, and have two attacking claims, to one white defending claim; white could then defend again in the other direction, adding a second defending claim, leading to a fairly frequent triangular shape (‘empty triangles’ can be OK!) with a double claim in the interior of the triangle (we will avoid marking claims on occupied squares, except where they can be attacked.)
That has started giving some of the frequent shapes of JadeJack, that emerge naturally out of its basic ‘atomic’ strengths. A four-square shape can survive by itself, each corner lending a defending strength to its two neighbours; on the side of the board, the same is true for just two pieces, though they may need to double up and become 2-high; but better at the side of a board is a triangle, so there is some territory, or a ‘monkey jump’ between the two pieces. (Only double claims indicated on these two diagrams.) A ‘bamboo joint’ shape also emerges naturally, with double claims between the pieces.
A knight’s move extension is a strong developmental shape which can be easily consolidated. A 4-square shape of course has no territory; players score for (unoccupied) territory where their claims are greater, so that is a shape of last resort, where the other player has cut off possibility of development. Let’s look at some of the 11x11 games which are being played, to see these shapes and how they develop and consolidate on the board, and gain territory.
At this point, play 26, white has just played at j4. You can see the use of knight’s-move plays, defending by playing alongside one of your own pieces, and a triangle facing a knight’s-move play, so starting an area from which black is excluded.
A few plays later, and the board has developed. D7 looks vulnerable: a piece which gets surrounded on three sides can no longer muster enough support from the one direction left open to it. A parallel formation (‘bamboo joint’) has formed on the left side, one row away from the edge (j5 was the last play). From limited experience of playing on an 11x11 board, the third row can be problematic (“there is death on the third row”!), since an opposing player can invade between it and the edge of the board; conversely it would require more pieces to secure that territory. The triangle has extended on one side, alongside one of the knight’s move plays.
An important part of the value of a knight’s move play is that is maximises contiguous territory. Granted they are only single claims, and it will need consolidating as play proceeds, but it is a solid starting point. Note also that there are no 2-high stacks yet in the game above; they would be an inefficient use of peices for territory influence at this point in the game.
We need to introduce the territorial strengths of higher stacks and the blocking rule. A 3-high stack, which can only come about as a result of a successful attack, has claims over three squares orthogonally and adds a diagonal strength. Remember tbat one piece can always be added to a succesful attack (on a subsequent turn). A 4-higb stack will have the range over which claims are exerted increased by one, that is to four squares orthogonally and two squares diagonally. ‘Blocking’ is a important way of limiting the strength of stacks, so they don’t pile up strengths in the same direction which would become overwhelming. I will use the diagram on the efbweb site, where formal rules are stated (efbweb.uwclub.net), since the diagram is clearer, showing the strengths on occupied squares as well. The rule states that if all intervening squares are occupied, a stack has no claim on a square at which it would normally have a claim. Strictly, this is only applied to orthogonal claims, though the Gorrion game playing site may have implemented it for diagonal strengths as well. Other games have similar blocking rules, for instance the TumbleWeed game, but implemented as ‘line-of-site’ blocking, that is to say, after the first occupied square encountered, the stack thereafter has no more claims – which is more restrictive. The JadeJack rule is more subtle and less restrictive.
Let’s return to the game and see how they are getting on. Rather than occupying k9, I would have consided a 2-stack at k7, defending k9 with a double claim, but also setting up additional strength at k5. Play at e2, was immediately pounced on as an opportunity for a double attack, on e2 and i2, by a 2-stack at g2. White’s influence in tbe top right corner is now as a consequence weaker. So some uses of 2-stacks. White’s defence of k2 could have been a 2-stack at k4. Black’s response of a 3-stack at 12 (to defend j1) is an efficient and elegant use of that: exerting many more claims without occupying territory that black already occupies. Then the game continues with some small knight plays – one of which also makes a large knight connection, b5-a8 – this time to the edge of the board. D7 still looks vulnerable. Apart from the upper left corner, consolidation and engagement will have to start soon.
A large knight’s move obviously does not mesh as well in its territory claims as a (small) knight’s move, and so can be broken through. One possibility with a large knight’s play, though, is a development into two (small) knight’s plays, which can be useful in initial play – or to forstall such a development. The same thing can happen with an even larger 4 by 3 knight’s play, with two additional plays.
The game we have been looking at is up to play 60. D7 has been rescued and now forms part of a black corridor from bottom left to top right (though who gets to connect through h4 and j4 is not yet decided.) The white piece below d7, e9, does not look like it has enough space – possibly to survive, but unlikely to claim territory. Influence and territory claims mid- and upper left have developed. A white invasion bottom right, black has left for the moment. Black’s pieces b2-b3-c4, though, look vulnerable without a rescuing play.
Play 69: black has secured the corridor through i4, and just threatened e9. Connected pieces have the advantage that they mutually defend each other, so the need to spend plays on defence is reduced: the connection can be through doubly-claimed spaces, which is normal and good – important territory points. Black has a 5.5 point lead at this p0int (largely as a result of the capture of i2 – the Gorrion site uses a komi of 1.5 points.)
Play 78 (black to play, who is now 7.5 points ahead): the game is entering the end game with territory being secured. E9 can be captured, and then, with consequent loss of e10, f11 can be neutralised as territory (diagonal strength from a 3-high stack on e10, plus strength from a 2-high stack on f9.) Black and white have just played in the upper and lower left corners respectively, black to secure territory, white to challenge (if white had played at a1, he would have claimed a2 and b1.) The order of play is significant now, to secure as much potential territory as possible, and also challenge or neutralise. White at a3 and c1 will attack a1, so requiring black to fill in one of his territory squares (blocking one of the attacks.)
A 2-high on h5 creates a double claim on h3, securing it for black (at the moment h3 is neutral, as a result of a single black claim from i2 and a single white claim from g3.) White could, at the moment, occupy h3, and black would then either have to occupy h4 immediately, or allow white to occupy it (either way, losing one actual territory point and one potential territory point.) If occupied by black, black would then be able to capture white on h3 – so white has to calculate the implications of the extra strengths of a 3-high black stack on h3 (probably not significant.) This sort of thinking is now repeated around the board in many places, which can be traded off one against another. White b11 or c11 would secure c11 or b11 for white; black b11/c11 would secure the same territory point for black: does white have to defend a11? white could play at a10 to defend, otherwise black can secure that by playing a second piece on a8.