Chess variants
|
by Jake Mandoshkin
|
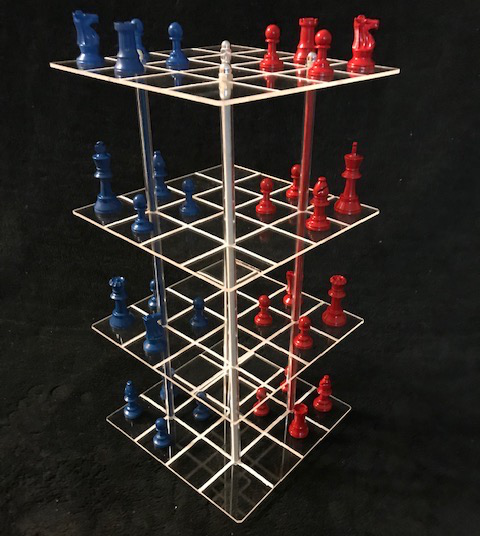
The game 3D XYZ Chess has been developed and perfected by Rick Hewson over several decades. The game is played on a 4x4x4 board with 64 spaces, the same number of spaces on a regular Chess board. Also, 3D XYZ uses the same 32 pieces as a regular Chess set, with the initial setup shown below. Note that the sets sold by the designer use Red and Blue instead of Black and White, and the boards are not checkered. You can see that the players usually face each other from opposite vertical corners of the board rather than from opposite sides.
3D XYZ Chess initial setup
White moves first, and the players take turns to move. The objective is to checkmate the opposing King. The moves of the pieces generally follow their regular Chess moves in vertical planes as well as horizontal planes.
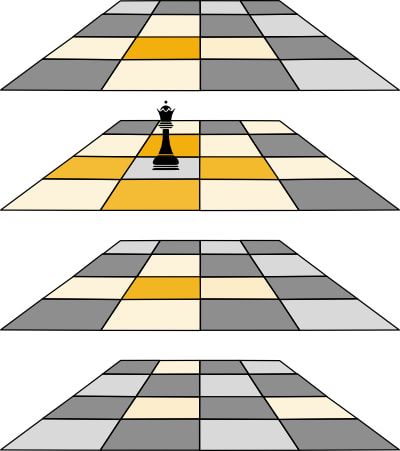
The King in 3D XYZ, however, does not have the power that a King has in regular Chess. The King is permitted to move one square orthogonally, not diagonally, as shown below left. If the King were permitted diagonal moves, too, the third dimension would give the King a lot of space, otherwise, to escape potential mating nets.
The Queen does follow the Queen's move in regular Chess, as shown below right.

King's possible moves
|
Queen's possible moves
|
Likewise, the Bishop, below left, follows its regular Chess move, although in three dimensions.
The Knight's move, shown below right, is nothing like the Knight's move in regular Chess. In 3D XYZ Chess, the Knight moves one space "triagonally." The Knight must change levels. The power of the Knight is considerably reduced compared with similar games, although the special triagonal move can be very useful tactically.
The Knight's move, shown below right, is nothing like the Knight's move in regular Chess. In 3D XYZ Chess, the Knight moves one space "triagonally." The Knight must change levels. The power of the Knight is considerably reduced compared with similar games, although the special triagonal move can be very useful tactically.

Bishop's possible moves
|
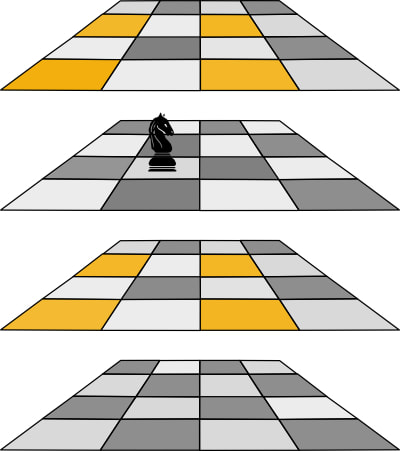
Knight's possible moves
|
Like Queen and Bishop, the Rook in 3D XYZ also follows its move in regular Chess, again in three dimensions, of course, as shown below.
Rook's possible moves
The Pawn's move is quite different from regular Chess and other versions of three-dimensional chess. Pawns cannot change level. The Pawn moves orthogonally on its level towards its opposite corner. The Pawn usually moves one space orthogonally, as shown below left.
On its initial move, a Pawn that starts off on the edge of the board can move two spaces orthogonally provided the first space is unoccupied, as shown below right.
Upon reaching the opposite corner on its level, the Pawn promotes to a Queen.
On its initial move, a Pawn that starts off on the edge of the board can move two spaces orthogonally provided the first space is unoccupied, as shown below right.
Upon reaching the opposite corner on its level, the Pawn promotes to a Queen.
Pawn's possible moves
|
Edge Pawn's possible initial moves
|
Like (almost) all chess-type games, capture of opposing pieces is by replacement. As mentioned above, the objective is to checkmate the opposing King. Stalemate is a draw.
Notation system: The levels of the board are A (top), B, C, D (bottom); on each level, the columns are named a (closest), b, c, d (furthest); on each level, the rows are names 1 (furthest to the right), 2, 3, 4 (furthest to the left).
The following annotated game is a good demonstration of how 3D XYZ Chess works. In order to make some of the exchanges comprehensible, we should make some comments about the relative values of the pieces. Firstly, and most importantly, note that the Rook can move to a maximum of nine spaces from the centre of the board, whereas the Bishop can move to a maximum of 15. Perhaps surprisingly, the Bishop is a more powerful piece than the Rook in three dimensions, despite being restricted to only half the board spaces. On the other hand, the triagonal Knight is perhaps a little less valuable than the Pawn. A Knight has potentially eight spaces to move to, but a Pawn has the possibility of becoming the massively powerful Queen.
Rick Hewson (White) and Jake Mandoshkin (Black)
March 28, 2022
1.Rb1A-c1A (A strong and safe opening move) 1....Pd3-d2C (Allowing more space to the Bishop and Rook on level D, and the Queen on level C) 2.Pa2C-a4C (A similar move to Black's, but also White threatens to trap Black's Knight on c4C.) 2...Bd3B-d2A (Threatens White's Rook and makes more space for Black's pieces including the Knight at c4C.)
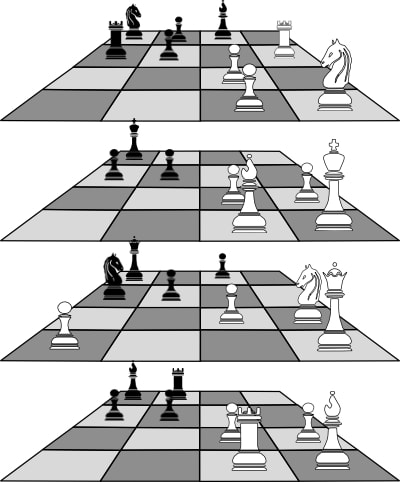
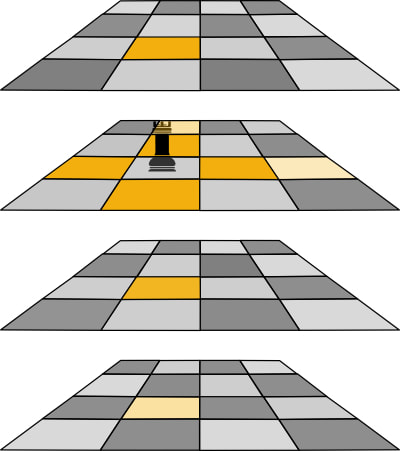
Diagram 1: Position after 2...Bd3B-d2A
|
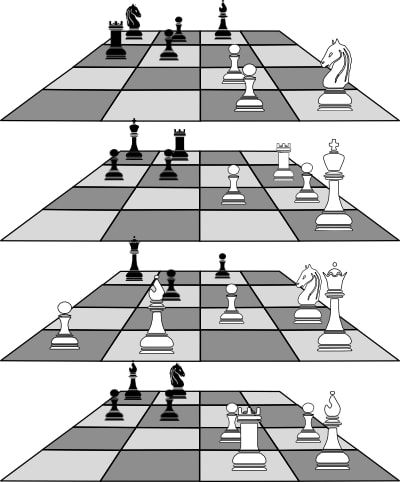
Diagram 2: Position after 4....Nc4C-d3D
|
3.Rc1A-c1B (Improving the position of the Rook) 3....Rd3D-d3B (Countering White) 4.Ba2B-a3C (Opening the square at a2B) 4....Nc4C-d3D (Giving more space to the Queen and hiding the d4D corner)
5.Pa4C-b4C?! (Prevents Black from moving to c4 but seems to overextend the Pawn and give equality to Black; however White has done some trickery with this move in the past.) 5....Rc4A-b4A (Developing the Rook and attacking the Pawn at b4C) 6.Pb2B-b3B Pc3B-c2B
5.Pa4C-b4C?! (Prevents Black from moving to c4 but seems to overextend the Pawn and give equality to Black; however White has done some trickery with this move in the past.) 5....Rc4A-b4A (Developing the Rook and attacking the Pawn at b4C) 6.Pb2B-b3B Pc3B-c2B
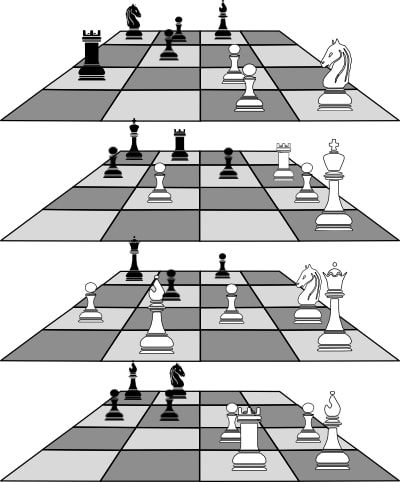
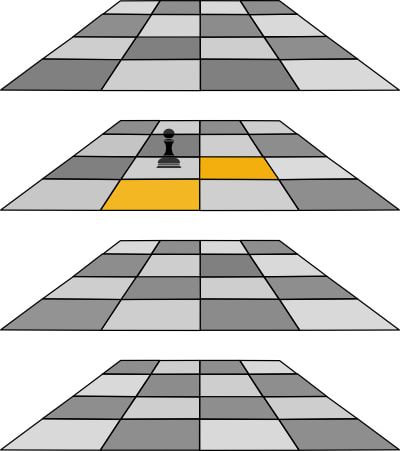
Diagram 3: Position. after 6....Pc3B-c2B
|
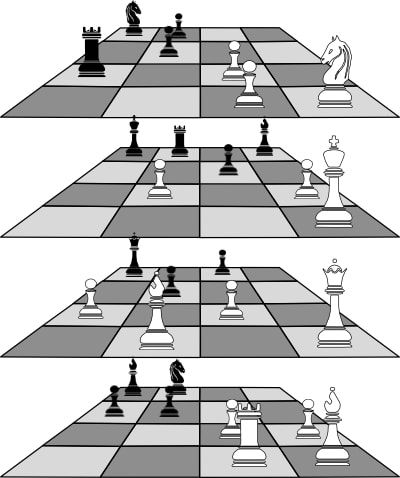
Diagram 4: Position after 8....B d2AxRd1B
|
7.N b1CxPc2B!? (Weakens Black's King's defences) 7....Pc4BxNc2B, 8.Rc1B-d1B!? (Complicating the King's level) 8....B d2AxRd1B
9.Pb1BxBd1B Rd3BxPd1B+ (Gaining tempi, but White has both Bishops, which control a lot of squares!) 10.Ka1B-a2B Rb4AxPb4C (Brings the Rook into play while removing some restrictions)
9.Pb1BxBd1B Rd3BxPd1B+ (Gaining tempi, but White has both Bishops, which control a lot of squares!) 10.Ka1B-a2B Rb4AxPb4C (Brings the Rook into play while removing some restrictions)
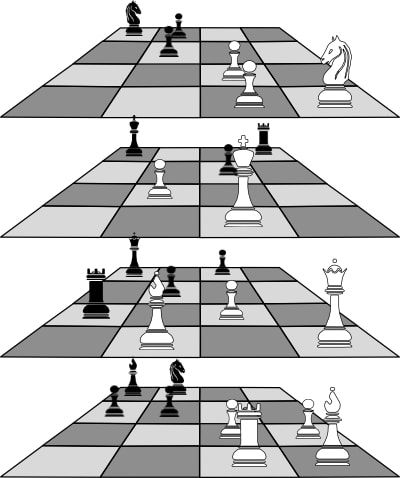
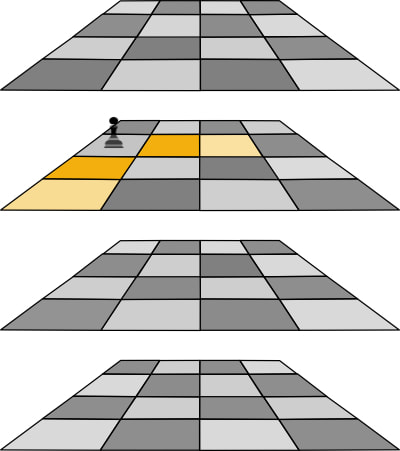
Diagram 5: Position after 10....Rb4AxPb4C
|
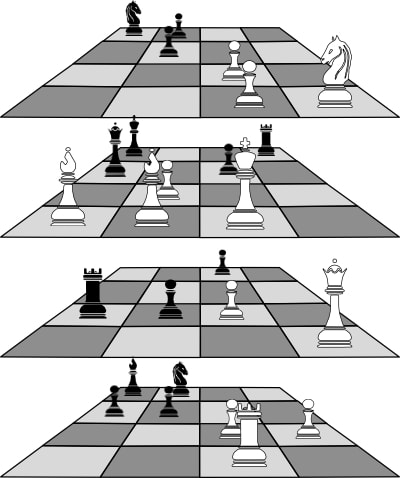
Diagram 6: Position after 12....Qd4C-c4B
|
11.Ba1D-a3B (Defends and threatens to attack at the same time) 11....Pc3C-b3C (Pushing the Bishop from a3C; White's Pawn on b2C cannot capture the Pawn, as it would allow Black's Qd4C to capture White's Queen on a1C with check.) 12.Ba3C-a4B Qd4C-c4B (Pins the weak Pawn at b3B to the King and attacks the Bishop at a4B)
13.Ba4B-a3A Bd4D-b4B (Keeping up pressure while developing) 14.Na1A-b2B! (Strong move; if 14....Pc2BxNb2B+ then 15.Ba3BxPb2B+, putting Black's King in danger while gaining tempo and disabling Black's Knight at d4A) 14....Pc3A-b3A (To remove the Bishop defender of the Pawn at b3B)
13.Ba4B-a3A Bd4D-b4B (Keeping up pressure while developing) 14.Na1A-b2B! (Strong move; if 14....Pc2BxNb2B+ then 15.Ba3BxPb2B+, putting Black's King in danger while gaining tempo and disabling Black's Knight at d4A) 14....Pc3A-b3A (To remove the Bishop defender of the Pawn at b3B)
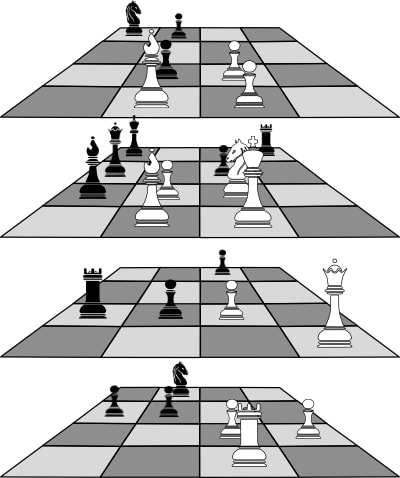
Diagram 7: Position after 14....Pc3A-b3A
|
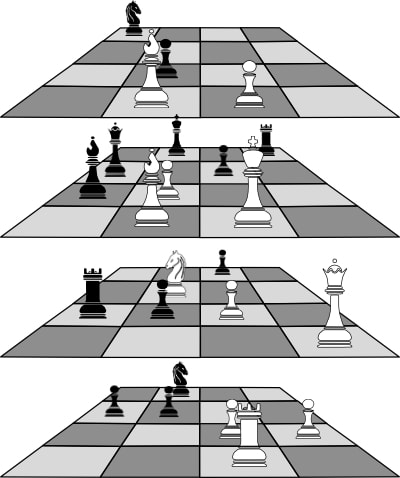
Diagram 8: Position after 16....Pd3AxPb3A
|
15.Nb2B-c3C+ Kd4B-d3B, 16.Pb2AxPb3A Pd3AxPb3A
17.Nc3CxBb4B Pb3AxBa3A, 18.Ka2B-a2C? (Trying to escape danger, but walks into a mating net) 18....Pb3CxPb2C+
17.Nc3CxBb4B Pb3AxBa3A, 18.Ka2B-a2C? (Trying to escape danger, but walks into a mating net) 18....Pb3CxPb2C+

Diagram 9: Position after 18....Pb3CxPb2C+
|
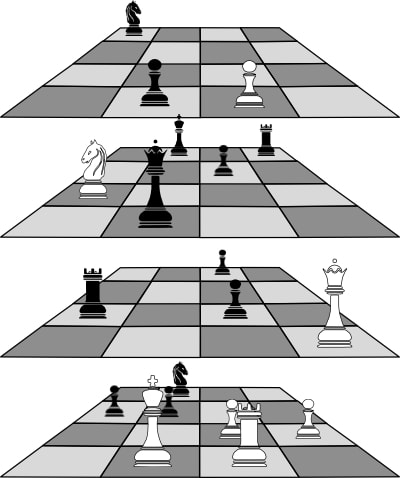
Diagram 10: Position after 20....Qb3BxBa3B+
|
19.Ka2C-a3C Qc4BxPb3B+, 20.Ka3C-a3D Qb3BxBa3B+
21.Qa1C-a3C Qa3B-c3B+, 22.Qa3C-b3C Qc3BxQb3C# ◾️
21.Qa1C-a3C Qa3B-c3B+, 22.Qa3C-b3C Qc3BxQb3C# ◾️
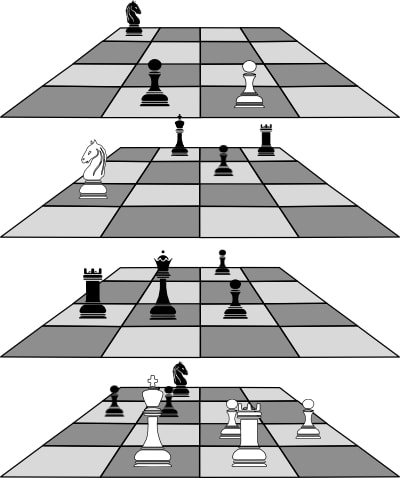
Diagram 11: Final position after 22....Qc3BxQb3C#