Hex variants
|

by Larry Back
|
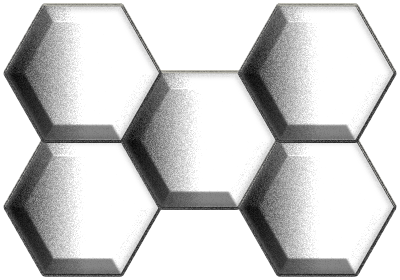
In this article I would like to introduce a connection game that I recently created called Rectangle Hex. Diagram 1 shows the Rectangle Hex board. Rectangle Hex is a variant of Hex. The rules of Hex and Rectangle Hex are the same, only the boards differ. Black has the first move in Rectangle Hex. Black wins by connecting the top and bottom jagged edges while White wins by connecting the left and right smooth edges. Draws are not possible. The pie rule is used to balance the game: To begin the game, one player places the first black piece on the board and then the other player chooses to continue playing from that position as either Black or White. The player that becomes White makes the next move and players alternate moves for the rest of the game.
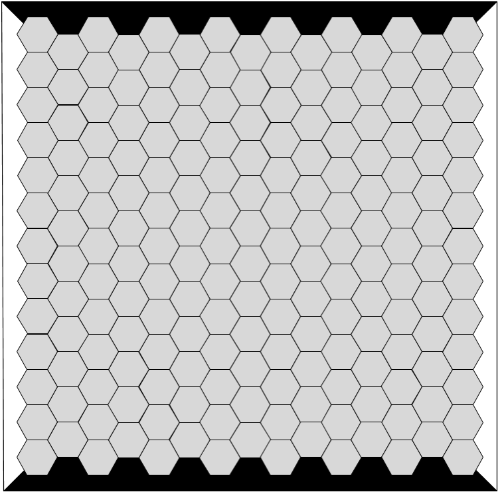
Diagram 1: Rectangle Hex board
Rectangle Hex is fairly unique among connection games in that the board is asymmetrical when comparing Black’s winning objective to White’s winning objective. Attempting to connect the two jagged edges is obviously a different task than attempting to connect the two smooth edges. In Hex, due to the symmetry of the board, if Black is given the first move of the game, then for any first move by Black it can be shown that there is a symmetrically equivalent first move by White if White is given the first move of the game. In fact, except for a first move to the central cell by Black, every Black first move will have two equivalent first moves that White can make. In some cases, one of these equivalent first moves by White could be to the same cell as Black’s first move. For example, if Black’s first move is to a corner cell then that move is equivalent to a first move by White to either the same corner cell or to the opposite corner cell. In other cases, White will have two equivalent first moves on different cells than Black’s first move. Diagram 2 shows a possible first move by Black, in Hex, to the cell with the black piece and the symmetrically equivalent first moves by White to either of the two cells with the white piece.

Diagram 2: Hex board with first move by Black and equivalent first moves by White
Rectangle Hex does not have this property. For any first move by Black there is no symmetrically equivalent first move by White. Given that the board is not symmetrical it may seem that one pair of opposite edges would be easier to connect than the other pair. And, as a result, one player would start the game with an unfair advantage. However, one player starts out with an unfair advantage in connection games played on symmetrical boards too, given that one player gets to have the first move. Therefore, in order to give both players relatively even chances of winning in a connection game played on a symmetrical board, the pie rule is usually adopted. But while the pie rule can be used to even the chances for both players in a connection game played on a symmetrical board, it can also be used to even the chances for both players in a connection game played on an asymmetrical board, such as the Rectangle Hex board.
Therefore, by simply adopting the pie rule, Rectangle Hex becomes a playable game with relatively even chances for both players despite being played on a board that is not symmetrical.
I should mention that the Rectangle Hex board obviously has a type of symmetry. The top half of the board is the mirror image of the bottom half of the board. The left half of the board is the mirror image of the right half of the board. Therefore, for most first moves by Black, there are three other first moves by Black that are symmetrically equivalent. But because the top and bottom jagged edges, that Black is trying to connect, are different than the left and right smooth edges, that White is trying to connect, we can say that the board is asymmetrical when comparing Black’s winning objective to White’s winning objective.
Most connection games have arbitrary board sizes. A typical board size for Hex is 11x11 but other board sizes can, and are, used to play Hex. But for a symmetrical board with an equal length and width there is only one dimension that needs to be determined when it comes to board size. For Rectangle Hex, not only must an arbitrary length be chosen but an arbitrary width must be chosen as well.
When deciding on board length and width the main concern should be that there are some winning first moves for Black and there are some losing first moves for Black. And among these moves there should also be some seemingly neutral first moves where it is difficult to determine whether they are winning moves or losing moves. If the board is too wide then there may be no losing first moves for Black. If the board is too narrow then there may be no winning first moves for Black. Obviously, in either case, it would not be a fair game.
As an example, Diagram 3a shows a small 2x3 Rectangle Hex board that is somewhat wide. The B in each cell indicates a winning first move for Black. It turns out that all first moves for Black are winning moves on this board. Diagram 3b shows that if White had the first move on this board, then White would have one winning first move as indicated by the cell containing a W.
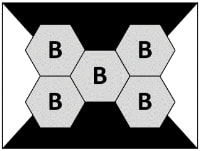
Diagram 3a: Black’s winning first moves
|
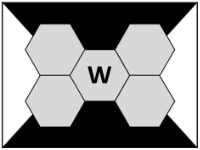
Diagram 3b: White’s winning first move
|
Diagram 4a shows a more balanced 3x3 board. Now Black has only two winning first moves as indicated by the two cells containing a B. Diagram 4b shows that White also has two winning first moves on the 3x3 board as indicated by the two cells containing a W. Interestingly, the winning first moves for Black on this board are both different than the winning first moves for White.
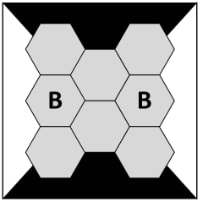
Diagram 4a: Black’s winning first moves
|
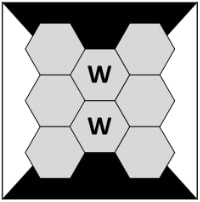
Diagram 4b: White’s winning first moves
|
Diagram 5a shows a narrower 4x3 board. Now Black has no winning first moves. This means that every first move by White is a winning move on the 4x3 board as shown in Diagram 5b where each cell contains a W.
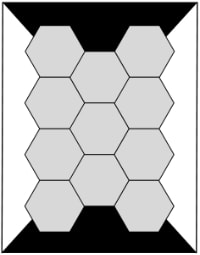
Diagram 5a: Black has no winning first moves.
|
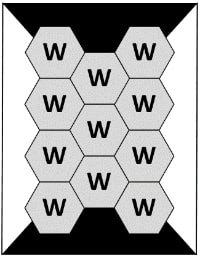
Diagram 5b: White’s winning first moves
|
Looking at boards with the next biggest width, Diagram 6a shows that on a 4x5 board there are only two first moves for Black that are not winning moves. Diagram 6b shows that White has six winning first moves on this board.
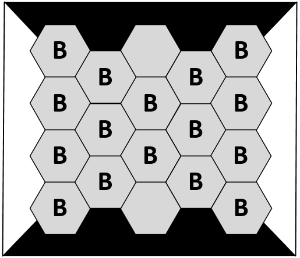
Diagram 6a: Black’s winning first moves
|
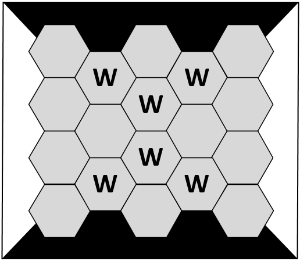
Diagram 6b: White’s winning first moves
|
Diagram 7a shows the 5x5 board. According to my analysis, Black has four winning first moves and nineteen losing first moves. It is a little surprising that a first move to the central cell loses for Black. The reason this is surprising is because it is fairly obvious that the quickest win in 5x5 Hex, taking at most seven moves in total, is achieved by playing to the central cell to start the game. And yet a first move to the central cell in 5x5 Rectangle Hex is a losing move for Black even though there are other first moves for Black that win.
Diagram 7b shows that White has fifteen winning first moves and eight losing first moves on the 5x5 board. Clearly, based on this analysis, connecting the two smooth edges on the 5x5 board is an easier task than connecting the two jagged edges.
Diagram 7b shows that White has fifteen winning first moves and eight losing first moves on the 5x5 board. Clearly, based on this analysis, connecting the two smooth edges on the 5x5 board is an easier task than connecting the two jagged edges.
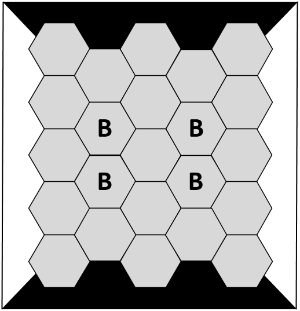
Diagram 7a: Black’s winning first moves
|
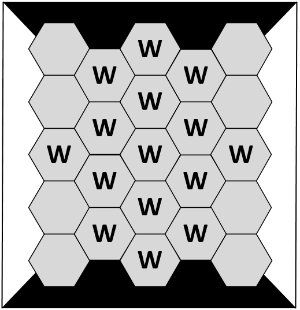
Diagram 7b: White’s winning first moves
|
To demonstrate what might happen after Black makes a first move to the central cell on a 5x5 board, Diagrams 8a and 8b show a couple of possible continuations after that move. In both continuations White ends up connecting the two smooth edges.
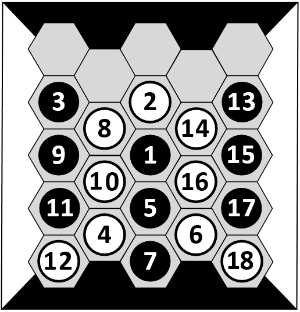
Diagram 8a: White wins after Black’s move 1.
|
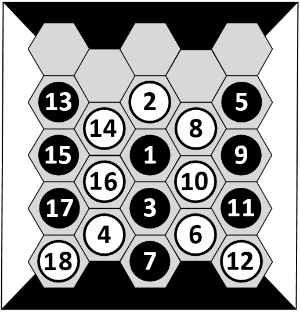
Diagram 8b: White wins after Black’s move 1.
|
Black, not surprisingly, has no first move win on the 6x5 board with the result that every first move for White is a winning move on this board.
Trying to determine Black’s first move wins on both the 6x7 board and the 7x7 board stretches my analytical ability to the breaking point. But I am reasonably sure that my analysis is correct, or at least close to it. Diagram 9a shows Black’s first move wins on the 6x7 board while Diagram 9b shows White’s first move wins on the 6x7 board.
Trying to determine Black’s first move wins on both the 6x7 board and the 7x7 board stretches my analytical ability to the breaking point. But I am reasonably sure that my analysis is correct, or at least close to it. Diagram 9a shows Black’s first move wins on the 6x7 board while Diagram 9b shows White’s first move wins on the 6x7 board.
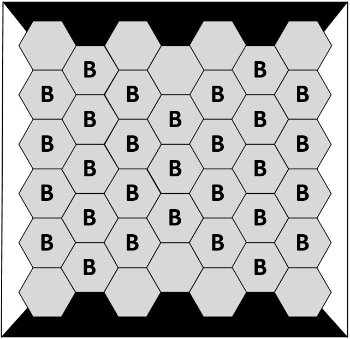
Diagram 9a: Black’s winning first moves
|
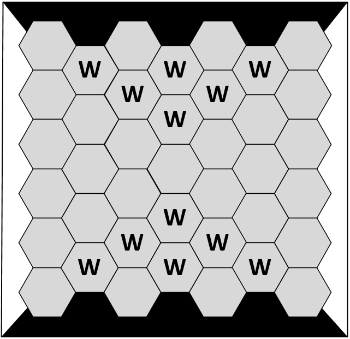
Diagram 9b: White’s winning first move
|
Diagram 10a shows, somewhat surprisingly, that Black only has four winning first moves on the 7x7 board. Diagram 10b shows, less surprisingly, that all of White’s first moves are winning moves except for moves along the white edge.
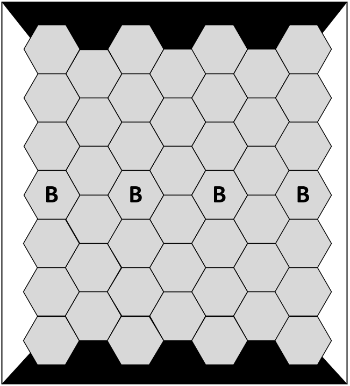
Diagram 10a: Black’s winning first moves
|
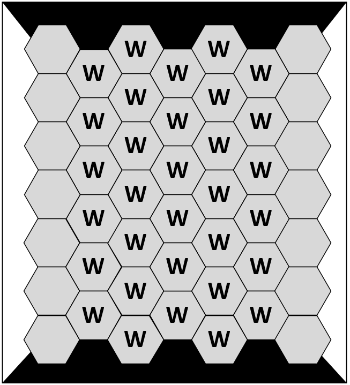
Diagram 10b: White’s winning first moves
|
It is no surprise that Black has no first move win on the 8x7 board with the result that every first move for White is a winning move on this board.
The point of this exercise in determining the winning first moves for Black and White on various small board sizes is to get an idea of the size and shape of an ideal Rectangle Hex board that would give Black some winning first moves and some losing first moves as well as some seemingly neutral first moves. Having looked at winning and losing first moves for both Black and White on these smaller boards, it is apparent that a Rectangle Hex board skews in favour of White. Therefore, it seems a big board should be slightly wide with the two black edges closer together than the two white edges. I have found two board sizes that seem to give Black a reasonable number of first move wins and first move losses. These board sizes are the 10x11 board and the 13x15 board. The 10x11 board seems a little small for an interesting game though. For this reason, I have chosen a standard board size of 13x15 for Rectangle Hex as shown in Diagram 1. This board contains a total of 188 cells.
I can think of three other connection games that can be compared to Rectangle Hex. One of these games is Unlur, created by Jorge Gómez Arrausi. Unlur is the winner of the 2002 Unequal Forces Game Design Contest. In Unlur, both players have different objectives. Black has the more difficult to achieve objective than White. But there is a rule that balances the winning chances of each player by ensuring that Black will start out with more pieces on the board than White. Diagram 11 shows an Unlur board with eight cells along the edge. (Other board sizes are used as well.) The first white piece has been placed on the board after nine black pieces have been placed on the board. This position was taken from a game played on the Gorrion website. We can see that Unlur is played on a board comprised of regular hexagons and has an overall hexagonal shape. In other words, the game is played on a hex hex board. So, while the objective for each player is different, like Rectangle Hex, the Unlur board is symmetrical, unlike Rectangle Hex. (By the way, not that I think I would have won, but I wish that I had entered Rectangle Hex into the 2002 Unequal Forces Game Design Contest. Unfortunately, I missed the deadline by about twenty years.)
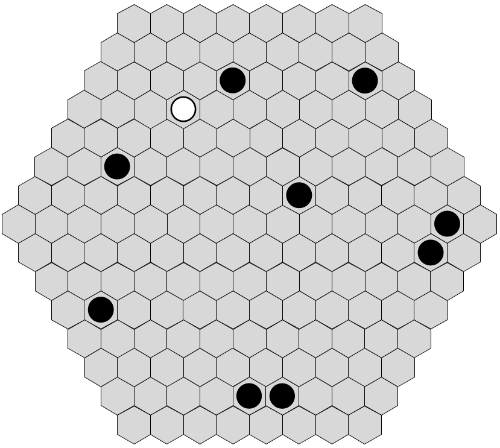
Diagram 11: Unlur position after first move by White
Another game that can be compared to Rectangle Hex is Atoll, created by Mark Steere. Atoll was featured in the May 2008 issue of Games magazine. The Atoll board is shown in Diagram 12. Having both jagged and smooth edges, it is obvious that the Atoll board is very similar to the Rectangle Hex board. However, there are two differences. One difference is that Atoll has four obtuse corners rather than four acute corners as in Rectangle Hex. This is not an important difference though. Atoll would probably work just as well with acute corners as it does with obtuse corners. The more important difference is that the Atoll board has eight sides. That is, Black has four sides and White has four sides. Each of the two jagged edges and each of the two smooth edges is split evenly into a black side and a white side. The objective in Atoll is for players to connect a pair of their opposite sides with their pieces. This can be done directly or this can be done indirectly by connecting each opposite side to the same one of the player’s other two sides. Exactly one player will end up achieving this goal. Draws are not possible.
Since each edge of the Atoll board is divided between a black side and a white side this creates a symmetry that Rectangle Hex does not have. To demonstrate this point, Diagram 12 shows a possible first move by Black, in Atoll, to the cell with the black piece and the equivalent first moves by White to either of the two cells with the white piece.
Since each edge of the Atoll board is divided between a black side and a white side this creates a symmetry that Rectangle Hex does not have. To demonstrate this point, Diagram 12 shows a possible first move by Black, in Atoll, to the cell with the black piece and the equivalent first moves by White to either of the two cells with the white piece.
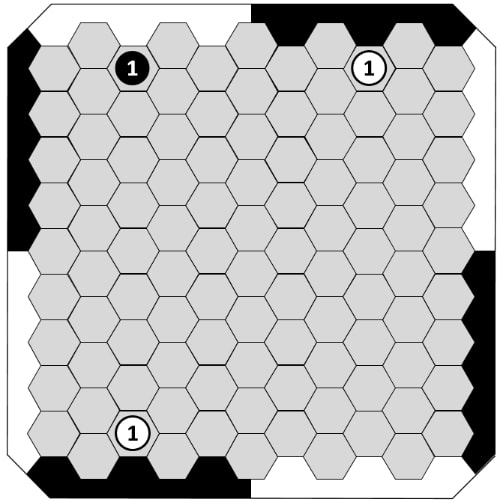
Diagram 12: Atoll board with first move by Black and equivalent first moves by White
One other connection game that can be compared to Rectangle Hex is Uneven Hex. Diagram 13 shows a 5x6 Uneven Hex board. Black has the more difficult to achieve objective in trying to connect the two black edges given that these edges are smaller and are farther apart than the white edges. But, unlike in Rectangle Hex, the pie rule does not balance the winning chances for each player. This is because Black has no winning first move in Uneven Hex. The letters in Diagram 13 show how White can win any game no matter what first move Black makes. Every cell shares the same letter with one other cell. All White needs to do, after each of Black’s moves, is to move to the cell with the same letter as the cell that Black just moved to. Using this method, White is guaranteed to win.
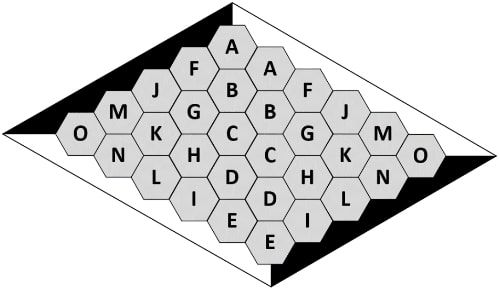
Diagram 13: Uneven Hex board
Aside from the idea of a connection game played on an asymmetrical board, one other noteworthy aspect of Rectangle Hex is that two of the edges are jagged (just like in Atoll) and this creates some intriguing differences in edge templates when compared to edge templates on smooth edges. It is interesting to look at various edge templates where Black is trying to connect a black piece to the bottom jagged edge while White is trying to stop Black from doing that. Each template consists of a somewhat triangular shaped portion of the board that includes the bottom edge and has one black piece that occupies the top cell of the template. For each template, if there are no White pieces in the template then White cannot stop the black piece from reaching the edge. But edge templates along jagged edges are different than edge templates along smooth edges because White sometimes needs to have two pieces in the template, instead of just one, as well as the next move, in order to stop the black piece from connecting to the edge.
Diagram 14 shows the smallest template along a jagged edge. This template consists of three empty cells, labelled A, B, and C. White will need two pieces, not just one, on this template. That is, White will need pieces on cells A and B, or A and C, or B and C, as well as the next move, which would obviously need to be made to the remaining unoccupied cell on the template, in order to stop the black piece from connecting to the edge.
Diagram 14 shows the smallest template along a jagged edge. This template consists of three empty cells, labelled A, B, and C. White will need two pieces, not just one, on this template. That is, White will need pieces on cells A and B, or A and C, or B and C, as well as the next move, which would obviously need to be made to the remaining unoccupied cell on the template, in order to stop the black piece from connecting to the edge.

Diagram 14: Edge template with 3 empty cells
Diagram 15 shows the next biggest edge template. This template consists of seven empty cells. This time, instead of three cells, we can say there are three regions, and White needs to occupy two of the three regions. The regions are: A consisting of three cells, B consisting of one cell, and C consisting of three cells. White needs to have a piece in regions A and B, or A and C, or B and C, as well as the next move, which must be made to the remaining unoccupied region, in order to stop the black piece from reaching the edge.
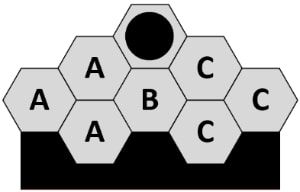
Diagram 15: Edge template with 7 empty cells
Diagram 16 shows the next biggest edge template. This template consists of twelve empty cells. This template turns out to be quite complicated. This is because there are now seven regions, and these regions overlap.
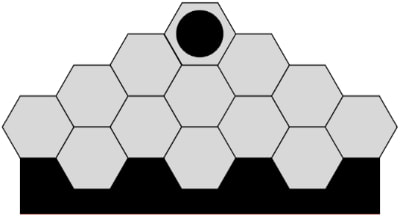
Diagram 16: Edge template with 12 empty cells
These seven regions are shown in isolation in Diagrams 17a, 17b, 18a, 18b, 19a, 19b, and 20. The regions are: A consisting of 4 cells, B consisting of 3 cells, C consisting of 3 cells, D consisting of 3 cells, E consisting of 3 cells, F consisting of 3 cells, and G consisting of 4 cells.
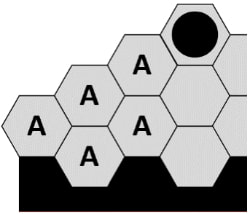
Diagram 17a: Region A of template
|
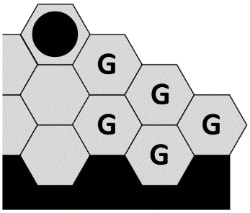
Diagram 17b: Region G of template
|
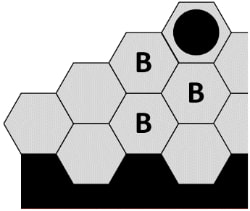
Diagram 18a: Region B of template
|
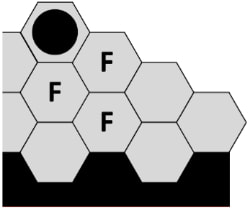
Diagram 18b: Region F of template
|
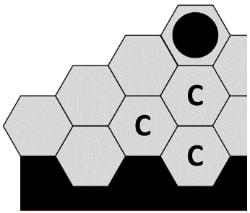
Diagram 19a: Region C of template
|
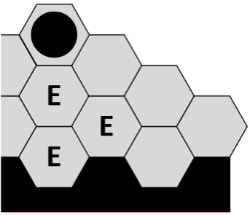
Diagram 19b: Region E of template
|
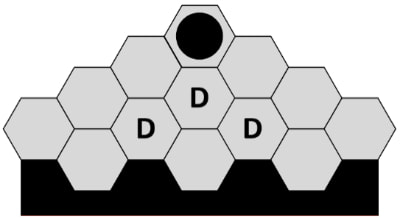
Diagram 20: Region D of template
Diagram 21 shows the overlap of the regions. Each cell in Diagram 21 is included in one, two, four, or five regions as indicated by the letters. The key to stopping the black piece from connecting to the bottom edge on this template is for White to have pieces that occupy some of these regions to begin with and then make a move that causes White to end up occupying all seven regions.
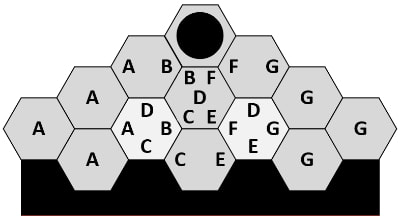
Diagram 21: Seven overlapping regions are shown in the template.
There are two cells in the template of Diagram 21 that White can occupy that will allow White to have just one piece in the template, along with the next move, and still be able to stop the black piece from connecting to the bottom edge. These are the cells that are highlighted and contain the four letters A, B, C, D, or D, E, F, G. If White has a piece on one of these highlighted cells then White just needs to move to the other highlighted cell. After such a move, White will have a piece on each of the seven regions A through G and will therefore be able to stop the black piece from connecting to the edge.
It may seem that the cell below the black piece with the five letters B, C, D, E, F is the best cell for White to occupy in this template since this cell is in five regions all by itself. But this cell is not in region A or region G. And since those two regions do not overlap there is no opportunity for White to simultaneously occupy those two regions with the next move. Therefore, a white piece on the cell below the black piece cannot, by itself, stop the black piece from reaching the edge.
If White does not have a piece on one of the highlighted cells then White will need to have at least two pieces in the template to begin with, and also have the next move. But it is important that White have two pieces that occupy enough regions so that there is a White move that causes White to end up occupying all seven regions. For example, in Diagram 22, White has two pieces in the template and has the next move. But the two pieces together only occupy regions A, C, E. There is no move that will occupy the remaining regions B, D, F, G, given that region B and region G do not overlap. From this position, White will not have a move that stops the black piece from reaching to the edge.
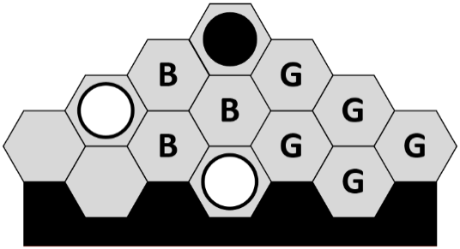
Diagram 22: White cannot stop the black piece from reaching the edge.
Diagram 23 shows the next biggest edge template. This template consists of 18 empty cells. It turns out that there are four cells that White can occupy in this template that would enable White, with just one piece in the template and the next move, to stop the black piece from reaching the edge. These are the two cells labeled A and the two cells labeled B. If White has a piece on one of the A cells then a move to the other A cell stops Black. Similarly, if White has a piece on one of the B cells then a move to the other B cell also stops Black. If White does not have a piece on one of the A or B cells then White will need at least two pieces on the template, as well as the next move, in order to stop the black piece from reaching the edge.
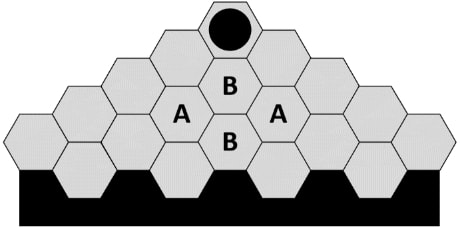
Diagram 23: Edge template with 18 empty cells
The cells not labelled A or B can be divided into two regions. There is region C on the left and region D on the right as shown in Diagram 24.
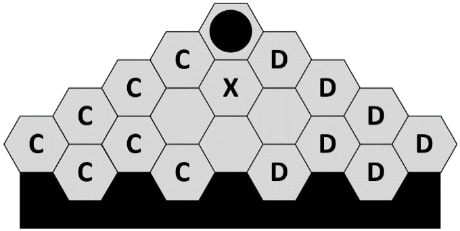
Diagram 24: Regions C and D of template
It turns out that if White has a piece in each of these regions, regardless of which cell each piece occupies in the two regions, then a move to the cell labelled X will always stop Black.
Diagram 25 shows an attempt by Black to reach the edge where White has a piece in each of regions C and D and has just moved to the X cell. Black tries to connect to the jagged edge, first on the left and then on the right, but does not succeed.
Diagram 25 shows an attempt by Black to reach the edge where White has a piece in each of regions C and D and has just moved to the X cell. Black tries to connect to the jagged edge, first on the left and then on the right, but does not succeed.
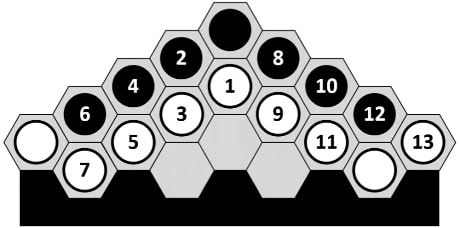
Diagram 25: White stops the black piece from reaching the edge.
If White has two pieces in the template, and they are either both in region C or they are both in region D then, depending on which cells these pieces occupy, it is still possible for White to stop the black piece from reaching the edge. In Diagrams 26a, 26b, 27a, 27b, 28a, and 28b, White has two pieces in the right place to enable White, with a move to the cell labelled X, to stop the black piece from reaching the edge. Any other position in this template where White has two pieces in region C or has two pieces in region D, and no other pieces in the template, will be a position where White cannot stop Black from reaching the edge.
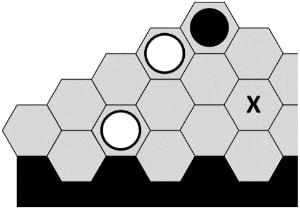
Diagram 26a: A White move to X stops Black.
|
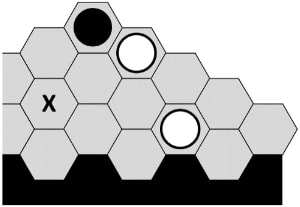
Diagram 26b: A White move to X stops Black.
|
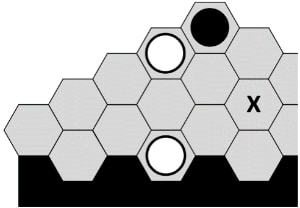
Diagram 27a: A White move to X stops Black.
|
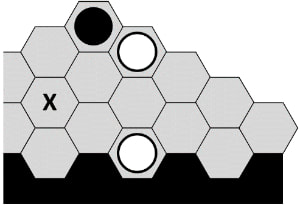
Diagram 27b: A White move to X stops Black.
|
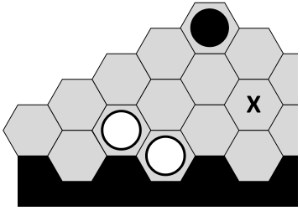
Diagram 28a: A White move to X stops Black.
|
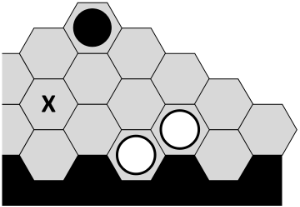
Diagram 28b: A White move to X stops Black.
|
It is instructive to see how these templates work in an actual game. In Diagram 29, Black has moved to 1 in the bottom half of the board. This piece is on a partial template along the bottom edge as indicated by the highlighted cells.
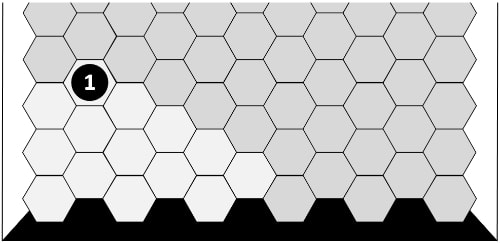
Diagram 29: The black piece is on a partial template.
Diagram 30 shows an equivalent full template with five white pieces occupying the cells that are missing from the partial template in Diagram 29. Comparing the template in Diagram 30 to the templates in Diagrams 23, 24, 26a, 27a, and 28a, we see that White occupies five cells in region C but does not occupy any A or B cells or any cells in region D. While White occupies five cells in region C these cells do not include both of the cells occupied by the white pieces in Diagram 26a. Nor do these five cells in region C include both of the cells occupied by the white pieces in Diagram 27a. Furthermore, these five cells in region C do not include both of the cells occupied by the white pieces in Diagram 28a. Therefore, White cannot stop the black piece from reaching the edge in the full template in Diagram 30 or the equivalent partial template in Diagram 29.
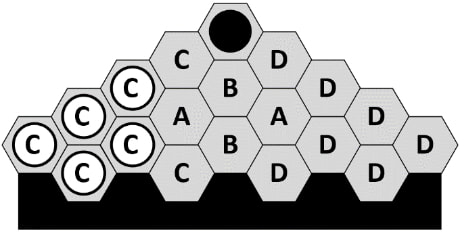
Diagram 30: White cannot stop the black piece from reaching the edge.
Having looked at this template it is interesting to revisit Diagram 9b and see why a White first move to the central cell on a 6x7 board loses for White. Diagram 31 shows that Black can answer the White move to 1 with 2. The black piece at 2 is now on the same partial template along the bottom of the board as the template in Diagram 29. But this piece is on a separate equivalent template along the top of the board too. The cells in these two separate templates are highlighted. Now White cannot stop the black piece at 2 from connecting to both the bottom of the board and the top of the board. Hence, White’s move to 1 is a losing move on the 6x7 board. And not only is 1 a losing move for White on this board but any other first move by White that is not in one of the highlighted cells of the top or bottom template will also lose. But even if White’s first move is to one of the highlighted cells Black can respond with a move 2 to the cell labelled X and therefore be on two different but symmetrically equivalent top and bottom templates. This means that any move 1 by White must be on both of these upper symmetrically equivalent templates or must be on both of these lower symmetrically equivalent templates in order to be a winning move. Looking at Diagram 9b we can see that all of White’s winning first moves satisfy this condition.
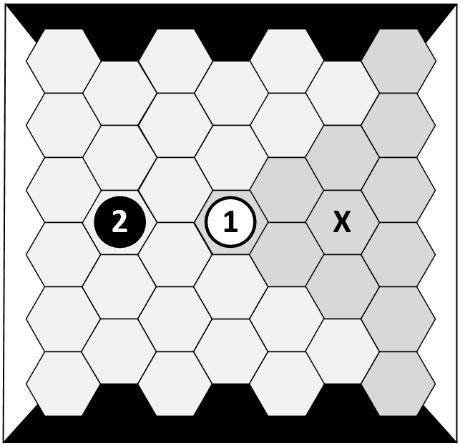
Diagram 31: The black piece is on two separate templates.
It should be mentioned that there are positions where White might be able to stop a black piece on a template from reaching the jagged edge even though White does not have sufficient pieces in the template to do so. Sometimes White can place a piece in the template where this move threatens to make a connection outside the template that Black feels compelled to block. If Black responds to this connection threat then White, with the extra piece in the template, may now have enough pieces in the template to stop the black piece from reaching the edge.
For example, in Diagram 32, the black piece at A is on a template. White has one piece on this template but this piece is not sufficient to stop the black piece from reaching the bottom edge.
For example, in Diagram 32, the black piece at A is on a template. White has one piece on this template but this piece is not sufficient to stop the black piece from reaching the bottom edge.
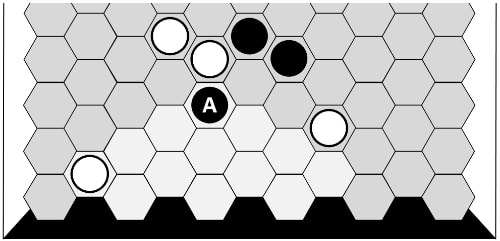
Diagram 32: Black piece at A is on a template.
However, the White move to 1, in Diagram 33, threatens to connect to the white piece at B by a move to C. The piece at 1 is in the template and this move gives White enough pieces in the template to stop the black piece from reaching the edge. If Black responds to 1 by moving to C in order to block the connection between 1 and B then White can play to D in the template and stop the black piece at A from reaching the bottom edge.
Diagram 33: White piece at 1 makes two threats.
The next biggest template is shown in Diagram 34. This template, with twenty-five empty cells, is similar to the template in Diagram 23 but it is more complicated.
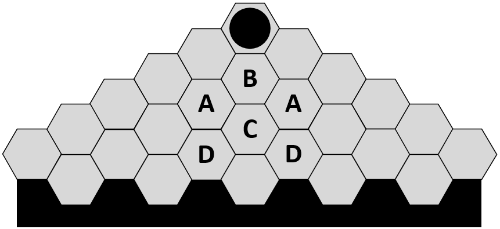
Diagram 34: Edge template with 25 empty cells
In this template, White can stop Black if White has a piece on any of the cells labelled A, B, C, or D and also has the next move. If White has a piece on an A cell then White’s next move must be to the other A cell. If White has a piece on the B cell then White’s next move must be to the C cell or to either D cell. If White has a piece on the C cell then White’s next move must be to the B cell. And if White has a piece on a D cell then White’s next move must be to the other D cell or to the B cell.
The cells not labelled A, B, C, or D can be divided into two regions, just as in Diagram 24. There is region E on the left and region F on the right as shown in Diagram 35.
The cells not labelled A, B, C, or D can be divided into two regions, just as in Diagram 24. There is region E on the left and region F on the right as shown in Diagram 35.
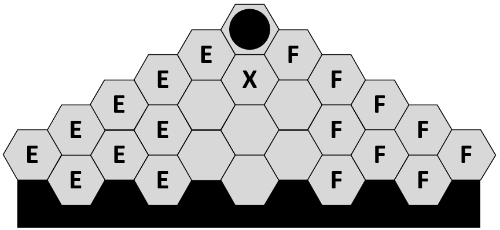
Diagram 35: Regions E and F of template
Similar to the template in Diagram 24, if White has a piece on any cell in each of the regions E and F then White can stop Black with a move to the cell labelled X.
If White does not have a piece in each of the regions E and F but has two pieces in one of those two regions then, depending on which cells these pieces occupy, it is still possible for White to stop the black piece from reaching the edge. In Diagrams 36a and 36b there is one white piece in either region E or region F. If White has another piece in the same region that is on one of the two cells labelled H then White can move to the X cell and stop Black.
But even if the white piece in Diagrams 36a and 36b is the only piece in region E or region F then White can still stop the black piece if White also has a piece on the cell labelled M. In this case White needs to move to the X cell or to the Y cell on the next move in order to stop the black piece from connecting to the edge.
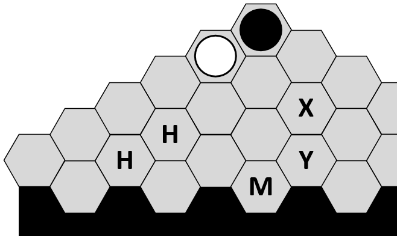
Diagram 36a: White can stop Black.
|
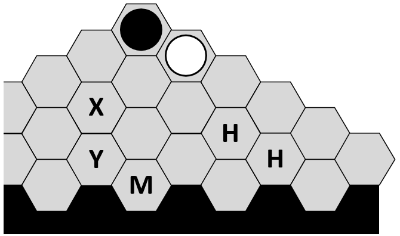
Diagram 36b: White can stop Black.
|
Finally, Diagram 37 shows a template that consists of thirty-three empty cells. This template is the biggest template that can fit on the 13x15 Rectangle Hex board. But perhaps this is enough analysis for one article. Besides, I do not wish to spoil the fun for those readers who may want to explore this template for themselves.
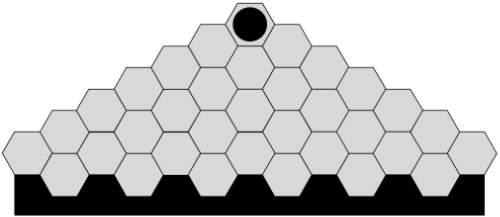
Diagram 37: Edge template with 33 empty cells
This would seem to cover the concept of Rectangle Hex. In conclusion, there may be other potential connection games that nobody has thought of because the board would be asymmetrical and this property might be considered to be unappealing. But, that objection aside, other connection games with asymmetrical boards might be quite playable by simply adopting the pie rule. Maybe Rectangle Hex will inspire someone to invent such a game. ◾️
🔴⚫️🔴⚫️🔴⚫️🔴
The author, Larry Back, has contributed prolifically to Abstract Games over the years:
And now,
In addition, Issue 287 of Games magazine (2013) published his original game Diamond.
Onyx is Larry's magnum opus, in my view, and he has amply demonstrated the depth and interest of the game in the several articles noted above. (Onyx can be played on Gorrion.)
Larry Back is a prolific game designer. What sets his style apart is the serious effort by the author himself to understand his own creations. In his articles he explains with meticulous analysis why his games are interesting! I often think Larry's work represents some of our best and most interesting content in Abstract Games. ~ Ed.
- The original game Onyx AG4
- The original games Square Hex, Head Start Hex, and Eight Sided Hex AG5
- "Onyx Strategy and Tactics" AG6
- The original game Three Crowns AG8
- "A Beautiful Move in Othello" AG9
- The original game 77 AG10
- "Onyx: Analysis of a game" AG11
- "Domain: A tile game related to Othello" AG12
- "Edge Templates in Onyx" AG17
- The original games Tip-Top-Toe and Hox AG21
And now,
- The original game Rectangle Hex
In addition, Issue 287 of Games magazine (2013) published his original game Diamond.
Onyx is Larry's magnum opus, in my view, and he has amply demonstrated the depth and interest of the game in the several articles noted above. (Onyx can be played on Gorrion.)
Larry Back is a prolific game designer. What sets his style apart is the serious effort by the author himself to understand his own creations. In his articles he explains with meticulous analysis why his games are interesting! I often think Larry's work represents some of our best and most interesting content in Abstract Games. ~ Ed.