Game design competition

|
by Kerry Handscomb
|
Back in AG17, we briefly reviewed the game design competitions we ran in the earlier series of Abstract Games. We proposed an Unequal Board Spaces Game Design Competition. In other words, the games have boards in which the effect of the spaces on the pieces is variable, as with Katarenga (AG17), Quandary, Kamisado, and others. I speculated that there may be other ways entirely of interpreting the meaning of “terrain” for abstract games.
We vacillated about a new game design competition over the succeeding year. In particular, I felt that already there were plenty of other opportunities for game designers to showcase their work elsewhere. However, Abstract Games, I hope, has a unique perspective on games that may not adequately be represented elsewhere. In addition, several game designers contacted me to ask about the Unequal Board Spaces Game Design Competition. People had already started to develop games just for the purpose of entering this competition. We must continue, then! And so, we are formally announcing the opening of the Unequal Board Spaces Game Design Competition.
Entries will be accepted until around the middle of this year, June 30, 2021. Documents with rules and diagrams should be emailed to me here. I cannot say yet that we have all the judges lined up, but I will be reaching out to a few people before June 30. Designers of the top three games will receive a complimentary copy of the hard-copy magazine in which their design is featured.
To set the scene, I would like to introduce two of the games that were already submitted, Tip-Top-Toe and Hox, both by Larry Back. Larry, of course, is well known in the pages of Abstract Games, and he has contributed many articles. The games here are obviously not necessarily the winning entries, but I think they are good examples of the kind of thing we were reaching for with the concept of "terrain" for an abstract game. For that matter, Larry's older games Onyx and Diamond would also count as games with variable board spaces. The presentations are by Larry himself. I have included some of his notes on strategy and tactics after the rules of each game.
Tip-Top-Toe
Created by Larry Back
Tip-Top-Toe is a two-player game played between Black and White (or any two contrasting colours). The game is played on a board that is comprised of nine Houses, each of which is comprised of nine squares. The nine Houses are arranged in a 3x3 array and the nine squares within each House are also arranged in a 3x3 array. Among the nine squares in each House are four Side squares, four Corner squares, and one Middle square. In total, there are 81 squares on the Tip-Top-Toe board.
Each square on the Tip-Top-Toe board is labelled with a number from 1 to 39. Each Side square shares the same number with two other Side squares. Each Corner square shares the same number with one other Corner square. Each Middle square shares the same number with no other square. Readers can use this Tip-Top-Toe board.
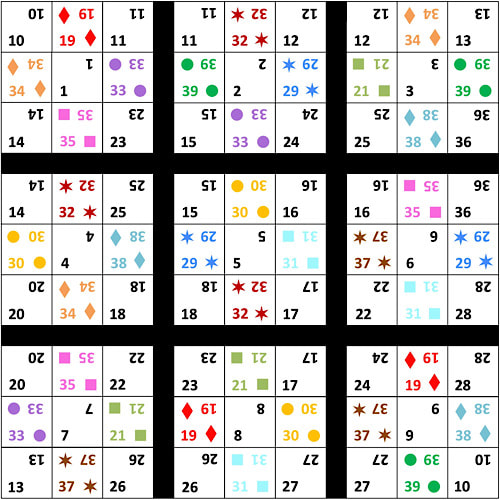
Tip-Top-Toe board
The game starts with no pieces on the board. During the game, Black will place black pieces on the board and White will place white pieces on the board. Black has the first turn and players alternate turns throughout the game. Passing a turn is not permitted.
A turn in Tip-Top-Toe consists of placing a piece on a square and then, if there are other squares labelled with the same number, placing a piece on those squares too. This means that each turn will consist of placing either three pieces on Side squares, two pieces on Corner squares, or one piece on a Middle square.
A player occupies a House if that player has three pieces in a row, diagonally or orthogonally, in that House. It is possible for both players to occupy the same House. For example, both players can have three pieces in a row horizontally, or both players can have three pieces in a row vertically, in the same House. As a result, each House will end up being occupied by one player, both players, or neither player.
The game ends when one player has occupied three Houses in a row, diagonally or orthogonally. If neither player occupies three Houses in a row then the game ends when the board is filled with pieces.
There are three ways to win a game of Tip-Top-Toe:
Draws are not possible.
In the following position, Black moves to the two corner 28 squares. The lower 28 move gives Black the win as Black now occupies the bottom three houses in a row. (Note that both players occupy the two bottom corner houses after the 28 move. A player wins by occupying three houses in a row even if the opponent also occupies one or two of those same houses.)
A turn in Tip-Top-Toe consists of placing a piece on a square and then, if there are other squares labelled with the same number, placing a piece on those squares too. This means that each turn will consist of placing either three pieces on Side squares, two pieces on Corner squares, or one piece on a Middle square.
A player occupies a House if that player has three pieces in a row, diagonally or orthogonally, in that House. It is possible for both players to occupy the same House. For example, both players can have three pieces in a row horizontally, or both players can have three pieces in a row vertically, in the same House. As a result, each House will end up being occupied by one player, both players, or neither player.
The game ends when one player has occupied three Houses in a row, diagonally or orthogonally. If neither player occupies three Houses in a row then the game ends when the board is filled with pieces.
There are three ways to win a game of Tip-Top-Toe:
- Be the first player to occupy three Houses in a row, diagonally or orthogonally.
- If neither player occupies three Houses in a row, then be the player that occupies the most Houses.
- If neither player occupies three Houses in a row and both players occupy the same number of Houses, then be the player with the fewest pieces on the board.
Draws are not possible.
In the following position, Black moves to the two corner 28 squares. The lower 28 move gives Black the win as Black now occupies the bottom three houses in a row. (Note that both players occupy the two bottom corner houses after the 28 move. A player wins by occupying three houses in a row even if the opponent also occupies one or two of those same houses.)
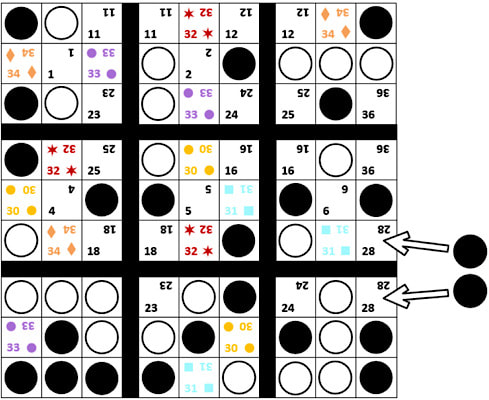
Black makes a winning move.
To begin the game, players decide who should have the first turn as Black. But then, after the first turn by Black, White can switch sides and play as Black for the rest of the game or White can continue to play as White and have the next turn. (This rule serves to offset Black’s first-turn advantage.) The option to switch sides is only available to White after Black’s first turn.
Tip-Top-Toe Strategy Notes
For strategy purposes I assigned a value to each square on the board. I figure side squares are worth 2 points since you can make 3-in-a-row in two ways that involve the side square. Similarly, corner squares are worth 3 points and middle squares are worth 4 points. I do the same thing with houses: 2 points for a side house, 3 points for a corner house, and 4 points for the middle house.
Then, to calculate the value of each square on the board within a house, I add the value of the square within the house to the value of the house. For example, the 1 square is a middle square on a corner house (a middle-corner or MC) so it has a value of 4+3=7. The 32 square at the top of the board is a side square on a side house (a side-side or SS) so it has a value of 2+2=4. But the side squares come in threesomes so to calculate the value of a move to three side squares you need to add the values of all three side squares. It turns out when you do that the total always adds up to 14. For example, each side square threesome is either made up of SS+SS+SM (4+4+6=14) or SS+SC+SC (4+5+5=14).
I constructed the board this way on purpose. The idea is to make it so that it is not obvious to which side square threesome you should move, at least early in the game before there are many pieces on the board. The more pieces there are on the board the less relevant this point system becomes. But early in the game I think it is useful.
The corner pairs add up to either 11 or 12. I could not make them all add up to the same number but at least there is not much difference, point-wise, in the corner pairs. There was nothing I could do with the middle squares though.
Using this point system, I figure a move to square 1, 3, 7, or 9 is a good neutral first move since each of these squares is worth 7, according to my point system, which is half of 14. After the first move I assume it is best to move to side square threesomes initially since these moves have higher point values than corner or middle square moves. But, of course, if you just move to side squares then you will never make 3-in-a-row, so obviously you must consider corner square and middle square moves at some point as well.
Hox
Created by Larry Back
Hox is a simple Hex variant. The Hox board is like a Hex board except that each cell on the Hox board is labelled with the letter H, O, or X. Readers can use this Hox board.
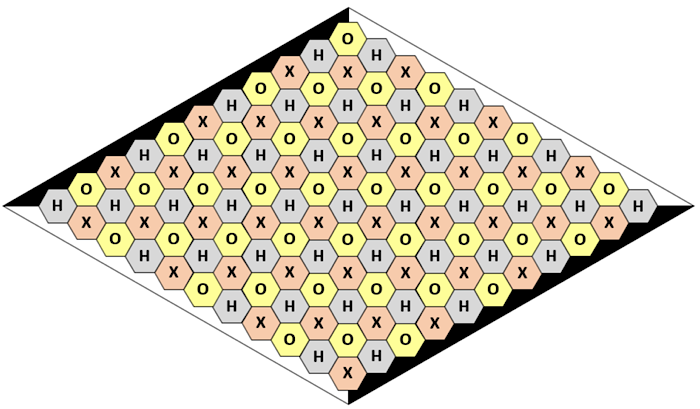
Hox board of size 11x11 (other sizes possible, like Hex)
The only other aspect of Hox that differs from Hex is the following rule:
To clarify, Black will start by placing a black piece on an H cell; then White will place a white piece on an O cell; then Black will place a black piece on an X cell; then White will place a white piece on an H cell; then Black will place a black piece on an O cell; then White will place a white piece on an X cell; then Black will place a black piece on an H cell; and so on.
No two adjacent cells on a Hox board will have the same letter. Different board sizes can be used, but for any board size the cells on the acute corners must be H cells. This ensures that there is an equal number of O and X cells, and that the number of H cells is either equal to, or is one greater than, the number of O and X cells. Consequently, all cells can eventually contain a piece. As a result, draws will not be possible.
Like Hex, Hox uses the pie rule: To start the game, one player will place a black piece on an H cell. The other player will then decide whether to continue the game from that position as Black or White. The player that becomes White will make the next move (to an O cell) and players will alternate moves for the rest of the game.
- A move to an H cell is always followed by a move to an O cell.
- A move to an O cell is always followed by a move to an X cell.
- A move to an X cell is always followed by a move to an H cell.
To clarify, Black will start by placing a black piece on an H cell; then White will place a white piece on an O cell; then Black will place a black piece on an X cell; then White will place a white piece on an H cell; then Black will place a black piece on an O cell; then White will place a white piece on an X cell; then Black will place a black piece on an H cell; and so on.
No two adjacent cells on a Hox board will have the same letter. Different board sizes can be used, but for any board size the cells on the acute corners must be H cells. This ensures that there is an equal number of O and X cells, and that the number of H cells is either equal to, or is one greater than, the number of O and X cells. Consequently, all cells can eventually contain a piece. As a result, draws will not be possible.
Like Hex, Hox uses the pie rule: To start the game, one player will place a black piece on an H cell. The other player will then decide whether to continue the game from that position as Black or White. The player that becomes White will make the next move (to an O cell) and players will alternate moves for the rest of the game.
Hox Strategy Notes
One Way Stretch: This is where you have a piece on a cell (say an H cell) and you place another piece on a nearby cell (say an X cell) such that there is an empty O cell in-between the H and X cells. In Hex, your opponent could just play to the O cell on the next move and block the connection between your pieces on the H and X cells. But, in Hox, after you have played to an X cell you know your opponent's next move must be to an H cell and then you can play to the O cell on your next move and connect your two pieces on the H and X cells. However, your opponent might be able to find an H cell move somewhere on the board that makes a threat and compels you to make your O cell move elsewhere. This would be like a ko threat. Now your opponent would have the next O cell move so, in this case, your opponent would be able to break the connection between your two pieces on the H and X cells.
One Way Push: Similar to the One Way Stretch but this is where you have a piece on a cell (say an H cell) and you place another piece on an adjoining cell (say an X cell) where there is an empty O cell adjacent to the X cell such that the X cell is between the H and O cells. Again, your opponent will not be able to move to the O cell on the next turn so you are free to continue pushing in the same direction with a move to the O cell on your next turn. But, same as with the One Way Stretch, your opponent may have an H cell move that compels you to respond with an O cell move elsewhere and then your opponent will have the next O cell move.
Two Way Stretch: Both Hex and Hox have a Two Way Stretch but it works differently for each game. In Hex, when you make a Two Way Stretch you usually wait until your opponent plays to one of the two in-between cells and then you immediately play to the other in-between cell in order to complete the connection. But, in Hox, you cannot do this. After making a Two Way Stretch (say between two H cells) you must move to one of the in-between O or X cells on either of your next two moves or your opponent can break the connection between your pieces on the two H cells. So, after playing to an H cell and making a Two Way Stretch with another one of your pieces on an H cell your opponent can immediately play to the in-between O cell and you can just answer by playing to the in-between X cell. But if your opponent plays to an O cell elsewhere and this move compels you to respond by playing to an X cell elsewhere and then your opponent makes an H cell move that compels you to respond to an O cell elsewhere then your opponent can break your connection between the two H cells by playing to the in-between X cell. At this point you would have an H cell move and then your opponent could follow up by playing to the in-between O cell and thereby break your connection between the two H cells on the Two Way Stretch. So, in other words, your opponent needs two consecutive threats (like ko threats) to break the connection between your two H cell pieces on the Two Way Stretch. Hex has nothing like that.
Edge Templates: Hox has very different edge templates than Hex. The following diagram shows an example.
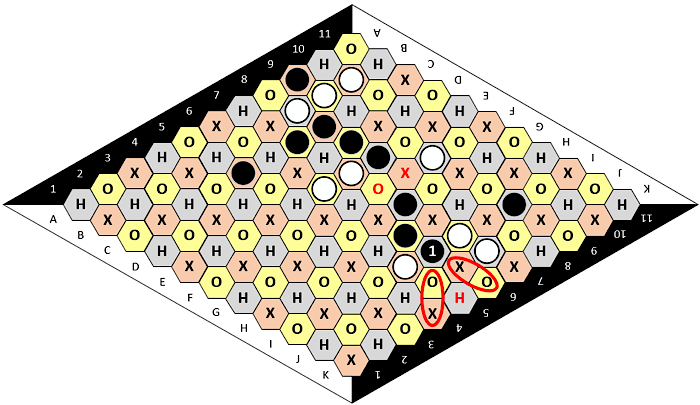
Hox edge template.
Having just moved to the H cell near the bottom-right edge with 1, Black’s next two moves will be to an X cell followed by an O cell. This gives Black the threat to make a one-way stretch (along the O-X pair at J5-K4) as well as the threat to make a one-way push (along the X-O pair at J6-K6) thereby connecting the black piece at 1 to the edge. If White plays to an O cell in one of those pairs then Black just plays to the X cell in the other pair. But White can disrupt this connection by playing to an O cell somewhere else on the board so that Black feels compelled to respond with an X cell move elsewhere. One such move by White would be to the red O at F7. If Black responds by playing to the red X at F8 then the connection of the black piece at 1 to the edge is no longer guaranteed. This is because Black’s next two moves would be to an O cell followed by an H cell. This changes the dynamic and allows White to break the connection of 1 to the edge with a move to the red H at K5. ◾️