Abstract wargames
|
by David Ploog
|
I am going to introduce a game that is not brand-new but still just a few years old, and which feels very fresh to me: Boom & Zoom by Ty Bomba. Before explaining the rules and talking a bit about how to play, I will mention the man behind it.
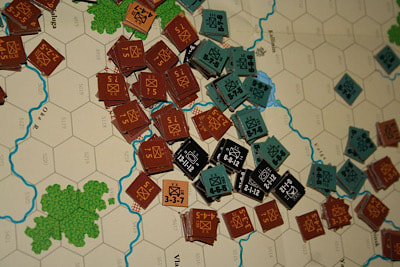 Detail of an ongoing Barbarossa game
Ty Bomba is a famous board game designer for conflict simulations. He is a US Air Force and US Army veteran, and BoardGameGeek lists more than a hundred titles to his name. Some of his titles are Proud Monster: The Barbarossa Campaign, Drive on Stalingrad, and Nato, Nukes, & Nazis, telling you upfront what to expect. Inside the wargaming genre, Ty’s titles are on the larger end: for example, his Barbarossa design comes with almost a thousand counters.
Despite—or, who knows, because of this background—in 2012 Ty Bomba came out with the abstract title I am going to discuss. Thus Boom & Zoom was a radical departure, with conflict resolution tables, panzer groups, and morale boosts being as absent as chance elements or hidden information.
Despite—or, who knows, because of this background—in 2012 Ty Bomba came out with the abstract title I am going to discuss. Thus Boom & Zoom was a radical departure, with conflict resolution tables, panzer groups, and morale boosts being as absent as chance elements or hidden information.
The original 2012 publication by Victory Point Games is kind of a missing link, in that it contains traces of Ty’s native genre, such as terrain markers, modular boards and missions with different setups or goals. In fact, its counters were cardboard chits typical of the wargaming genre.
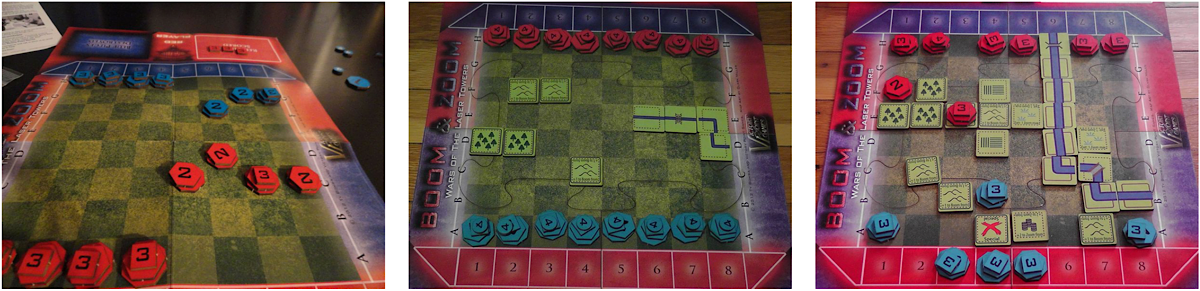
Original Victory Point games edition of Boom & Zoom (2012)
The impressive 2018 re-issue by Hollandspiele does away with all of that, restricting the game to a playing mat and massive wooden 40 mm × 40 mm blocks for counters. According to the publisher, this version implements the designer’s original vision and its rules are given below. In fact, in a forum posting Ty Bomba writes: "I consider this my best-ever design."
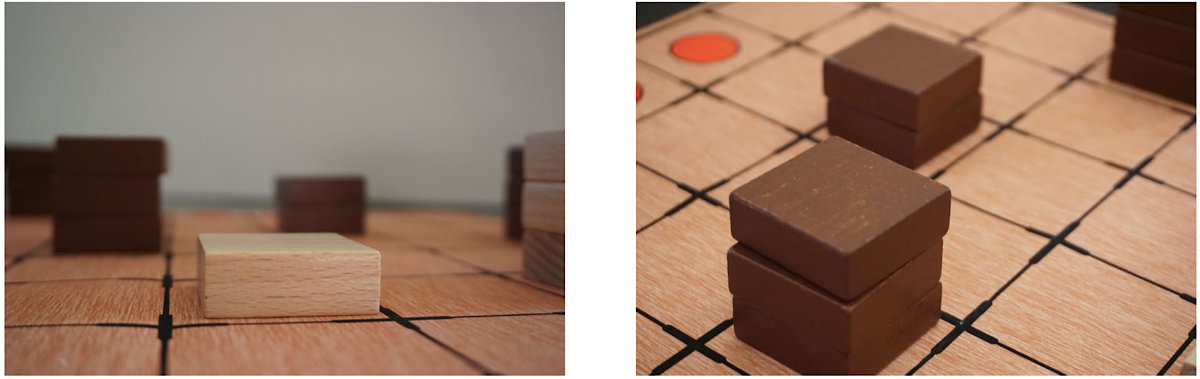
Hollandspiele second edition of Boom & Zoom (2018)
Rules
The game is played on an 8 × 8 board, with 12 stackable black counters and 12 stackable white counters. Initially, each side places four stacks of height 3 on the four central squares of the home row:
The game is played on an 8 × 8 board, with 12 stackable black counters and 12 stackable white counters. Initially, each side places four stacks of height 3 on the four central squares of the home row:
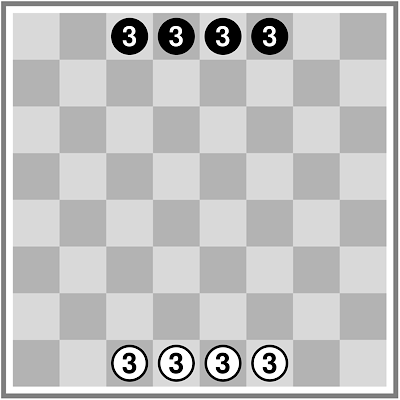
Opening position
During a turn, a player must carry out one of these actions with their stack:
Zoom (movement): The stack is moved in a straight line, orthogonally or diagonally, over free squares. The movement distance is capped by the stack’s height. It is allowed to move beyond the opposing base row.
Boom (capture): If a square the stack could otherwise move to is occupied by an opposing piece, one counter of the opposing stack is removed.
A stack may move beyond the opposing base row—imagine a virtual row extending the board on each side, and each virtual row is only accessible to pieces starting at the opposite end. Stacks moving there leave the board and are scored, where each counter is a point.
The game ends when a turn removes the last piece of a player from the board. The winner is the player with most points; draws by equal score are possible.
Remarks and diagrams explaining the rules
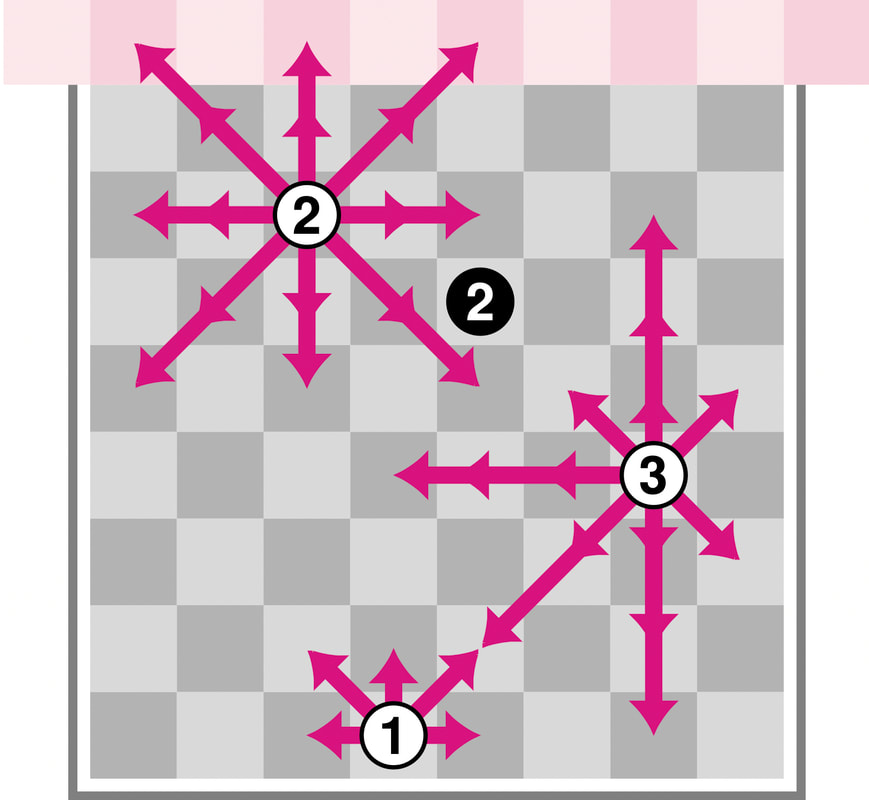
Zoom — movement: All possible white moves
|

A game ends if all board pieces have the same colour.
|
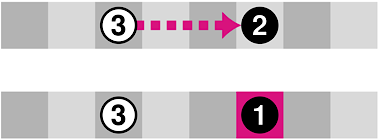
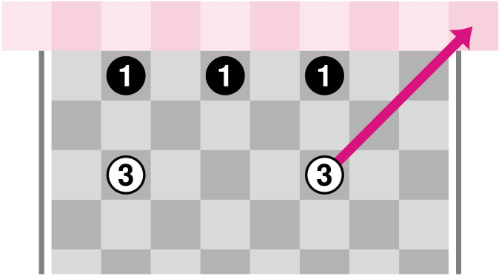
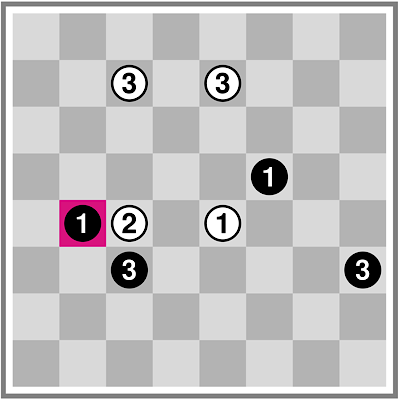
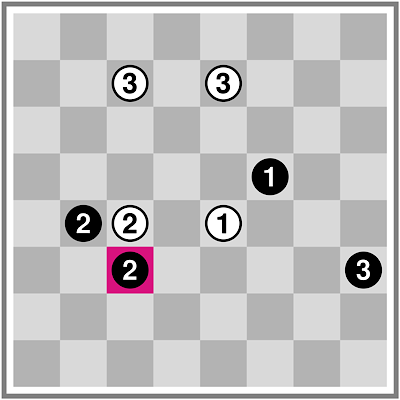
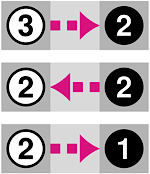
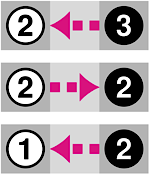
Boom —capture: White (top) can remove one counter from the 2 because the 3 can reach the target’s square, leaving a Black 1 (bottom).
A piece moving beyond the opponent’s home row is removed and scores one point for each counter. A game can end by one of two actions: a player may move their last piece off the board, or a player may shoot the last remaining opposing piece (then necessarily a single counter). If this happens, the player with the higher score wins.
Comments on the design
Before talking about how to play, I am going to analyze the design of Boom & Zoom a little.
First, the win condition: It is a scoring game, and the score is made from pieces crossing the board. In general, positional win conditions can be turned into score-based ones. For example, Ea Ea, the inventor of the connection game Y later delivered Star (1983) and ∗Star (1999), both of which are point-scoring games with certain connections giving points.
Likewise, one can award points for patterns. For example, Olix (Reiner Knizia, 1994) has four valid patterns yielding points, and Yinsh (2003, Kris Burm) can be seen as an alignment-scoring game where players aim to achieve a score of 3 first. Tintas (Dieter Stein, 2016) is a majority-scoring game and Mem (Anatol Holt, 1968) scores for shape–colour matches.
The goal of a crossing game is being the first player to reach a certain area of the board, most often the opponent’s home row, sometimes a corner. Examples are Camelot (George Parker, 1932), Epaminondas (Robert Abbott, 1975), Breakthrough (Dan Troyka, 2001) and Murus Gallicus (Phil Leduc, 2009). This win condition leads to race-like matches, and is generally by itself sufficient to create positive games.
Boom & Zoom takes this crossing goal and turns it into a score. What is exciting about this conversion is the end condition: the rules of any point-scoring need to define an end condition. Typical choices include the following: a full board; a player being unable to move; a certain number of moves played; a fixed number of points reached. In Boom & Zoom, a match ends when all counters of one side are off the board (i.e., captured or scored). This can be seen as a case of one player being unable to move; the fun thing is that this end condition sets up a clock making the game work. By the way, another nice game crossing-scoring game I can recommend is 27 (Laurent Escoffier, 2017), which is played on a line.
Second, Boom & Zoom employs line-of-sight capture. This is a popular mechanism, for movement as well as for capture. A few design choices make capture work particularly well in this game: the height of a stack affects both movement and capture range; capture is partial (a single counter), leading to differentiated pieces and granularity in scores. This also means that scores are more granular than the four starting pieces on the board might suggest.
Third, the game state is easy to read even though making a good move can be tricky, as we expect and demand from our games. In other words, Boom & Zoom has good board evaluation clarity, allowing players to make quick and informed guesses about which side is leading.
Like most abstract board games, Boom & Zoom is highly scalable. As usual, the board dimensions can be altered, as can the starting positions. Moreover, the stack limits may be changed. In fact, the first edition incorporated variants along these lines in its rules. I like the choices made by the designer for the second edition: the core mechanism works very well, and the game can be played with a standard Checkers set to boot!
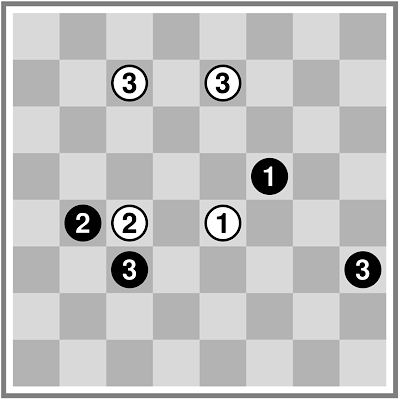
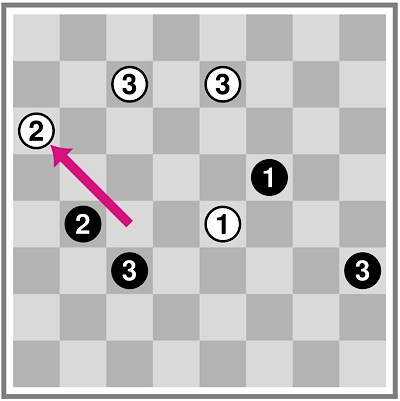
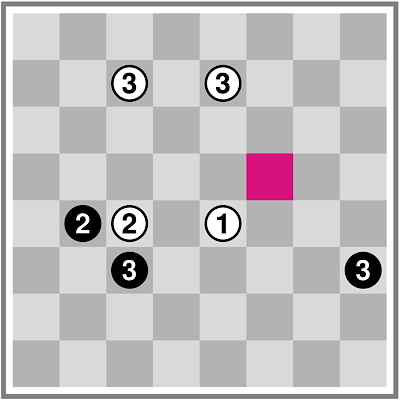
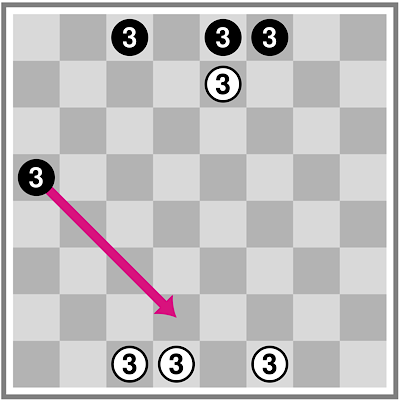
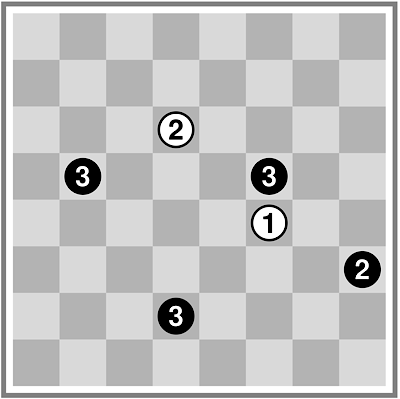
Here is a clarification about bearing off of pieces: the left 3 piece cannot bear off in the position shown here but the right 3 piece can bear off. This is because the goal zones are ten virtual squares on each player’s side, allowing diagonal escape through the corners.
Comments on the design
Before talking about how to play, I am going to analyze the design of Boom & Zoom a little.
First, the win condition: It is a scoring game, and the score is made from pieces crossing the board. In general, positional win conditions can be turned into score-based ones. For example, Ea Ea, the inventor of the connection game Y later delivered Star (1983) and ∗Star (1999), both of which are point-scoring games with certain connections giving points.
Likewise, one can award points for patterns. For example, Olix (Reiner Knizia, 1994) has four valid patterns yielding points, and Yinsh (2003, Kris Burm) can be seen as an alignment-scoring game where players aim to achieve a score of 3 first. Tintas (Dieter Stein, 2016) is a majority-scoring game and Mem (Anatol Holt, 1968) scores for shape–colour matches.
The goal of a crossing game is being the first player to reach a certain area of the board, most often the opponent’s home row, sometimes a corner. Examples are Camelot (George Parker, 1932), Epaminondas (Robert Abbott, 1975), Breakthrough (Dan Troyka, 2001) and Murus Gallicus (Phil Leduc, 2009). This win condition leads to race-like matches, and is generally by itself sufficient to create positive games.
Boom & Zoom takes this crossing goal and turns it into a score. What is exciting about this conversion is the end condition: the rules of any point-scoring need to define an end condition. Typical choices include the following: a full board; a player being unable to move; a certain number of moves played; a fixed number of points reached. In Boom & Zoom, a match ends when all counters of one side are off the board (i.e., captured or scored). This can be seen as a case of one player being unable to move; the fun thing is that this end condition sets up a clock making the game work. By the way, another nice game crossing-scoring game I can recommend is 27 (Laurent Escoffier, 2017), which is played on a line.
Second, Boom & Zoom employs line-of-sight capture. This is a popular mechanism, for movement as well as for capture. A few design choices make capture work particularly well in this game: the height of a stack affects both movement and capture range; capture is partial (a single counter), leading to differentiated pieces and granularity in scores. This also means that scores are more granular than the four starting pieces on the board might suggest.
Third, the game state is easy to read even though making a good move can be tricky, as we expect and demand from our games. In other words, Boom & Zoom has good board evaluation clarity, allowing players to make quick and informed guesses about which side is leading.
Like most abstract board games, Boom & Zoom is highly scalable. As usual, the board dimensions can be altered, as can the starting positions. Moreover, the stack limits may be changed. In fact, the first edition incorporated variants along these lines in its rules. I like the choices made by the designer for the second edition: the core mechanism works very well, and the game can be played with a standard Checkers set to boot!
Here is a clarification about bearing off of pieces: the left 3 piece cannot bear off in the position shown here but the right 3 piece can bear off. This is because the goal zones are ten virtual squares on each player’s side, allowing diagonal escape through the corners.
The white pieces are blocked from bearing off.
Two fundamental heuristics
The executive summary of elementary Boom & Zoom play is encapsulated in the following two tenets, and I will proceed to explain why they hold true:
Clearly, this is the beginning of the story and just a first glimpse of what is going on. These heuristics should, however, allow you to beat Ai Ai’s implementation of the game without too much trouble.
The clock
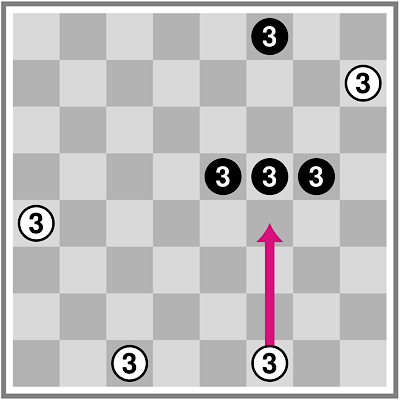
A cool feature of Boom & Zoom is the built-in clock. Because the game ends at once as soon as the last piece of one side disappears (either by getting shot or by moving off the board), for any given position there are two timers: the white timer counts the minimal number of moves to move all white pieces off the board; likewise, the black timer counts the minimal number of moves to move all black pieces off the board. The diagram below shows the number of moves required to bear off the white pieces.
The executive summary of elementary Boom & Zoom play is encapsulated in the following two tenets, and I will proceed to explain why they hold true:
- Attack the opponent’s most backwards pieces and try to get them to height 1.
- Move your most backwards pieces forward.
Clearly, this is the beginning of the story and just a first glimpse of what is going on. These heuristics should, however, allow you to beat Ai Ai’s implementation of the game without too much trouble.
The clock
A cool feature of Boom & Zoom is the built-in clock. Because the game ends at once as soon as the last piece of one side disappears (either by getting shot or by moving off the board), for any given position there are two timers: the white timer counts the minimal number of moves to move all white pieces off the board; likewise, the black timer counts the minimal number of moves to move all black pieces off the board. The diagram below shows the number of moves required to bear off the white pieces.
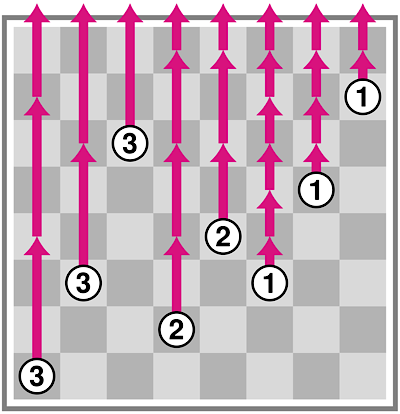
White timer: How many moves it takes White to bear off all pieces
The following table shows the minimal number of turns for a white piece to bear off, assuming an otherwise empty board, where row 1 is the White home row:
Row: |
1 |
2 |
3 |
4 |
5 |
6 |
7 |
8 |
3-stack |
3 |
3 |
2 |
2 |
2 |
1 |
1 |
1 |
2-stack |
4 |
4 |
3 |
3 |
2 |
2 |
1 |
1 |
1-stack |
8 |
7 |
6 |
5 |
4 |
3 |
2 |
1 |
In particular, each 3-stack on its starting position needs three turns to leave the board if the opponent does not intervene. In an actual position, it is easy to count the real timer value, taking into account delays when the shortest path for a piece is blocked.
Clock awareness is crucial. You want to decrease your timer, which you achieve by moving forward. And you want to increase your opponent’s timer, which is most efficiently achieved by shooting at the back stacks and by reducing an opposing stack to a singleton. Thus, it is often a mistake to remove a stack completely, as this reduces the opponent’s timer and puts more pressure on yourself. In Boom & Zoom, do not shoot to kill. Rather shoot to reduce the opposing stacks to singletons, and let them limp painfully across the battlefield!
Looking at a game position
In this position shown here, both players have nine counters on the board and timers are 10 for White, 9 for Black. It is White’s turn.
White's turn to move
Some options White might contemplate:
The next diagrams show the effects of each option on counters and timers.
- Move the faster, backwards piece forward, thereby protecting it.
- Shoot and create a black singleton.
- Shoot at the most backwards black piece.
- Remove a black piece entirely.
The next diagrams show the effects of each option on counters and timers.
1. Timers 9:9, counters: 9:9
|
2. Timers 10:11, counters 9:8
|
3. Timers 10:10, counters 9:8
|
4. Timers 10:5, counters 9:8
|
Option 4 is a major blunder—it goes against the basic heuristic! Option 1 is too peaceful: it does not change the game into White’s favour, and likely leads to a draw. The two captures are White’s best bets. Of these, going for the singleton in Option 2 produces the better outcome, a gain of one additional tick on the timer.
The shootout asymmetry
Because pieces can attack each other at ranges limited by height, it can be crucial who shoots first. Consider the following position and assume neither piece is attacked from elsewhere.
The shootout asymmetry
Because pieces can attack each other at ranges limited by height, it can be crucial who shoots first. Consider the following position and assume neither piece is attacked from elsewhere.

Either stack can attack the other.
The diagram below left shows what happens if White shoots first; below right shows what happens if Black shoots first.
Series of moves if White shoots first
|
Series of moves if Black shoots first
|
Whoever goes second is at risk of suffering a singleton! As a rule of thumb, stay clear from moving into range of a shoot-out unless there is a good reason.
Attacking heuristics
As discussed before, reducing a stack—but not removing it!— has the immediate benefit of slowing down the opponent. Moreover, usually a little less important, each capture reduces the opponent’s potential score by one. But even better, captures are often played with the tempo because the opponent will reply by shooting back. This holds especially when reducing a triple stack: the opponent risks a bad singleton, but if moving away, the player got away with the tempo and material gain.
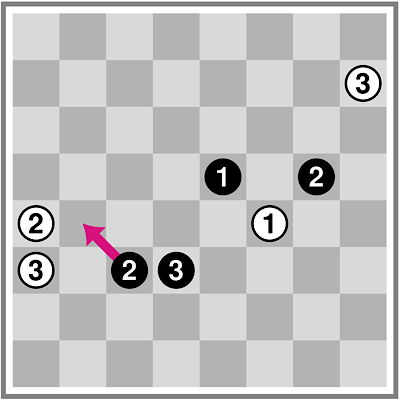
Below, the left-hand diagram shows a triple attack, which enables at least two captures— thus try to avoid clusters of pieces prone to multiple attacks. The right diagram shows a counter-attack: it is often a good idea to answer in the same way rather than replying meekly. This is in fact a meta-heuristic applicable to many board games.
Attacking heuristics
As discussed before, reducing a stack—but not removing it!— has the immediate benefit of slowing down the opponent. Moreover, usually a little less important, each capture reduces the opponent’s potential score by one. But even better, captures are often played with the tempo because the opponent will reply by shooting back. This holds especially when reducing a triple stack: the opponent risks a bad singleton, but if moving away, the player got away with the tempo and material gain.
Below, the left-hand diagram shows a triple attack, which enables at least two captures— thus try to avoid clusters of pieces prone to multiple attacks. The right diagram shows a counter-attack: it is often a good idea to answer in the same way rather than replying meekly. This is in fact a meta-heuristic applicable to many board games.
Triple attack!
|
Counter attack
|
Backwards movement
It can happen that a backwards move is correct! In the position shown below, White has a material advantage of 9:8 counters while timers are equal at 11:11. It is Black’s turn, but starting the race loses immediately because Black cannot avoid the piece on g5 becoming a singleton. Black will also lose by starting an exchange with c3:a3; after a3:c3, c3:a3, f4:g5, White has material 1 + 2 + 1 + 3 = 7 against Black’s 2 + 2 + 1 + 1 = 6 and still has timer equality of 14:14.
It can happen that a backwards move is correct! In the position shown below, White has a material advantage of 9:8 counters while timers are equal at 11:11. It is Black’s turn, but starting the race loses immediately because Black cannot avoid the piece on g5 becoming a singleton. Black will also lose by starting an exchange with c3:a3; after a3:c3, c3:a3, f4:g5, White has material 1 + 2 + 1 + 3 = 7 against Black’s 2 + 2 + 1 + 1 = 6 and still has timer equality of 14:14.
Backwards movement needed
In this position, the indicated backwards move c3-b4 is strong because White cannot avoid losing at least two counters. If White flees with the 2-stack, a4-c6, then b4:a3 follows, leading to a singleton either on a3 or on a5. But if White instead stays put and captures a4:b4, Black follows suit and White loses even more tempo.
Note how the backwards move is both a pin and a fork: it asphyxiates the most backwards white piece and at the same time attacks two pieces. Such moves are not available very often, but the position shows the special properties of the edge. Does this also work with the black 3-stack and 2-stack interchanged?
Two problems: White to play!
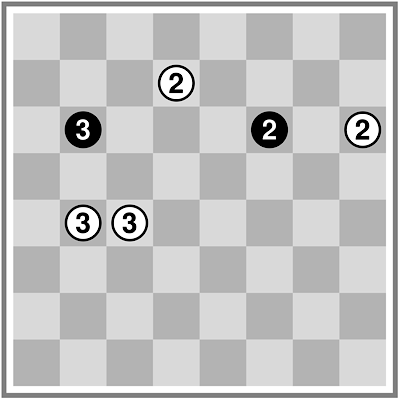
Here are two problems, I hope you find them interesting. They are supposed to hint at some of the depth you will experience when giving this game a shot. The captions for each diagram show the current scores. The solutions are here.
Note how the backwards move is both a pin and a fork: it asphyxiates the most backwards white piece and at the same time attacks two pieces. Such moves are not available very often, but the position shows the special properties of the edge. Does this also work with the black 3-stack and 2-stack interchanged?
Two problems: White to play!
Here are two problems, I hope you find them interesting. They are supposed to hint at some of the depth you will experience when giving this game a shot. The captions for each diagram show the current scores. The solutions are here.
Problem 1: White 6, Black 0
|
Problem 2: White 0, Black 5
|
For me, Boom & Zoom was an unexpected gem, dug up while looking into the vast game library Ai Ai offers. When I tried it, I had just the rules and after getting trashed by the program for several rounds, I started wondering what was going on. Only when preparing this text on the game did I stumble upon the exciting backstory of its designer. The game is as abstract as they come, but still you can feel the wargaming flair, if you want to. To me, Boom & Zoom distils tank warfare into the confinements of the chessboard.
With all this talk about tanks, and Ty Bomba’s œuvre dealing largely with WW2 campaigns, I want to finish this piece with a picture of Red Army T34/76 tanks in 1945 in Berlin. I was born and raised in East Berlin, and I am well aware of the human cost to the Soviet peoples in these five dark years. All talk and games about alternative realities notwithstanding, I am extremely grateful this conflict ended the way it did. ◾️
With all this talk about tanks, and Ty Bomba’s œuvre dealing largely with WW2 campaigns, I want to finish this piece with a picture of Red Army T34/76 tanks in 1945 in Berlin. I was born and raised in East Berlin, and I am well aware of the human cost to the Soviet peoples in these five dark years. All talk and games about alternative realities notwithstanding, I am extremely grateful this conflict ended the way it did. ◾️

The article above is another of the pieces written by David Ploog for his forthcoming book and adapted for Abstract Games. For AG17, David provided "Goals in Abstract Games: Proposing a new classification"; for AG18, "Stories and Themes for Boardgames"; for AG19, "The Movement Protocol of Symple" and for AG20, "An Interview with Stephen Tavener." The publication of David's book will be groundbreaking, a significant event for all abstract gamers. We're happy and grateful to provide some teasers from this book in Abstract Games. The author would like to thank Tom Hayes for a rule clarification. ~ Ed.