Go-like games
|

by Stephen Nulty
|
This is the start of some exploration into tactics for the game of Redstone. As a Go variant some tactics can be quite similar to Go but one can make use of Redstone’s immortal red stones when capturing in new tactical ways!
If you haven’t heard of Redstone, previous introductory articles can be found in AG21 and AG22.
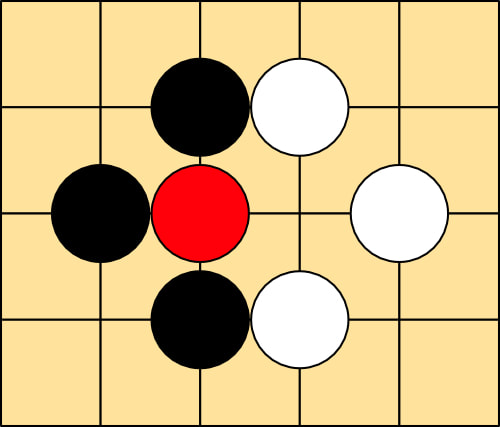
In short, the goal of Redstone is to capture all the opponent's stones, and with passing forbidden, one player will always lose all of their stones! The stones are played on the corners of squares (intersections) of the grid like in Go, and vacant adjacent (horizontal and vertical) intersections to a stone count as its liberties (lives). Adjacent stones of the same colour share life and are called a group. When a move by either player would take away the last liberty of a stone or group, the move played must be a red stone and captures all stones with no liberties. Suicide is legal, and you may capture your own stones. Sometimes a player makes a choice between extending a group or capturing it with a red stone. Red stones cannot be captured and are immortal.
Redstone is currently playable at BoardGameArena (BGA). In Go typically the letter I (capital i) is skipped when labelling the board with coordinates, while on BGA the letter I is used. We've consistently followed Go usage.
As a Go variant it seems useful to try to apply some ideas and tactics from Go as a starting point for Redstone tactics.
1. Eyes
One important concept that will be useful for fighting and capturing as well as for endgame is that of eyes. This is a concept that appears in Go and loosely speaking an eye is an intersection that is surrounded by stones only of your colour. In Figure 1 Black has eyes at J9, A9, C9, while White has an eye at E5.
If you haven’t heard of Redstone, previous introductory articles can be found in AG21 and AG22.
In short, the goal of Redstone is to capture all the opponent's stones, and with passing forbidden, one player will always lose all of their stones! The stones are played on the corners of squares (intersections) of the grid like in Go, and vacant adjacent (horizontal and vertical) intersections to a stone count as its liberties (lives). Adjacent stones of the same colour share life and are called a group. When a move by either player would take away the last liberty of a stone or group, the move played must be a red stone and captures all stones with no liberties. Suicide is legal, and you may capture your own stones. Sometimes a player makes a choice between extending a group or capturing it with a red stone. Red stones cannot be captured and are immortal.
Redstone is currently playable at BoardGameArena (BGA). In Go typically the letter I (capital i) is skipped when labelling the board with coordinates, while on BGA the letter I is used. We've consistently followed Go usage.
As a Go variant it seems useful to try to apply some ideas and tactics from Go as a starting point for Redstone tactics.
1. Eyes
One important concept that will be useful for fighting and capturing as well as for endgame is that of eyes. This is a concept that appears in Go and loosely speaking an eye is an intersection that is surrounded by stones only of your colour. In Figure 1 Black has eyes at J9, A9, C9, while White has an eye at E5.

Figure 1
In Redstone one can also make use of the red stones in order to make eyes. White has used red stones to make eyes at H1, J2, and at A1, A3.
In Go, groups with two separate eyes, like the Black group in the upper left are said to be alive because they can’t be captured. If the group was surrounded both of the eye points need to be played to capture the group. Any capture must be with a red stone. However, neither move captures the group by itself and White can’t make two simultaneous moves to capture the Black group.
In Redstone, however, Black's group in the upper left is only uncapturable until Black runs out of moves to play elsewhere. If the group is surrounded, Black might have to fill in one eye, and White can then capture with a red stone in the other! See the example in Figure 2, from the upper left clockwise, different stages of Black's group being captured.
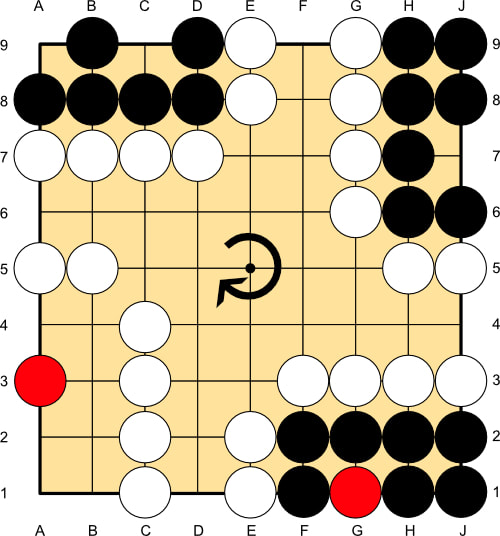
Figure 2
2. Eyespace
In Go players want to surround the most area, so typically players begin to surround bigger areas of space at first rather than surrounding one point at a time. Surrounded space where one has the possibility to make eyes is usually called eyespace (although in Go there can be other terms like area, territory etc).
Typically in Redstone it pays to have eyes both to keep groups alive and in the late game to have points only you can play in. This could be the difference between saving and losing entire groups of stones!
A nice example of this was given by user antonTobi in the Online-Go.com (OGS) forum, as shown in Figure 3. Black has created three eyes, while White has created only two eyes, one eye at A1, and a two point eyespace at D1 and E1. White cannot play inside Black's eyes, and Black cannot play at A1. However this brings us to the next tactic.
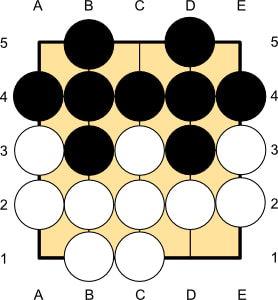
Figure 3
3. Playing in the opponent's eyespace
In the example in Figure 3, if it is Black’s turn to play Black can’t win by filling in Black's eyes alone. Both Black and White have three points to play in, and Black will fill in and be left with one eye before White.
However, Black can choose to play either D1 or E1, let’s say D1. White then has to play either the E1 point as a red stone to capture or A1. If white plays A1, White's stones immediately get captured with a red stone at E1. If instead, White plays E1 to capture, as in Figure 4, Black can safely play one of the three Black eyes and wait for White to reach one eye first.
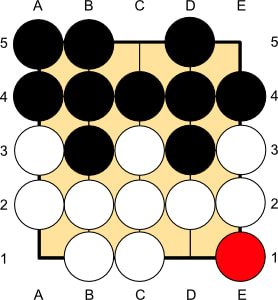
Figure 4, after Black plays A5
Okay, now for some sharper tactics to make two eyes or to capture!
4. Throw-ins
In the following few examples we’ll see a tactic normally referred to as a throw-in in Go. Essentially, it’s a tactic where one plays a stone knowing it can be captured but the sacrifice can give some benefit like reducing liberties, helping to prevent two eyes forming for a group, etc.
In Figure 5 we see a game where there’s a fight between one large White group and two Black groups, and we will focus on the upper right corner. White has a nice idea to play throw-in stones at F9 and J6. These stones can be immediately captured by Black but doing so will end up putting red stones at key positions in order to make two eyes for White's stone at H8. Let’s see how it could play out.

Figure 5
White plays the first throw-in at J6 (Figure 6), and Black captures the White stone by putting a red stone at J7 (Figure 7).
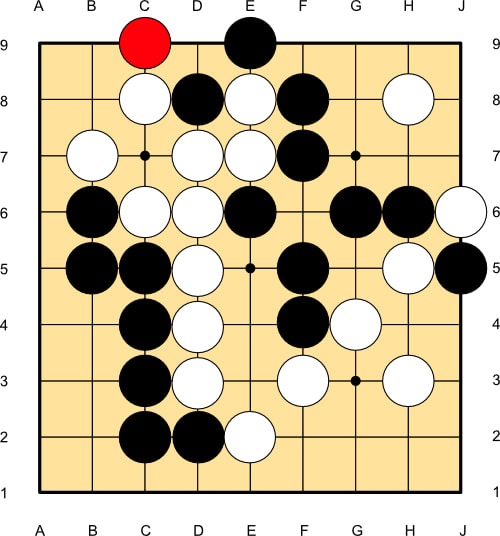
Figure 6
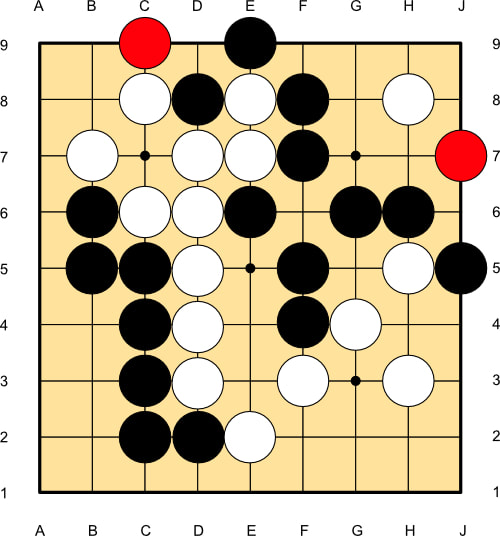
Figure 7
Then it’s followed with another throw-in at F9. When captured again by Black, White plays J9, and in Figure 8 we see a familiar formation with two eyes.

Figure 8
So if Black plays this way White has managed to live in the corner with this throw-in technique, which is what happened in an actual game. Black might try to resist in other ways like with G8 or H7, or potentially J9 herself, but further analysis might be too deep for our current tactical exploration.
Figure 9 shows an example of a clever use of a throw-in and the usage of a red stone at a key spot to capture some stones instead. In the following game we focus on the Black stones on the bottom of the board.
Figure 9 shows an example of a clever use of a throw-in and the usage of a red stone at a key spot to capture some stones instead. In the following game we focus on the Black stones on the bottom of the board.
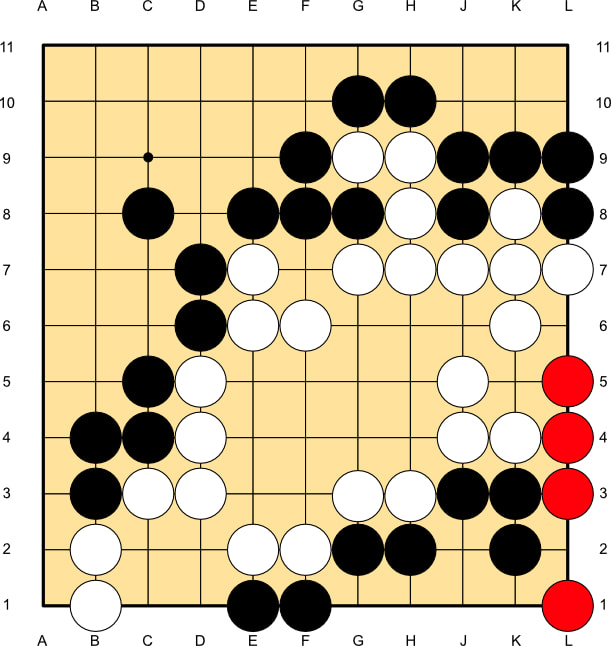
Figure 9
White plays a clever throw-in at G1 (Figure 10), which will ultimately lead to capturing Black's two stones on the first line (edge of the board). Let's see how.

Figure 10
Black captures the throw-in with a red stone, and then White threatens to capture (atari in Go terms) the two Black stones by playing D1, as shown in Figure 11.
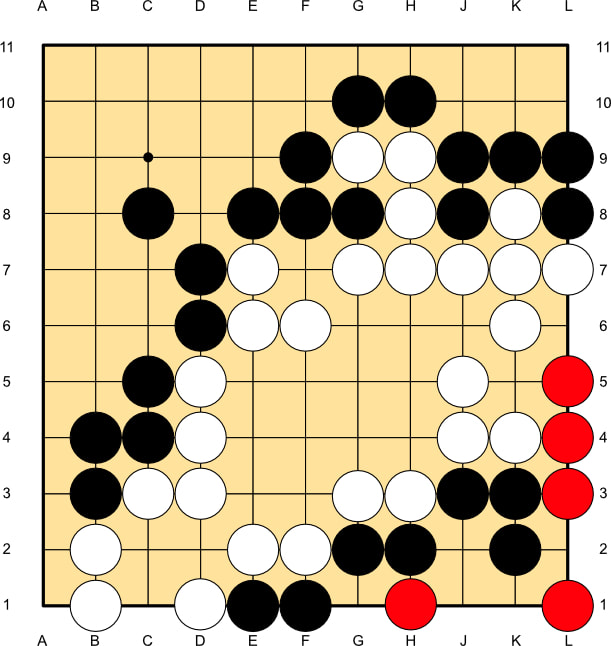
Figure 11
It turns out that the red stone from the throw-in plays a key role in stopping Black from saving the two stones. Let’s see what happens if Black tries to save them.
Black plays G1 to connect her stones, but with the red stone at H1 Black has only one liberty after connecting. White then plays a red stone at J2, capturing all five Black stones! (See (Figure 12).) This is usually referred to as a shortage of liberties or connect and die in Go.
Black plays G1 to connect her stones, but with the red stone at H1 Black has only one liberty after connecting. White then plays a red stone at J2, capturing all five Black stones! (See (Figure 12).) This is usually referred to as a shortage of liberties or connect and die in Go.

Figure 12
5. Redstone squeeze
Here’s another tactic which uses the red stone from a capture to fill the opponent's liberties and ultimately capture more stones. I’ve termed it a Redstone squeeze, as this type of tactic is usually referred to as a squeeze (squeezing the stones, and keeping their liberties low) in Go.
In the following position in Figure 13, Black has played the unusual move of C6, while in a normal Go game a knight's move of B6 might be more usual. However, this is Redstone, and the natural Go sequence that follows leads to some tactics.
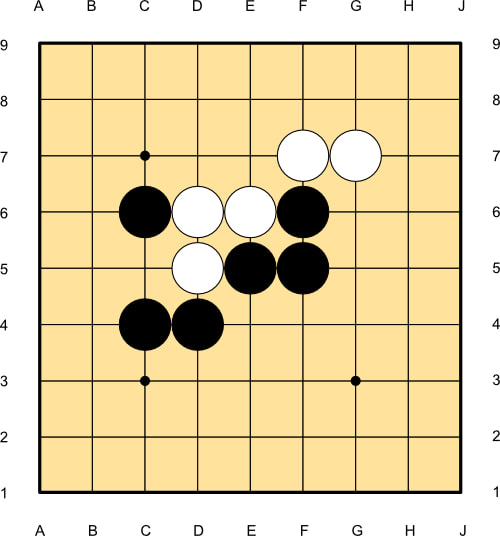
Figure 13
White plays C5 to separate the Black stones, Black blocks at B5, and then White cuts at B6 threatening to capture the Black stone. Now Black cuts at E7! (See Figure 14.)
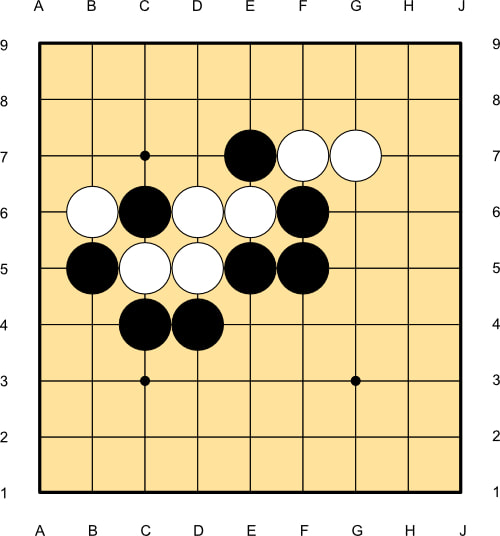
Figure 14
Normally this wouldn’t work out well for Black in Go, but if White captures with C7, which happened in the game, we will see that the red stone is detrimental to White. Black follows the capture with the atari of D7, threatening to capture the four White stones. (See Figure 15.)
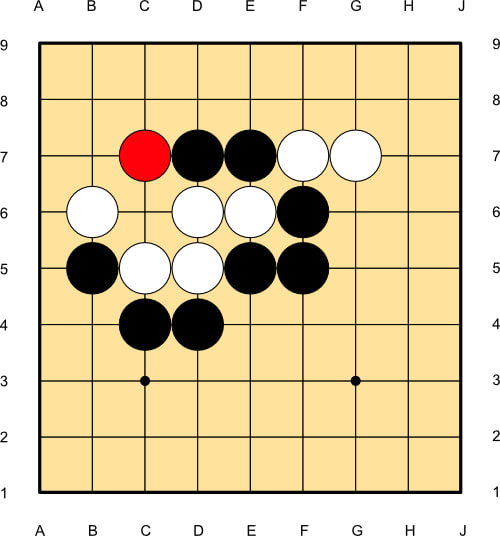
Figure 15
If White connects at C6, as shown in Figure 16, White will lose all the stones. Let’s see how.

Figure 16
Although White connects, the red stone keeps White at two liberties and now Black plays B7, threatening to capture and driving the White stones toward the edge of the board.
If White extends with A6 Black can follow with A5 (Figure 17), and there’s nowhere for the White stones to go . They’re captured!
If White extends with A6 Black can follow with A5 (Figure 17), and there’s nowhere for the White stones to go . They’re captured!
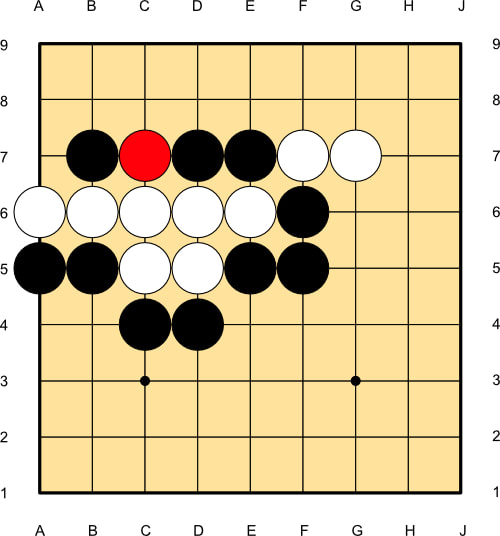
Figure 17
Stepping back a bit to Black's cut at E7 in Figure 14, if White instead threatens to capture the E7 stone, Black can give it up, threatening to capture the White stones and ultimately capturing the White B6 stone instead. (See Figure 18.)
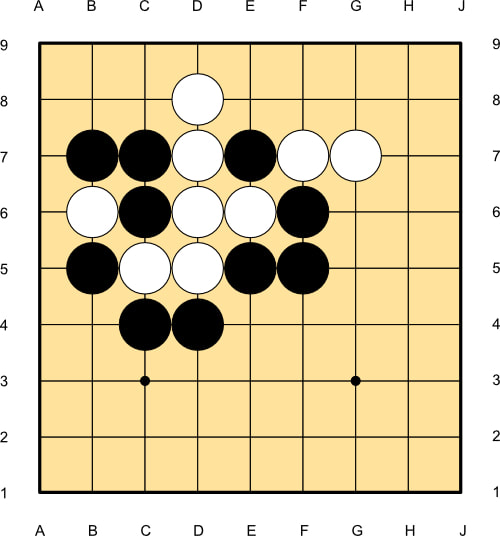
Figure 18
Again if White extends to A6, Black can follow with A5 and capture as before.
6. Mutual capture
Now, one interesting feature of Redstone that is distinct from Go is that when captures occur there isn’t any priority to removing stones with no liberties. All stones with no liberties get removed simultaneously when a capture occurs and this can lead to some interesting ways to try to survive.
If we look again at Figure 17, White can think of making the best of a bad situation with the loss and choose to play on instead of resigning. One idea is the atari of B8. White knows she can’t save the stones but can try make the most of the capture by putting the red stone in a good location. When Black captures (capturing the single Black stone on C7 as well as the White group), it puts a red stone at A7, and White can think of a move like D8 to live in the corner. (See Figure 19.)
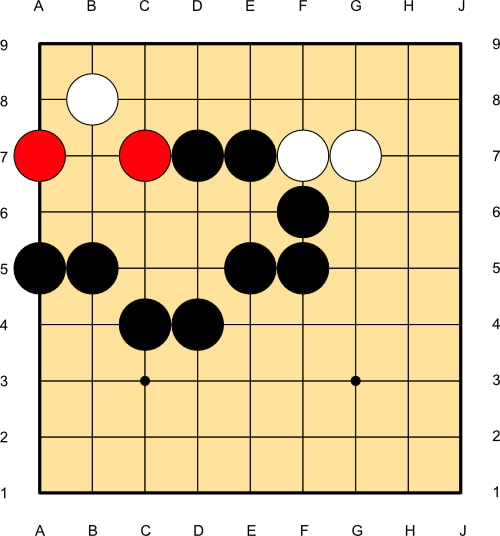
Figure 19
Figure 20 shows an example from a game, where White has got into a lot of trouble in the upper left. Black played a standard capturing sequence from Go problems to effectively capture the White stones, except one has to be careful how one captures stones at times in Redstone.
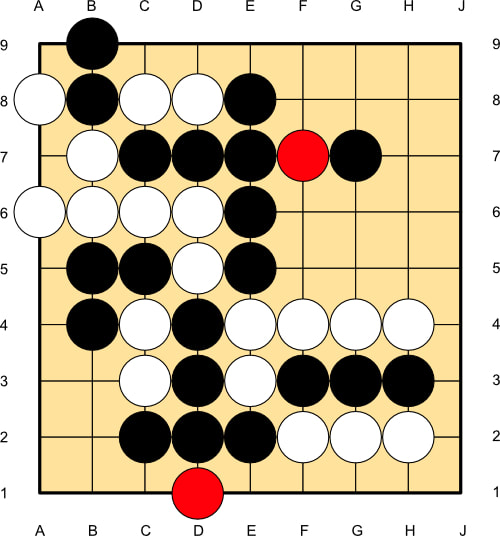
Figure 20
White tried to escape with the two stones with a move at B3. Black keeps the liberties to one and pushes White toward the edge, which is a common tactic for capturing in Go. (See Figure 21.)
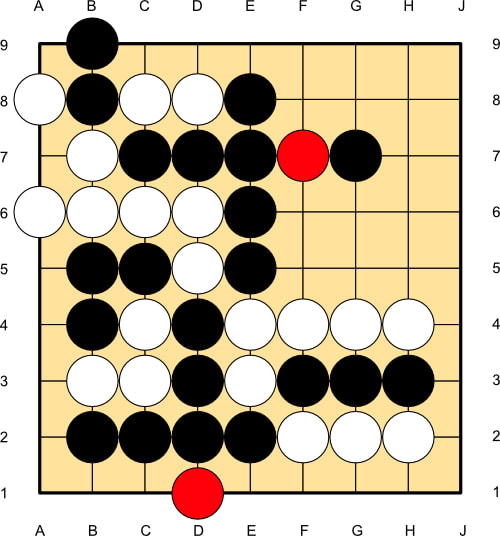
Figure 21
However, when White reaches the edge and Black plays A2, white plays the atari of A5! (See Figure 22.)
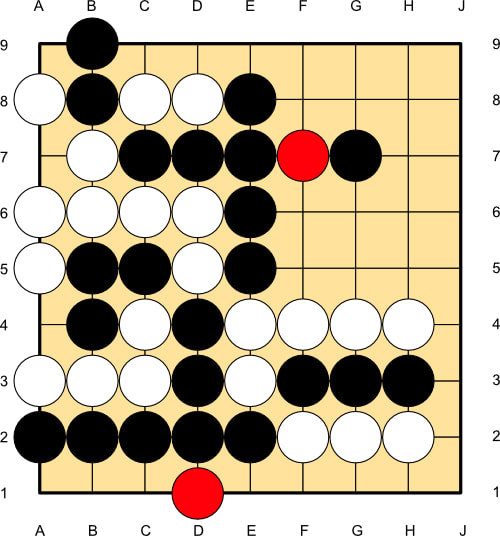
Figure 22
With the simultaneous capture rule, if Black captures the four White stones, the three Black stones are captured also! (See Figure 23.)
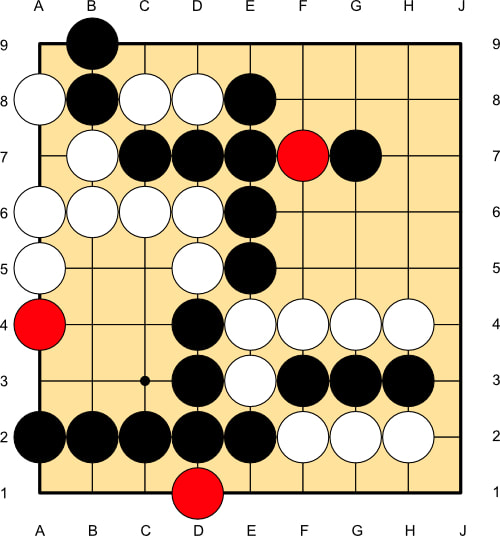
Figure 23
Now, this simultaneous capture doesn’t give White two eyes, but it does give White some time before the stones are captured, and White has the first move if Black captures. In fact, White managed to turn this game around and win, too. There was a nice sacrifice tactic later in the same game, so we’ll cover that later.
7. Redstone snapback
Before we continue with the previous game, let’s look quickly at another tactic that uses the mutual capture tactic in Redstone in an interesting way.
In Go there’s a term called a snapback, which can show up in many forms, but a simple example is given in Figure 24.
7. Redstone snapback
Before we continue with the previous game, let’s look quickly at another tactic that uses the mutual capture tactic in Redstone in an interesting way.
In Go there’s a term called a snapback, which can show up in many forms, but a simple example is given in Figure 24.

Figure 24
In Go, Black would play F4. Then, if White captures with F5, Black "snaps back" to capture the three White stones with another move to F4. The same position in Redstone works differently.
If Black plays F4, the White move to F5 immediately captures the two White stones and one Black stone with a red stone, as shown in Figure 25.
If Black plays F4, the White move to F5 immediately captures the two White stones and one Black stone with a red stone, as shown in Figure 25.
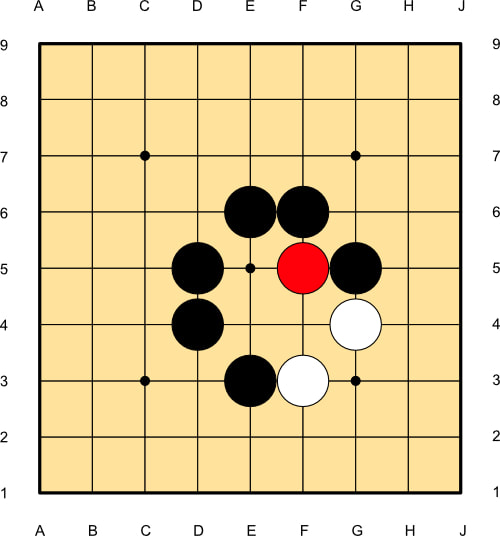
Figure 25
With the simultaneous capture there’s not so much “snap” in the capture, but still the Black move of F4 captures the two White stones and the Black stone at F4.
A similar idea can be seen in the following game in Figure 26, although it uses the fact that captures must be red stones in a sneaky way.
A similar idea can be seen in the following game in Figure 26, although it uses the fact that captures must be red stones in a sneaky way.
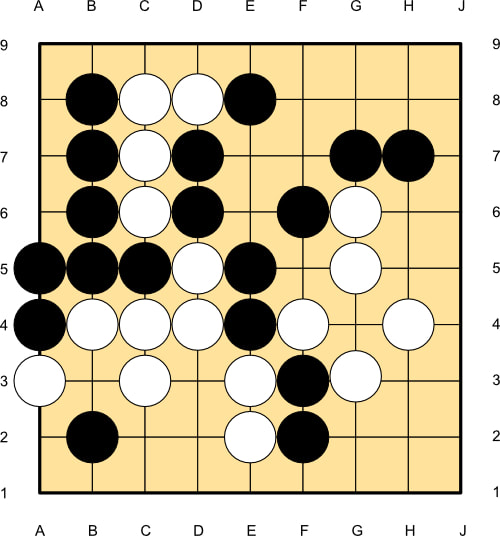
Figure 26
White’s four stones at the top are in trouble, but luckily in Redstone we have a tactic available.
White cuts at E7 with an atari, and Black connects at E6 to save the two stones. However white has another atari at F5 (Figure 27) and this is the sneaky tactic.
White cuts at E7 with an atari, and Black connects at E6 to save the two stones. However white has another atari at F5 (Figure 27) and this is the sneaky tactic.

Figure 27
Black would like to play F7 in this situation to capture the White stone and connect the Black stones, but captures must be red stones. So the Black stones in the centre and the lone White stone are captured as they stand (Figure 28), similar to the snapback above, although this time it looks a bit more jarring because of the empty space at F7!
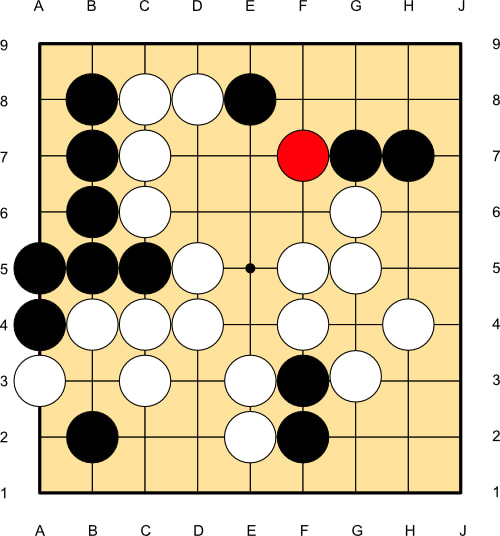
Figure 28
Actually, either player can play F7 to remove the captured stones and White has successfully saved her stones!
8. Tactical sacrifices
In strategy games, making small sacrifices to make a larger gain overall is a common tactic. One idea in Redstone is to choose to sacrifice stones such that red stones end up in good tactical locations, and an example was already seen previously with throw-ins. Here’s another example.
The following position continues from Figure 22, and we arrive at the position in Figure 29, where neither player has played out the left-hand side captures for the moment.
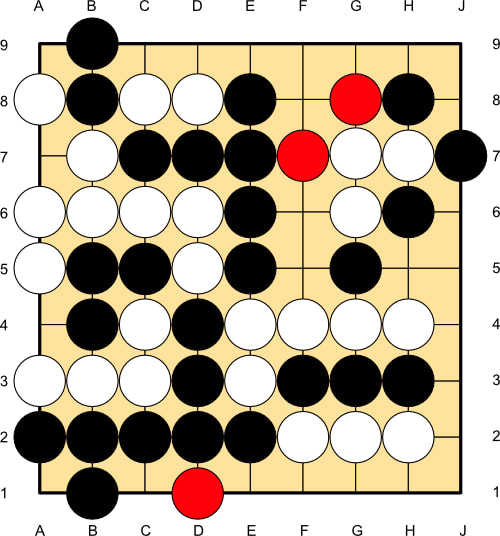
Figure 29
White plays F5 threatening to save the three stones and Black connects with H5 (Figure 30), which is clever since White still can’t connect the stones (connect and die).
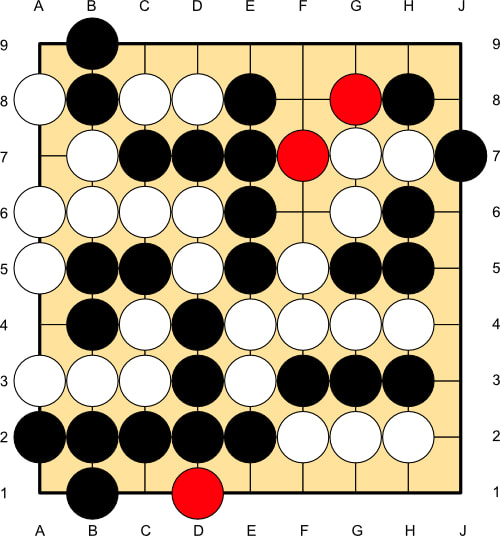
Figure 30
So instead White threatens to save the three stones by taking the three black stones (F3, G3, H3) off the board, removing the liberty problem mentioned previously. However, this is only a threat. The real plan is to target the Black central stones that only have three liberties. White will happily sacrifice the three stones in the top right because if Black captures them (Figure 31), as happened in the game, the red stone reduces the liberties of the Black central stones to two, enough for White to capture.
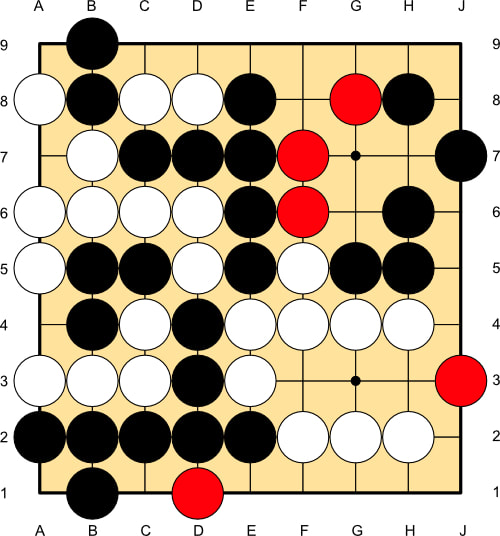
Figure 31
White can revive the C8, D8 stones and capture with E9, as shown in Figure 32.

Figure 32
That’s all for now, but hopefully it gives a nice introduction to the tactical features Redstone offers in addition to ordinary Go tactics. It might be useful for Redstone players to review some Go fighting tactics. I won’t detail all of those here, but I recommend the interactive Way to Go tutorial as a nice starting place for Go tactics. ◾️
🔴⚫️🔴⚫️🔴⚫️🔴
Redstone's tactics are similar to Go's, but different, like an echo of Go. Beyond tactics, the position in Figure 3 suggests the "hard problem" in Redstone. As in Go, players will tend to form large eyespaces (i.e., territories). The question then is, whether to play in your opponent's eyespace to reduce his capability to make eyes, or whether to play in your own eyespace to create eyes. This dilemma comes up in almost every game of Redstone, even on the smaller boards, although it's a much more significant issue on the larger boards. My guess is that play in your opponent's eyespace is more efficient than playing in your own eyespace in terms of increasing the differential number of eyes between you and your opponent: it's easier to destroy eyes than create them. If this is true, then it would simplify the Redstone endgame. But it's just a guess, and even if it turns out generally to be true, there will be many exceptions. Anyway, if anyone has any ideas in this direction, we'd be happy to showcase them in Abstract Games! ~ Editor